


You are using an out of date browser. It may not display this or other websites correctly.
You should upgrade or use an alternative browser.
You should upgrade or use an alternative browser.
What have I done! (R4 GTL)
- Thread starter petak
- Start date
petak
Enthusiast
- Messages
- 1,882
- Location
- Vodice, Croatia
Thank you all for for warm support and joy for my success.
Yesterday fixed position of the dizzy, now it stands like it should. But car would not start. To me it seems like some fuel problem.
When i first started engine had same problem but then tried to clear pump from system and poor 0,5liter of petrol into bottle and stick hose from suction side of pump into bottle.
Pump took some 1 dcl of petrol and engine started. But when i connected hose back to the petrol tank car did not start.
Need to do something about that.
But, it seem to me that i have dome some thing on car and did not post it here.
So let begin!
Worked little bit on inside
1. Shelfs

2. Drivers in place

3. Passengers in place

Had big trouble mounting them because of insulation. They are tight fit even when there is no insulation, than you can imagine what trouble i had to put them in place, especially as i did not know where bolt hose are. So took nails and push them form out side to get some guide.
4. brakes


Had trouble here also. When i have put master cylinder in car he was working fine, but now few mounts later piston got stucked inside, and i could not get brake oil into calipers. So had to change whole master cylinder.
After change everything went alright
Poor gearbox oil
2 liters will be enough

to easy job and not to poor oil all over made my self help


After a while oil came out of the gearbox. That is sign that you have put oil to the top

This process was very slow. because i had small filling bottle and small hose.
Yesterday fixed position of the dizzy, now it stands like it should. But car would not start. To me it seems like some fuel problem.
When i first started engine had same problem but then tried to clear pump from system and poor 0,5liter of petrol into bottle and stick hose from suction side of pump into bottle.
Pump took some 1 dcl of petrol and engine started. But when i connected hose back to the petrol tank car did not start.
Need to do something about that.
But, it seem to me that i have dome some thing on car and did not post it here.
So let begin!
Worked little bit on inside
1. Shelfs
2. Drivers in place
3. Passengers in place
Had big trouble mounting them because of insulation. They are tight fit even when there is no insulation, than you can imagine what trouble i had to put them in place, especially as i did not know where bolt hose are. So took nails and push them form out side to get some guide.
4. brakes
Had trouble here also. When i have put master cylinder in car he was working fine, but now few mounts later piston got stucked inside, and i could not get brake oil into calipers. So had to change whole master cylinder.
After change everything went alright
Poor gearbox oil
2 liters will be enough
to easy job and not to poor oil all over made my self help
After a while oil came out of the gearbox. That is sign that you have put oil to the top
This process was very slow. because i had small filling bottle and small hose.
Last edited:
petak
Enthusiast
- Messages
- 1,882
- Location
- Vodice, Croatia
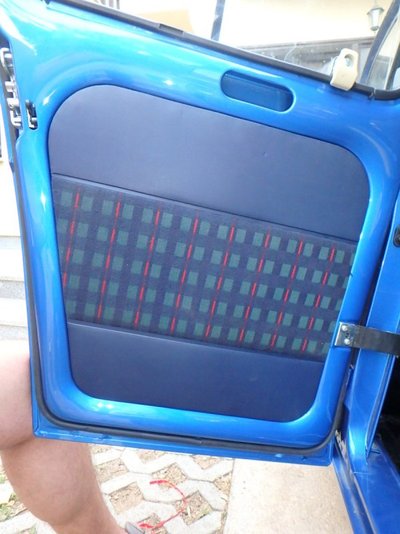
So wile oil was draining into gearbox i have started to put rubbers on doors.
one that i have bought on ebay for small amount of money.
They are not original but close enough.
Wanted to see how they will fit and how god will prevent air and water getting into car
This is how profile looks like

Positioning on the doors


rear doors

On rear door it fits pretty good
But on front doors there is some gap at the same place shown on this picture. This is picture of the rear doors.

one that i have bought on ebay for small amount of money.
They are not original but close enough.
Wanted to see how they will fit and how god will prevent air and water getting into car
This is how profile looks like
Positioning on the doors
rear doors
On rear door it fits pretty good
But on front doors there is some gap at the same place shown on this picture. This is picture of the rear doors.
petak
Enthusiast
- Messages
- 1,882
- Location
- Vodice, Croatia
Also booth door.
Have kept original corners of the rubber and glue them back
Upper part of the rubber is fitting nice and believe it wont get water inside, but lower part is to small and need to find different solution


Used this glue for the job.
It seems to me that will hold good but problem is that you need to left glue cure for 30 min at least. I have left it over nigh (almost 24 hours)

Quick look at my both

Next job was cooling liquid
Preparation for job and not messing all around.
Mixed 2 liters of antifreeze (-80°C) and 3 liters of distilled water.

Turn heating on ( to red dot), open bleeding screw and cap on radiator.
Start to filling system

After water reached top of the radiator close cap and keep filling until you get water coming out of the bleeding screw

When you get nice and steady jet of water close bleeding screw, position expansion bottle on her place and tap it up until you reach MAX line on bottle. That is it.
You can then start the engine, watching ventilator to go on, and once more open bleeding screw to let some residual air out.
You are god to go.
Have kept original corners of the rubber and glue them back
Upper part of the rubber is fitting nice and believe it wont get water inside, but lower part is to small and need to find different solution
Used this glue for the job.
It seems to me that will hold good but problem is that you need to left glue cure for 30 min at least. I have left it over nigh (almost 24 hours)
Quick look at my both
Next job was cooling liquid
Preparation for job and not messing all around.
Mixed 2 liters of antifreeze (-80°C) and 3 liters of distilled water.
Turn heating on ( to red dot), open bleeding screw and cap on radiator.
Start to filling system
After water reached top of the radiator close cap and keep filling until you get water coming out of the bleeding screw
When you get nice and steady jet of water close bleeding screw, position expansion bottle on her place and tap it up until you reach MAX line on bottle. That is it.
You can then start the engine, watching ventilator to go on, and once more open bleeding screw to let some residual air out.
You are god to go.
petak
Enthusiast
- Messages
- 1,882
- Location
- Vodice, Croatia
Side plastic protections.
As i could not find original plastic clips for screws to use, found something that will do the job. BUt need to trim clips little bit to fit.
Original shape

Trimed

HOle for plastics

Clip inside


Plastics

One in place. Used fi3,6 16mm long screw

Plugs for holes will go used one for now....but planing to buy new.
Time for belts
Used continental brand....Will see how will work

Alternator belt

Waterpump belt

When engine was running i have noticed that tensioner pulley is wiggling and there is some squeaking sound so probably did not put bearing inside correctly. Need to fix that.
As i could not find original plastic clips for screws to use, found something that will do the job. BUt need to trim clips little bit to fit.
Original shape
Trimed
HOle for plastics
Clip inside
Plastics
One in place. Used fi3,6 16mm long screw
Plugs for holes will go used one for now....but planing to buy new.
Time for belts
Used continental brand....Will see how will work
Alternator belt
Waterpump belt
When engine was running i have noticed that tensioner pulley is wiggling and there is some squeaking sound so probably did not put bearing inside correctly. Need to fix that.
petak
Enthusiast
- Messages
- 1,882
- Location
- Vodice, Croatia
Fill up engine with oil

Oil filter and hand maid tool for drain plug (already on the car)

Next step exhaust.
Will use old piles, and new silencer and rubber mounts
exhaust from start to finish


Look from behind without silencer. I still need to buy one.

Oil filter and hand maid tool for drain plug (already on the car)
Next step exhaust.
Will use old piles, and new silencer and rubber mounts
exhaust from start to finish
Look from behind without silencer. I still need to buy one.


petak
Enthusiast
- Messages
- 1,882
- Location
- Vodice, Croatia
I think you can buy the boot lid lower seal moulding from the R4 specialists like Retro Passion. The door seals look good with the big hole in the middle. A lot of the reproduction ones are too stiff.
Thank you malcolm....do you know is it hollow tip?
This was test for me and rest of R4 lovers to see will cheap ebay rubber make it good or it is not worth buying.
JonathanT
Not normal for Norfolk
- Messages
- 1,332
- Location
- Wymondham Norfolk
Ha ha I like the helpers photo....mine are older and a bit more reluctant to help Dad. Soon I hope to be pAst all the dirty work and re assembling shiny restored and clean parts. I think my son now 16 will help me with that bit
harbourseal
Renault R4 Lunatic
- Messages
- 1,045
- Location
- Breda The Netherlands
Hey Petak,
It looks wonderfull what you have done so far.
Wish I could see her in real life some day.
Keep up the good work.
Regards, Robert
It looks wonderfull what you have done so far.
Wish I could see her in real life some day.
Keep up the good work.
Regards, Robert
petak
Enthusiast
- Messages
- 1,882
- Location
- Vodice, Croatia
Harbourseal...if you ever pass by Vodice in Croatia don't be shy and let me know you are here.
Drink and glass of nice conversation with R4 lover is always good time spend.
And others are welcome to.
And maybe i get going thru Europe and visit your town....
Drink and glass of nice conversation with R4 lover is always good time spend.
And others are welcome to.
And maybe i get going thru Europe and visit your town....
") Are you too busy driving around in "čvrkica"?
Are you too busy driving around in "čvrkica"?  Just a thought .....wonder if there is a way for us all to meet across the globe in live video conversation... Some kind of multiway Skype ....or am I just showing myself up here ?
  ....maybe I should ask a teenager
petak
Enthusiast
- Messages
- 1,882
- Location
- Vodice, Croatia
I have some big trouble with rear lights, and i can not find where problem is.
When all light bulbs are taken away then i have 11,56V on every pin according how they are light on.
On stop light if i press brake, on light if i start light, on revers light if I engage revers,and so on, also on every pins if i engage all of them.
But second after i put light bulbs back on, it is charade. Brake light working all the time regarding brake pedal position (but only if lights are on, if lights are of then brake light works fine as brake pedal is pressed or not), all lights (rear, revers, blinker, stop) are dimmed.
I have checked voltage and it seems that they split voltage once bulbs are in.
I have believed that problem is in earthing, so taken whole rear light casing from car and connect rear lights earth to the accu minus pole (same thing).
Believed that problem is in cabin light, disconnected it but all the same.
Tried with led lights, and they are working fine but also splitting voltage. Difference is that led lights are more immune to voltage drop, and they do work as normal if voltage is above 9 or 10.
And when i add blinker (normal bulb) then all led lights are blinking as blinker)
I have add only two thing to the rear wiring.
First is cabin light but i have ruled out that one as i have disconnected it from wiring of the car.
Second thing is tow bar wiring, and i have connected it to the pins on rear lights. But have separated that wiring also and same thing was happening.
Now i do not know what else i can check to see where problem is.
I have one more idea at my mind, and will try to do it this weekend. After that i am done....my knowledge ends there.
petak
Enthusiast
- Messages
- 1,882
- Location
- Vodice, Croatia
Done that. Directly from bulb casing to battery "-" pole. No luck. Unfortunately.Hmm lights doing strange things usually points to bad earthing. Maybe take a long strong wire back to the battery to provide a temporary solid earth then isolate in turn
Thank you for help!
mr-reno-139
AKA Paul Cunningham
- Messages
- 2,246
- Location
- lancing west sussex england
Are you using twin filament bulbs in back lights and single for indicators
petak
Enthusiast
- Messages
- 1,882
- Location
- Vodice, Croatia
Yes!Are you using twin filament bulbs in back lights and single for indicators
Double wires in one bulb for brake and rear light
Single wire in indicator bulb.
mr-reno-139
AKA Paul Cunningham
- Messages
- 2,246
- Location
- lancing west sussex england
Are you missing the Earth wire for the body between the battery and the inner wing do the front lights all work correctly