


You are using an out of date browser. It may not display this or other websites correctly.
You should upgrade or use an alternative browser.
You should upgrade or use an alternative browser.
R4 TL restauration
- Thread starter Jurjenz
- Start date

Niels Svane
Renault 4TL '83, 1B1 845cc engine, Ducellier diz
- Messages
- 382
- Location
- Denmark
Now that coolant vacuum kit I want! ")
Jurjenz
Enthusiast
- Messages
- 467
- Location
- Groningen, Netherlands
I bought mine on https://www.vidaxl.nl/e/8718475826767/koelsysteem-afpers-en-vul-set-6-delig
They don´t send to Denmark, but if you really want one I can order one for you and send it to you.
Today I filled the gearbox, to tighten the bolt you can use the back of a socket, it fits exactly!
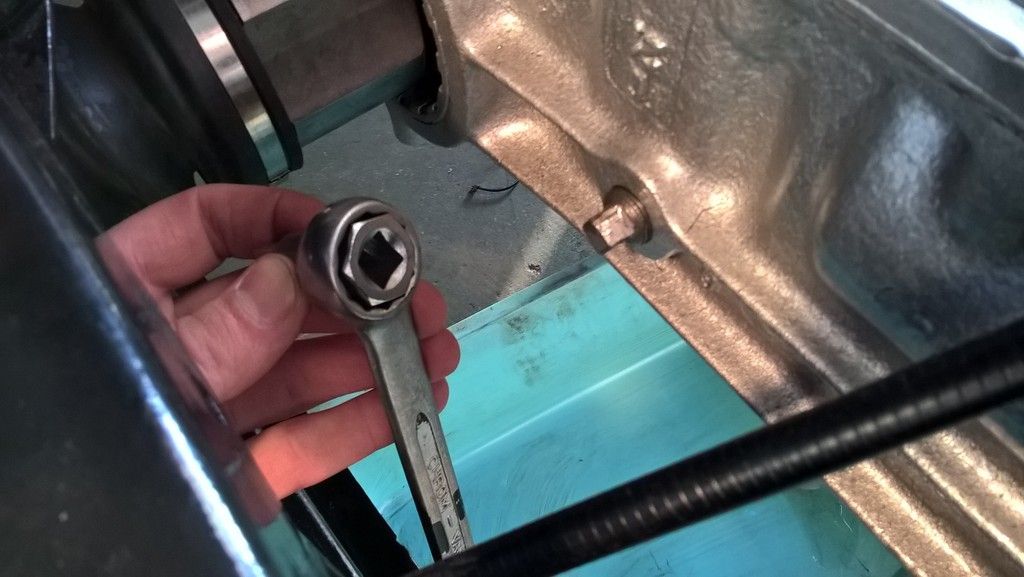
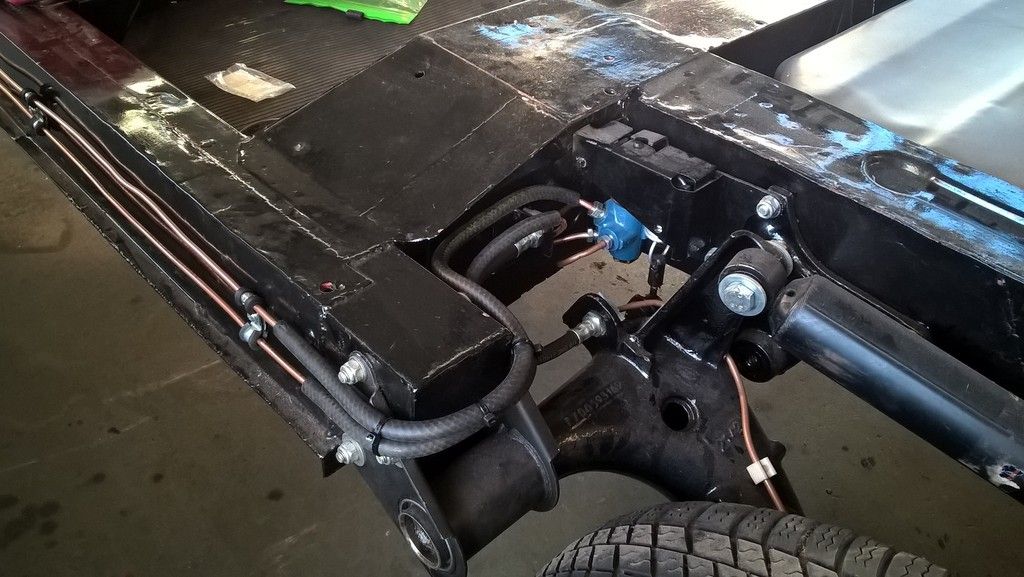
I also attached the remaining brakelines which go to the front of the car. Unfortunately I don´t have a straightening tool.. I used a fuelline to protect the brakeline from dirt, stones etc.
They don´t send to Denmark, but if you really want one I can order one for you and send it to you.
Today I filled the gearbox, to tighten the bolt you can use the back of a socket, it fits exactly!
I also attached the remaining brakelines which go to the front of the car. Unfortunately I don´t have a straightening tool.. I used a fuelline to protect the brakeline from dirt, stones etc.
Niels Svane
Renault 4TL '83, 1B1 845cc engine, Ducellier diz
- Messages
- 382
- Location
- Denmark
I think we have the equivalent tool here, but thanks I'll just keep an eye out
I'll just keep an eye outJurjenz
Enthusiast
- Messages
- 467
- Location
- Groningen, Netherlands
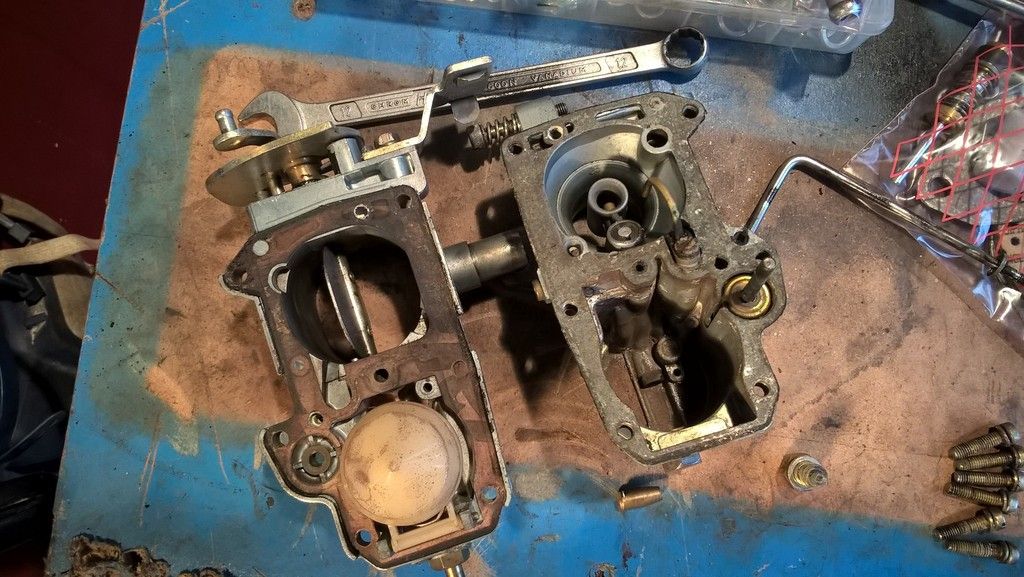
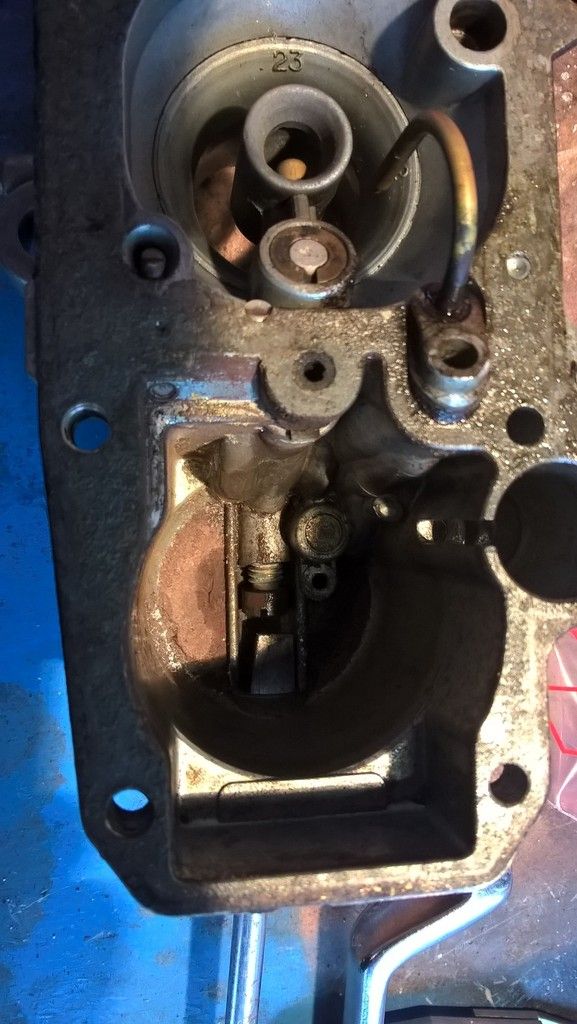
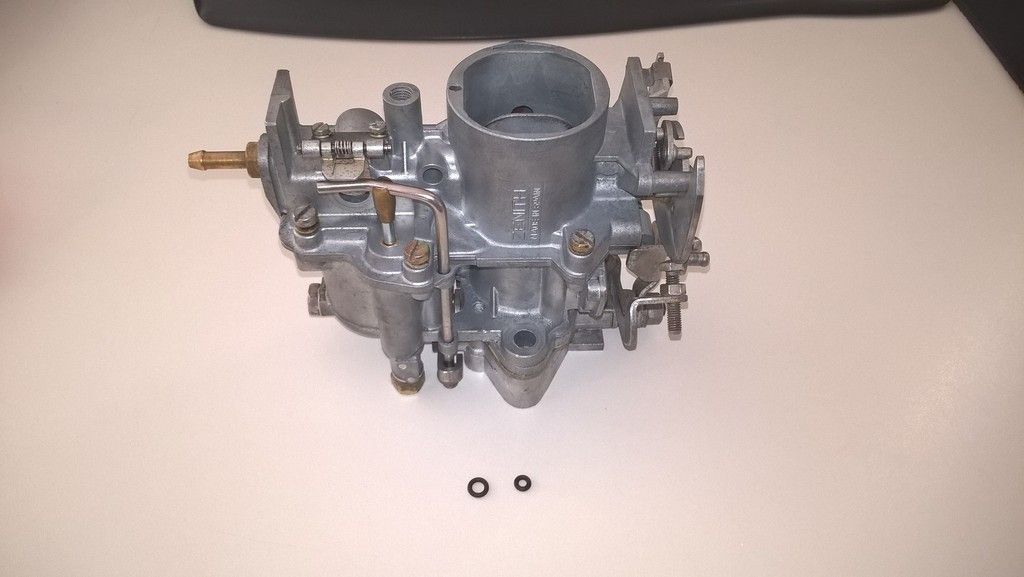
Wow, I really enjoyed working on the Zenith 32IF7 carburetor. Almost a year ago I cleaned the outside with my sodablaster, that worked great! But I still needed to clean the inside, because you never know which dirt and residue will occur. So it was time to open it up. I couldn't find an exploded view of the carb, so I made plenty of photos to reminder which parts need to go where when rebuilding....
This is how the carb looked like:

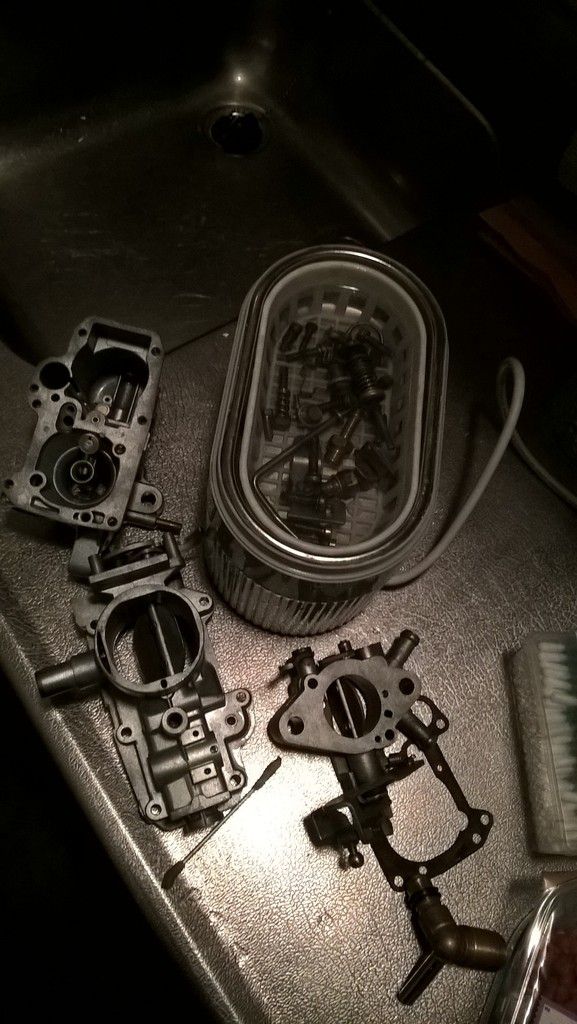
Open it up:
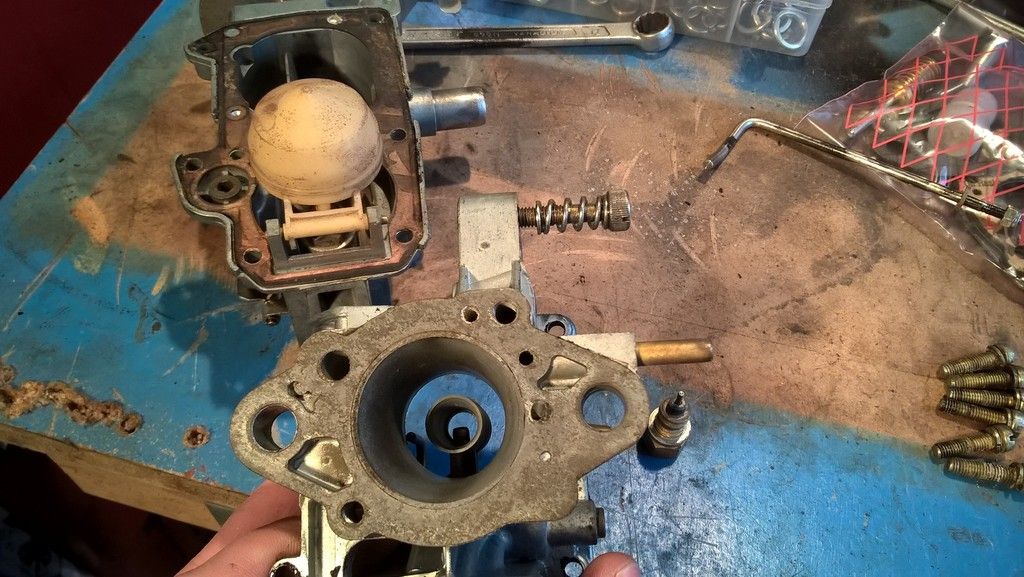

Then I sandblasted the parts again with a blastingagent which is suitable for aluminium. Then I took the parts at home to give them an ultrasonic cleaning. Still a lot of dirt came off, especially from the inner tubes.
I also replaced some parts with new ones
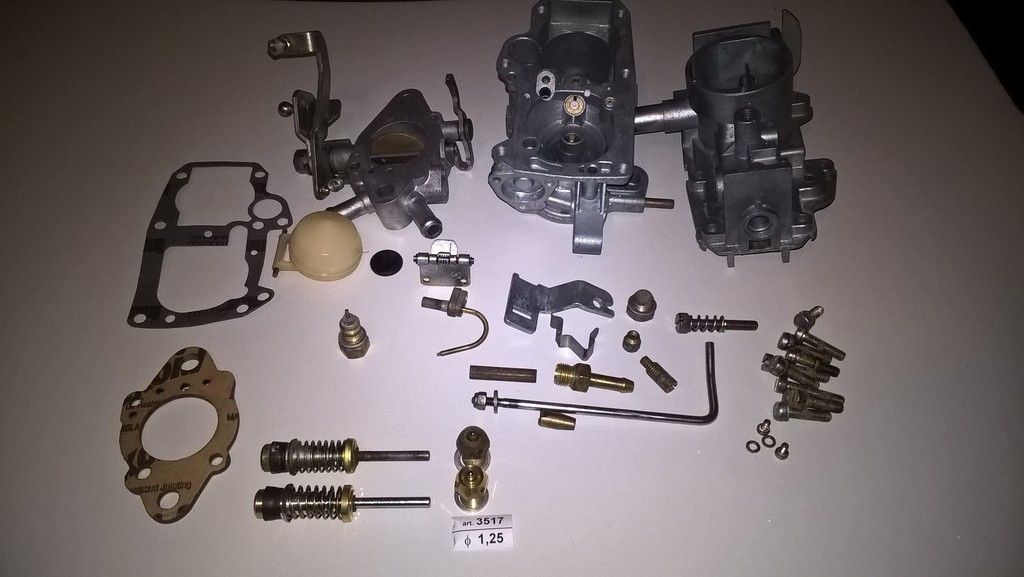
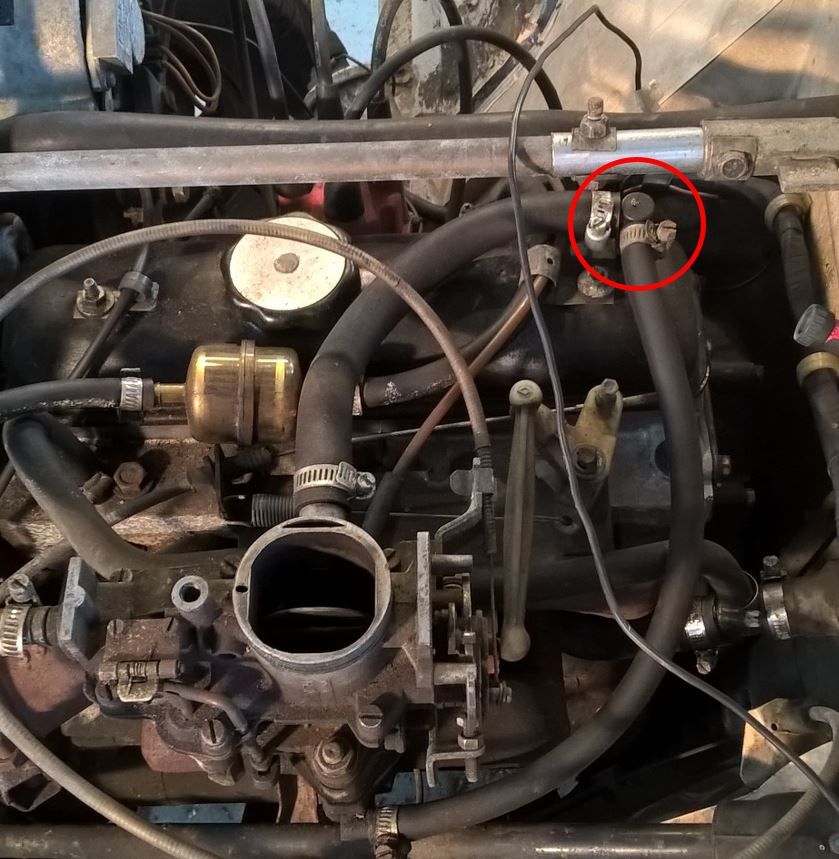
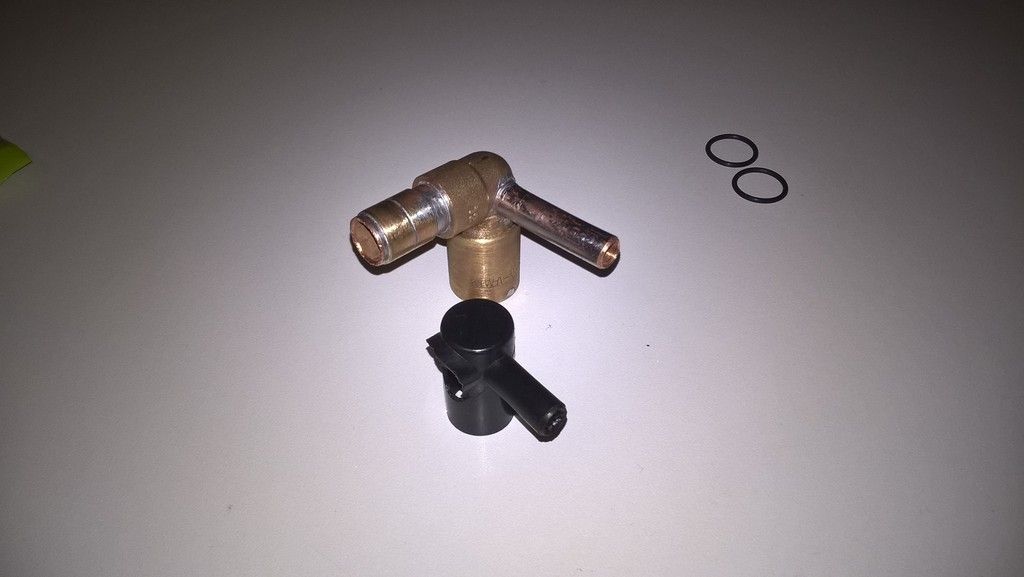
And, last but not least, a friend of mine made a new unit (don't know the english name). I the part on the head cover which is connected on the carb. the pastic part was broken.
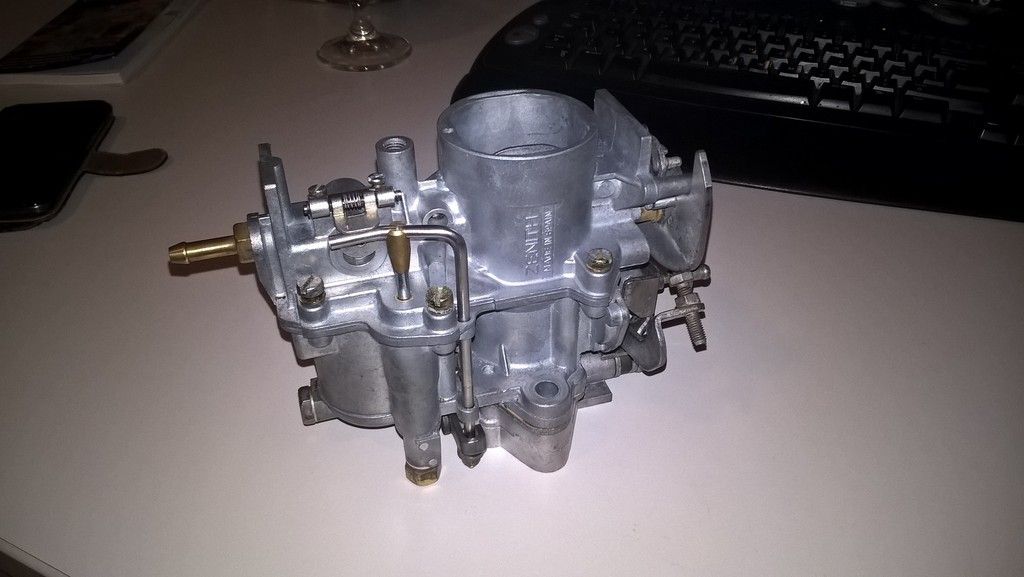
Hell yeahhhhhhhhh
This is how the carb looked like:
Open it up:
Then I sandblasted the parts again with a blastingagent which is suitable for aluminium. Then I took the parts at home to give them an ultrasonic cleaning. Still a lot of dirt came off, especially from the inner tubes.
I also replaced some parts with new ones
And, last but not least, a friend of mine made a new unit (don't know the english name). I the part on the head cover which is connected on the carb. the pastic part was broken.
Hell yeahhhhhhhhh
petak
Enthusiast
- Messages
- 1,882
- Location
- Vodice, Croatia
perfect craftsmen work....especially that "T-Piece"
Your car came with that carb or you bought it latter as an upgrade?
I would like to find one of these Zenith 32IF7 to replace my zenith 28IF. It should give some little more power to the 1,1 engine (688)
Your car came with that carb or you bought it latter as an upgrade?
I would like to find one of these Zenith 32IF7 to replace my zenith 28IF. It should give some little more power to the 1,1 engine (688)
Jurjenz
Enthusiast
- Messages
- 467
- Location
- Groningen, Netherlands
Thanks guys! The car came with an 32IF7. How much does it increase in HP compared to a 28IF?
I have one question, the revision set also included two small rubber rings, but when I dismantled the carburator it hadn't any rubber rings? Do know what these rubbers are for? I haven't found any exploded viewings of the 32IF7 yet.
Nevermind, gound the small O-ring: idle control screw
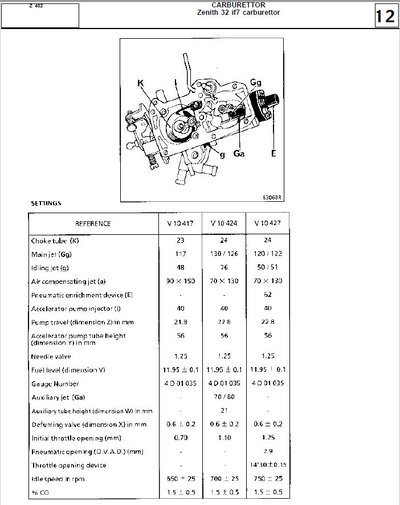
Just to share, I did found these:
file:///G:/Afbeeldingen/Auto's/Renault%204/Carburateur/karburator_ang.pdf
I have one question, the revision set also included two small rubber rings, but when I dismantled the carburator it hadn't any rubber rings? Do know what these rubbers are for? I haven't found any exploded viewings of the 32IF7 yet.
Nevermind, gound the small O-ring: idle control screw
Just to share, I did found these:
file:///G:/Afbeeldingen/Auto's/Renault%204/Carburateur/karburator_ang.pdf
Otto96
Enthusiast
- Messages
- 37
- Location
- Czech Republic
I could manage to get one for you.perfect craftsmen work....especially that "T-Piece"
Your car came with that carb or you bought it latter as an upgrade?
I would like to find one of these Zenith 32IF7 to replace my zenith 28IF. It should give some little more power to the 1,1 engine (688)
Looks like one fitted around mixture screw.Thanks guys! The car came with an 32IF7. How much does it increase in HP compared to a 28IF?
I have one question, the revision set also included two small rubber rings, but when I dismantled the carburator it hadn't any rubber rings? Do know what these rubbers are for? I haven't found any exploded viewings of the 32IF7 yet.
Just to share, I did found these:
file:///G:/Afbeeldingen/Auto's/Renault%204/Carburateur/karburator_ang.pdf
Jurjenz
Enthusiast
- Messages
- 467
- Location
- Groningen, Netherlands
Thanks! I found the smaller rubber, missed that one..
Today I had some real trouble with a broken bolt. It just snapped when placing the choke cable bracket on the carb.
Well, that can happen so I drilled it out to put a torx in.
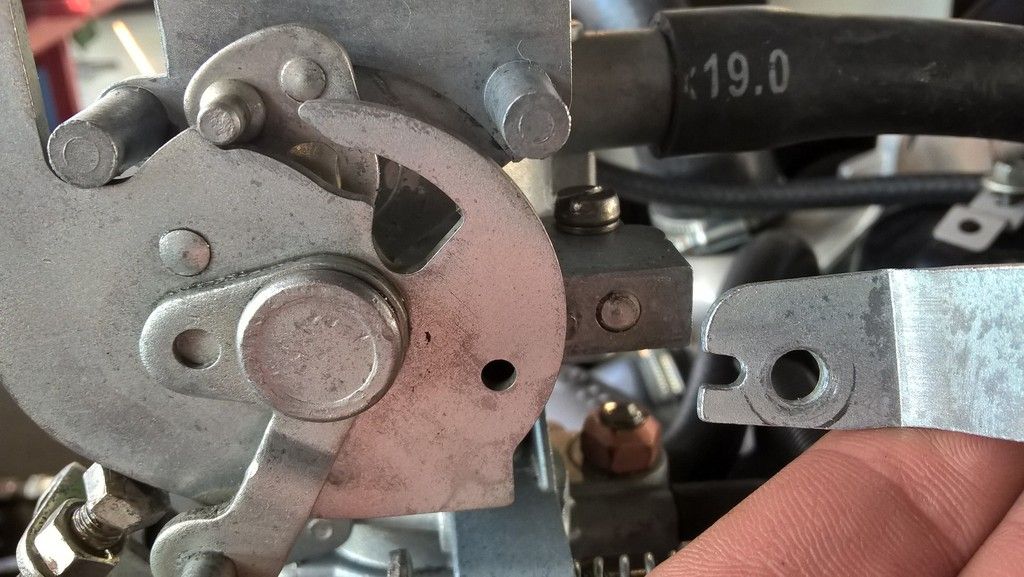
Then real disaster happened, the torx broke of! I couldn;t drill it out because the torx was assumebly made of hardened steel. After some thinking I made a new bracket to hold the original bracket in place. It needs a few spot welds, but it is now very well fixed. Took me all afternoon to solve it...
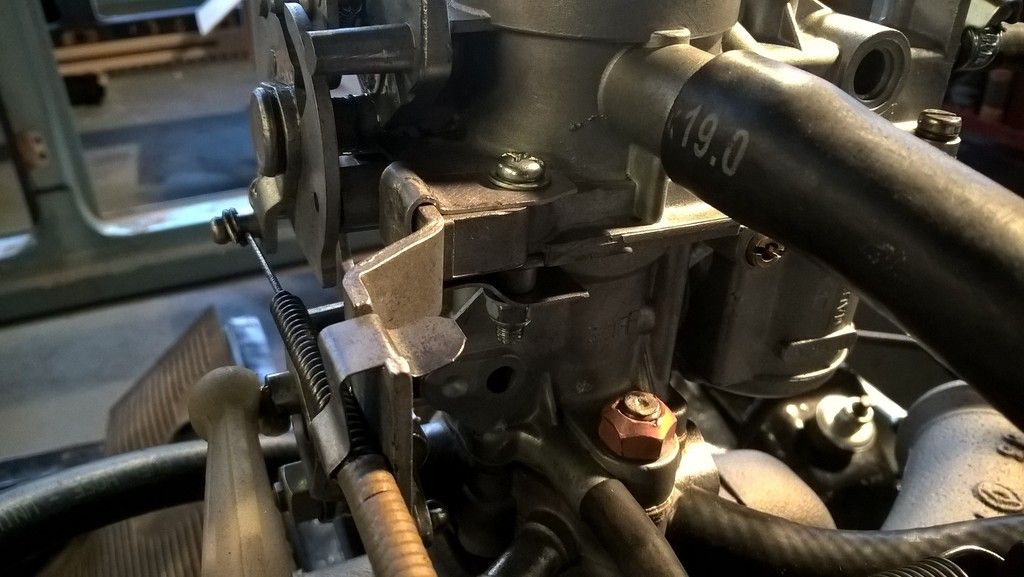
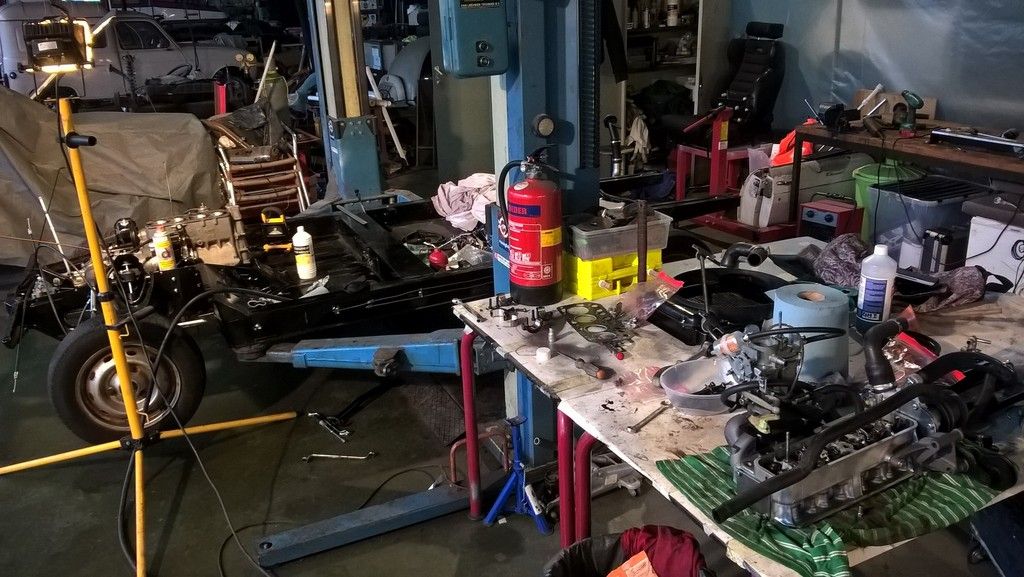
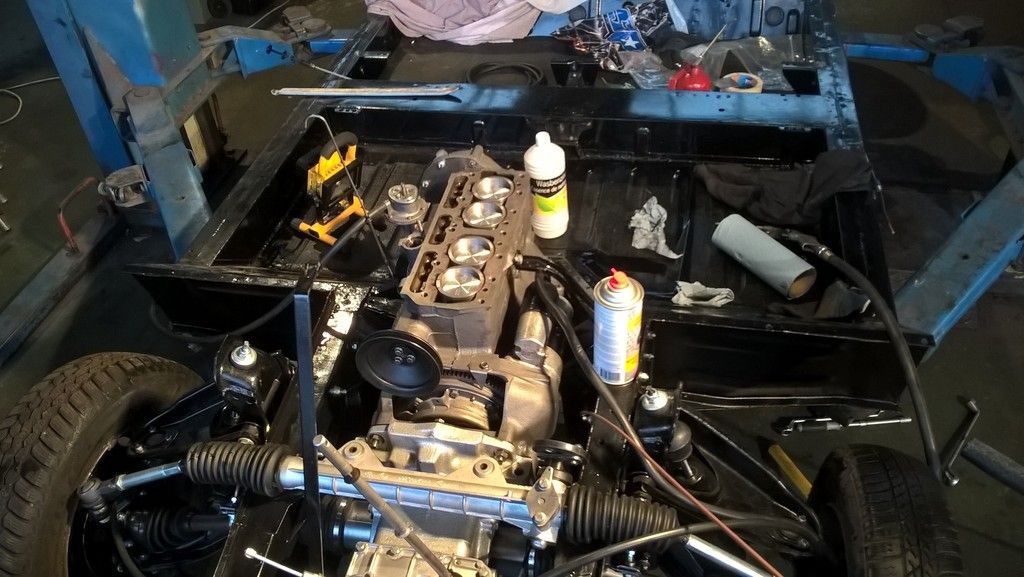
In the end, it is looking to become an engine again!

Next weekend, checking and rechecking all the work I did on the engine an maybe give it a spin?
Today I had some real trouble with a broken bolt. It just snapped when placing the choke cable bracket on the carb.
Well, that can happen so I drilled it out to put a torx in.
Then real disaster happened, the torx broke of!
I couldn;t drill it out because the torx was assumebly made of hardened steel. After some thinking I made a new bracket to hold the original bracket in place. It needs a few spot welds, but it is now very well fixed. Took me all afternoon to solve it...
In the end, it is looking to become an engine again!
Next weekend, checking and rechecking all the work I did on the engine an maybe give it a spin?

harbourseal
Renault R4 Lunatic
- Messages
- 1,045
- Location
- Breda The Netherlands
I think you should start it now you still have space to work on it. When the body is on and it turns out that it isn't working you'll regret that you didn't run it before.
And indeed it is a super moral boost if it works
And indeed it is a super moral boost if it works
Jurjenz
Enthusiast
- Messages
- 467
- Location
- Groningen, Netherlands
Bad luck, I filled the radiator with coolant, guess what...
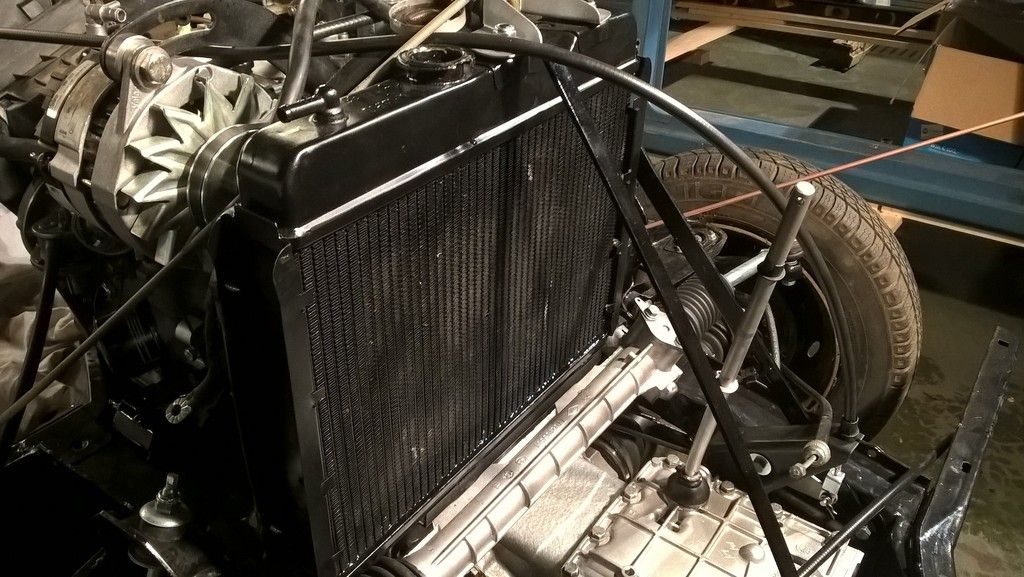
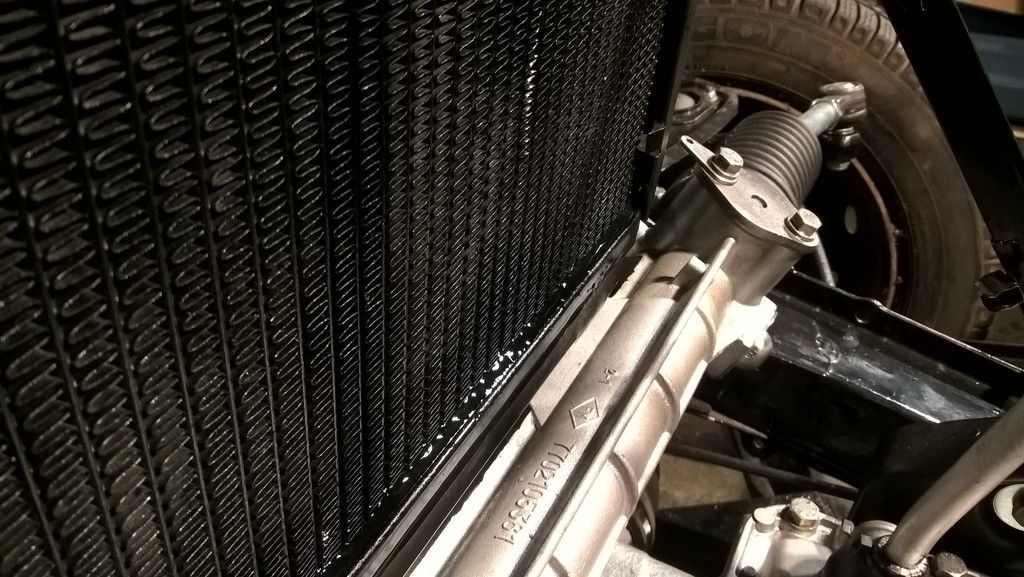
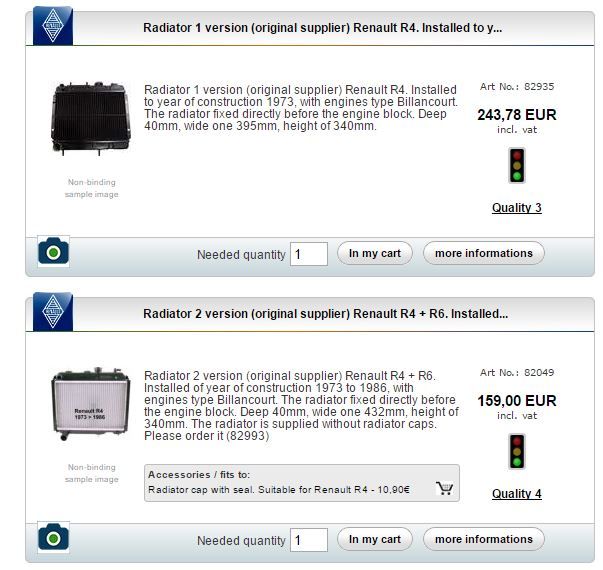
I'm not sure which radiotor I need, going back tomorrow the measure the widht, or do they both both fit?
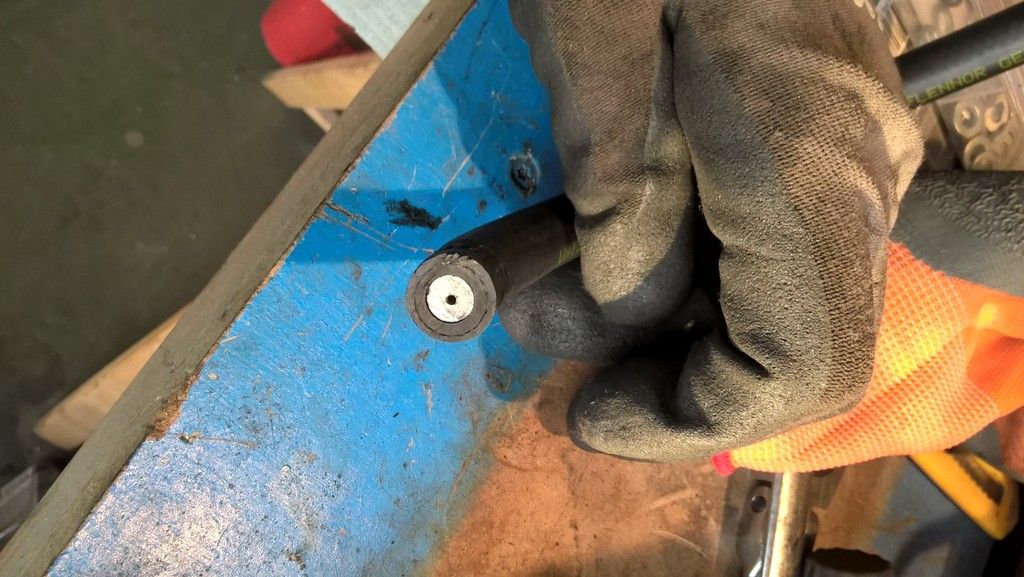
Well, the other job it was to make a new restrictor which is in the carburatorhose for idlingcontrol. The old hose which was on the car when I bought it had not a restrictor in it?
Well, now let's fix that radiator, aaargh
I'm not sure which radiotor I need, going back tomorrow the measure the widht, or do they both both fit?
Well, the other job it was to make a new restrictor which is in the carburatorhose for idlingcontrol. The old hose which was on the car when I bought it had not a restrictor in it?
Well, now let's fix that radiator, aaargh
Last edited:
mojobaby
Enthusiast
- Messages
- 1,287
Hello Otto, both the radiators will fit. The bolts underneath that fit into your steering rack have to be 180mm between the hole centres.
One thing that you should do, is ask Franzose what the distance is between the 4 holes on the sides of the radiator. Thats where the plastic shroud/cover for the fan screws into.
Especially as one of the radiators says 395 wide and the other one 432 wide
Here is the problem that I had
http://www.renault4.co.uk/forum/threads/fan-shroud.7997/#post-51601
Jurjenz
Enthusiast
- Messages
- 467
- Location
- Groningen, Netherlands
Major setback and mental breakdown
I did at first mistrust the paper seals which need to be put under the liners. Last week I filled the engine with coolant to check if there are any leaks. Well, it did leak, fluid went through the engine to the carterplug. So today I disassembled the engine again.
I have now the liners & pistons out of the engine again, and for this time I must do it correctly. With the paper seals the difference in height liner - top engine was clearly not enough. I read that there are also copper and compiste seals should be available? I haven't found these yet on the internet (well, just come home, my search need to begin to be honest) That seem to me a much better material to use as a seal?
Any advice, tips?
Well, one positive note. Better I did checked it. What would have happend when I first started the engine? That would have been much worse...
I did at first mistrust the paper seals which need to be put under the liners. Last week I filled the engine with coolant to check if there are any leaks. Well, it did leak, fluid went through the engine to the carterplug. So today I disassembled the engine again.
I have now the liners & pistons out of the engine again, and for this time I must do it correctly. With the paper seals the difference in height liner - top engine was clearly not enough. I read that there are also copper and compiste seals should be available? I haven't found these yet on the internet (well, just come home, my search need to begin to be honest
) That seem to me a much better material to use as a seal?Any advice, tips?
Well, one positive note. Better I did checked it. What would have happend when I first started the engine? That would have been much worse...
harbourseal
Renault R4 Lunatic
- Messages
- 1,045
- Location
- Breda The Netherlands
I'm sorry to hear you have a leakage through the liner seals.
my question is. Are the liners the right hight and have you found the right seals?
I bought a set of liner seals from der Fransoze and it had 4 thicknesses of seals in it.
If I recall I used three red ones and one yellow. I measured every cilinder seperatly.
Somewhere in Mojobaby's thread, look what I found there is an explanation on how to measure the right hight of the cilinder liner seal.
Look it up Jurjen
Jurjenz
Enthusiast
- Messages
- 467
- Location
- Groningen, Netherlands
Hi guys,
This is my plan
I got two set of seals from Fransoze. With different colours but I have no idea what the exact thickness is of the different colours (red, white, black). I measured them the previous time and I recall that the red seal is the thickest one. Does anyone have the correct measurements of the seals?
This is what I'm gonna do:
1) Polishing the contact area of the engineblock and the liners with grinding paste.
2) Buy myself feeler gauges with a range of (mm) 0,01 - 0,02 - 0,03 - 0,04 - 0,05 - 0,06 (and so on), so that I can exactly measure the distance between top of the liners & engine block.
3) Buy various sealant gaskets available in 0,15 - 0,20 - 0,25 mm (just to be sure) so I can make my own sealant rings. (the seals from Fransoze are too thin to match the correct height). With the 0,15mm sealant the liners will be within the tolerance of 0,04-0,12 mm
Questions:
-is it a good idea to put two seals on eachother?
-I will also apply a little amount of fluid sealant on the paper seals - good idea?
-I read that diluted paint can be put in the seal gap for extra sealing protection - good idea?
Today I did some polishing on the contact areas. I think that these are much more smooth now then they used to be. I used the old liners with grinding paste. It was a good work-out
After grinding with paste left on photo


To be continued...
This is my plan
I got two set of seals from Fransoze. With different colours but I have no idea what the exact thickness is of the different colours (red, white, black). I measured them the previous time and I recall that the red seal is the thickest one. Does anyone have the correct measurements of the seals?
This is what I'm gonna do:
1) Polishing the contact area of the engineblock and the liners with grinding paste.
2) Buy myself feeler gauges with a range of (mm) 0,01 - 0,02 - 0,03 - 0,04 - 0,05 - 0,06 (and so on), so that I can exactly measure the distance between top of the liners & engine block.
3) Buy various sealant gaskets available in 0,15 - 0,20 - 0,25 mm (just to be sure) so I can make my own sealant rings. (the seals from Fransoze are too thin to match the correct height). With the 0,15mm sealant the liners will be within the tolerance of 0,04-0,12 mm
Questions:
-is it a good idea to put two seals on eachother?
-I will also apply a little amount of fluid sealant on the paper seals - good idea?
-I read that diluted paint can be put in the seal gap for extra sealing protection - good idea?
Today I did some polishing on the contact areas. I think that these are much more smooth now then they used to be. I used the old liners with grinding paste. It was a good work-out
After grinding with paste left on photo
To be continued...
Last edited:
mojobaby
Enthusiast
- Messages
- 1,287
Hello Jurjenz, I can see why you had a leakage problem. The paper seals will never do their job with all that sediment.
All the seats of the liners should look like cylinder 1.
No.2 is nearly correct, you need to do a bit more work there on the right hand side.
I managed to get down there with a wire wheel brush fitting on my drill and it cleaned it off very nicely.
After 1968, Renault started with the paper seals, before then they were copper. The original Renault paper seals were 0,08mm, 0,10mm and 0,12mm.
As far as I can remember with the Franzose seals, the red are the thickest, then the black, and the white ones are the thinnest. I'm not sure what their exact measurements are, you'd have to use a micrometer to check.
Putting 2 seals on top of each other will probably not work, although I can't tell you why not. I put 2 rubber washers into a plumbing connection once, and it leaked
Is there a height difference between your new liners and the old ones? I was told that the paper seals have to be put in dry, so I don't know what affect a sealant will have.
As a test, put a liner in place and then pull a straight edge ruler across the top of the engine block. If it catches on the liner then it means that its higher than the block, which is what you want.
Good luck with the cleaning