Clementine's Garage
Clementine the Cat
 
Image of flower
Yellow R4
 
Réparateur d'automobiles

Barn Find Rebuild

barnfind

Enthusiast
Messages
323
Location
Lancashire
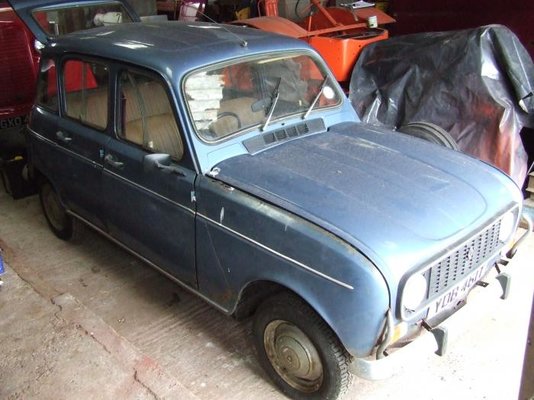
Not sure where to put this. Some car forums have a section for restoration and rebuild threads, so please feel free to relocate this thread if you think fit.

Today was day 1, back to Paul’s workshop with tools and Plus Gas to start a strip down.

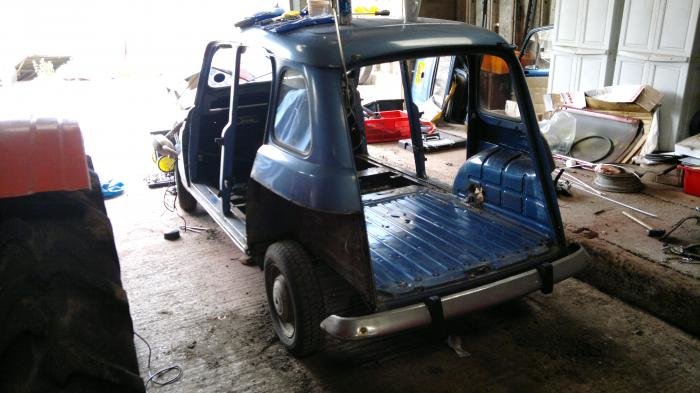
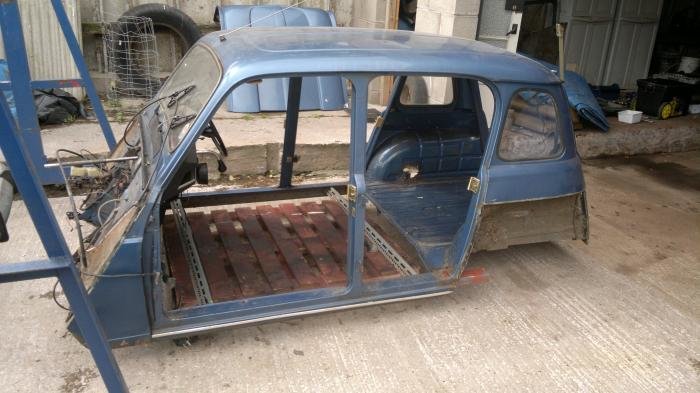
The doors came off extremely easily after the top hinge retaining nut was unscrewed from the spindle, insert a largish screwdriver on edge in the slot between the two leaves of the hinge and lever and the whole lot just slips off.
The doors are good, only the Driver’s door has some rot in the lower front corner which I shall probably repair rather than replace (unless anyone has a suitable external hinge type drivers’ door going begging. Sliding window frames need some attention however.

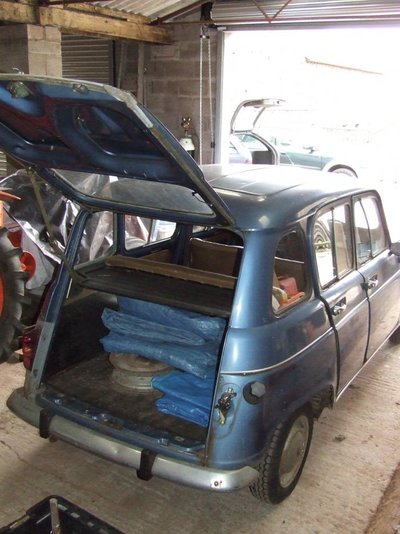
Tailgate again came off very easily after undoing the single retaining nut on the nearside spindle and disconnecting the wires and the stay. Once more, no rust.

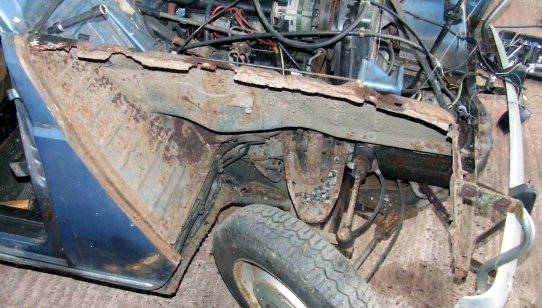
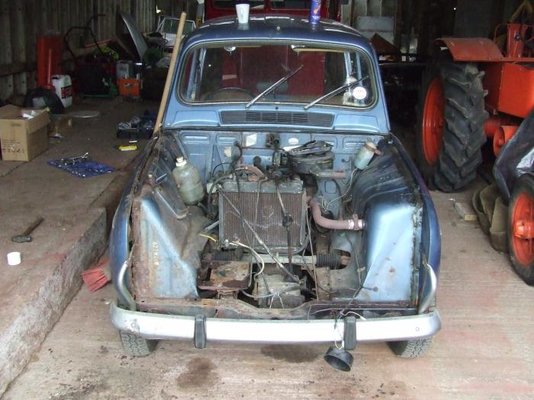
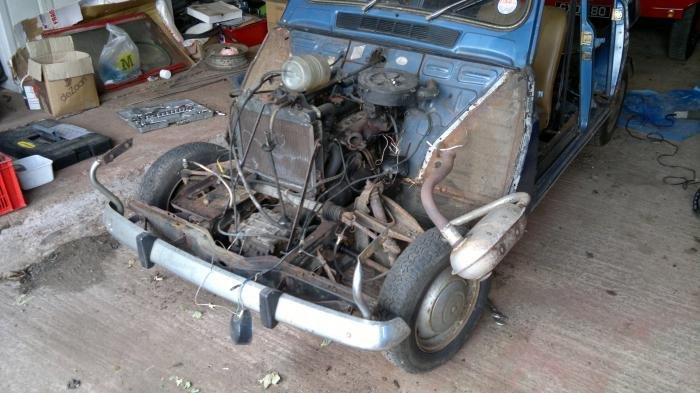
After a bit of scrambling around the bonnet came off (I removed the grille to avoid any damage), The front cross member looks a little crusty underneath, but not too bad. The bonnet itself is very good cosmetically, but the bottom stiffening member has some perforations that will need welding up. Oddly enough the front of the car was full of large tarmac chippings. Obviously one of its later trips back in 1992 was through some local road surfacing works.

Outer front wings were straightforward after I discovered that the rubber stop on the nearside had been screwed through the mounting flange. The offside was scrap, the inner front area having vanished completely. I undid what I could and then chopped the rear edge off with a cutting disc to release it so that I could get at the mountings more easily. The other wing looks fairly new and came off reasonably easily.

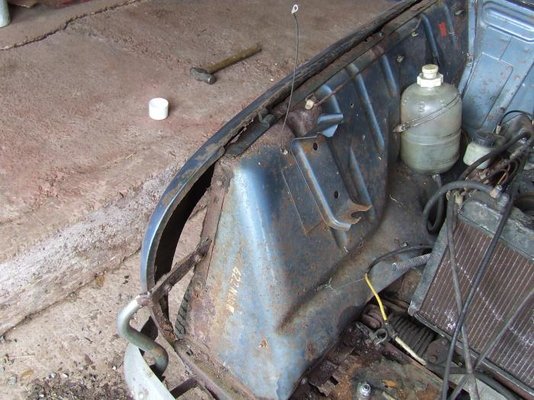
Inner wings were the usual R4 stuff, nearside has been repaired previously and is okay, albeit the welding is untidy even by my standards, but the offside needs a repair strip along the mounting flange. After taking out the parcel shelf, I managed to release all the bolts to the offside, but need to disconnect the brakelines to remove it.

The day was completed by soaking all the remaining fixings with releasing oil, and I will return later this week to remove rear wings and interior.

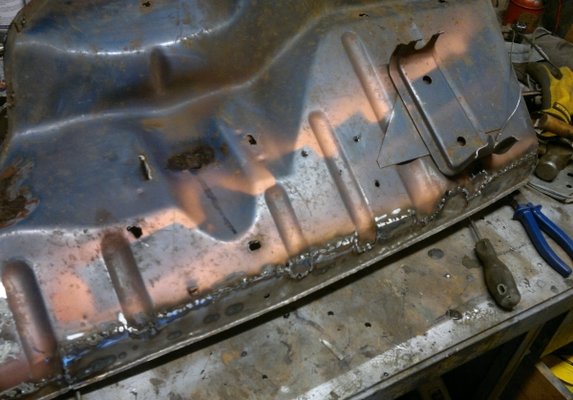
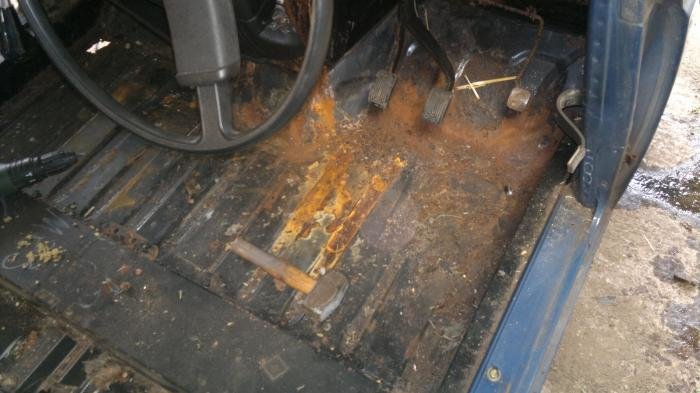
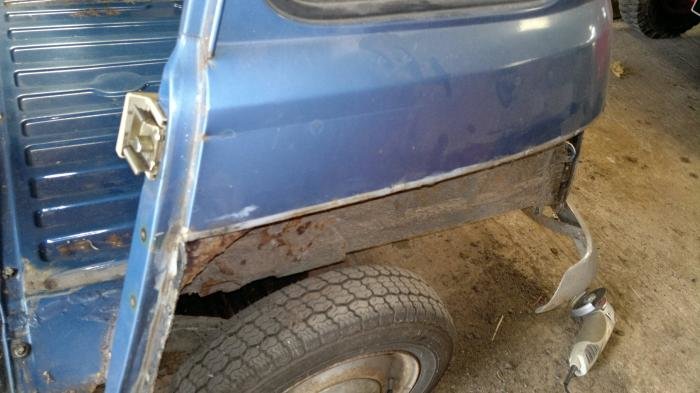
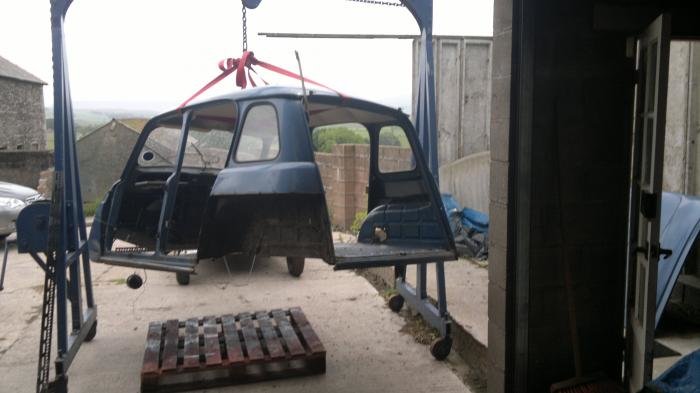
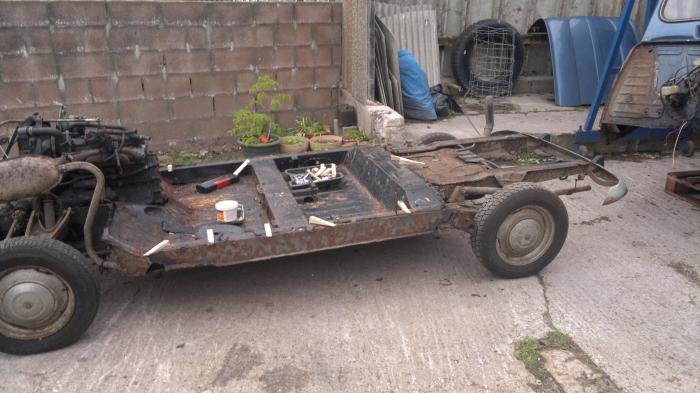
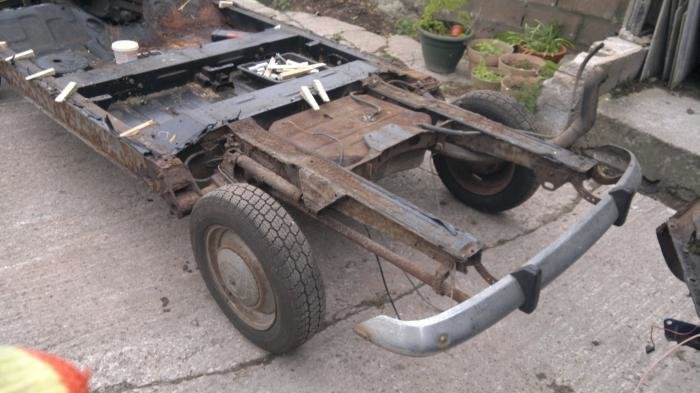
Generally my first impressions from when I viewed the car before Easter were borne out. There is clearly chassis rot in the front nearside corner and the top of the nearside rear outboard box section has also perished. What exactly we have to contend with elsewhere will be revealed, probably next week, when we attempt to lift the tub off the pan.

Time spent, approx 6 hours.
 
  • DSCF1611.jpg
    DSCF1611.jpg
    57.5 KB · Views: 1,954
  • DSCF1612.jpg
    DSCF1612.jpg
    92.8 KB · Views: 1,963
  • DSCF1615.jpg
    DSCF1615.jpg
    64.4 KB · Views: 1,956
  • DSCF1618.jpg
    DSCF1618.jpg
    74.7 KB · Views: 1,966
  • DSCF1621.jpg
    DSCF1621.jpg
    69.2 KB · Views: 1,970
Last edited:
Day 2

Returned on Thursday to carry on the process.
First was a draining of petrol, almost two thirds of a tank of rank old unleaded which stunk the place out.

Then the inner wings came off, although I did begin to wonder whether I should have taken a nut splitter along rather than a socket set, because even after several soakings in Plus Gas, several of the lower fastenings just sheared off after relatively little torque was applied.

Rear outer wings also came off. I used shears on the offside because it was scrap (rust and dents) and this meant that I could get at the petrol filler assembly as well as the fixings, that much more easily. Nearside was a little trickier.
Both sides had the inners coated in thick dry mud and both had a patch of rot where the reinforcement for the seat belt mounting was located. However, both sides were good along the top flange avoiding the sort of tricky repair that Malcolm shows in his website photo sequence.

Finally out with the interior. Mats and trim are all excellent, which will save trouble and money later and now the floor can be seen properly.
There is rust staining in the front footwell which suggests a heater matrix leak, and holes in both front corners, through the floor on the nearside and via a short split into the inside face of the chassis box section on the driver's side.
The rear well is pretty well unmarked inside and the boot floor appears similarly pristine with just a small rust hole in the bottom rear corner of the nearside door opening.
After disconnecting the engine ancillaries and brakes, we are now finally almost ready for a big lift, just needing to disconnect the tank under the rear floor.
Hopefully I can grab a day next week to do this.
 
  • 09062011040.jpg
    09062011040.jpg
    47 KB · Views: 1,878
  • 09062011036.jpg
    09062011036.jpg
    54.3 KB · Views: 1,879
  • 09062011041.jpg
    09062011041.jpg
    44.4 KB · Views: 1,881
  • 09062011047.jpg
    09062011047.jpg
    41.6 KB · Views: 1,873
  • 09062011043.jpg
    09062011043.jpg
    51 KB · Views: 1,877
  • 09062011046.jpg
    09062011046.jpg
    42.7 KB · Views: 1,866
According to the tax disc and the DVLA records, it hasn't been used since 1992! Inside was a bit like the Marie Celeste, with a vintage can of deicer, a duster and the handbook still on the parcel shelf.
 
The Big Lift

Day 3 saw us determined to get the body off the chassis.

Having soaked everything in plus gas on the previous visit, I was fairly optimistic that things would move and was rewarded with all the captive bolts coming out in a fairly cooperative fashion. I had to resort to the cutting disc on the outboard flange fittings by the toe board, where everything was well rusted into a solid lump, and had the usual struggle with the long centre bolt on the front edge of the boot floor.

I started parting chassis and shell initially with a series of shallow wooden wedges which I had cut out the previous night from some rough timber, with my circular saw. Using them initially at the bolt positions seemed to have the right effect and we put a trolley jack under the rear boot floor, using the spare wheel as a spreader and to my amazement, after a few taps pushing in the wedges a little further, the body tub literally eased up off its bed of mastic.

We then pushed it outside and used a hoist, with straps passed through the door openings, to lift it sufficiently to allow us to pull the chassis out.
All in all, quite straightforwards.

Finally, I unbolted the cross member and fuel tank from the chassis and we took stock.

No surprises really, most of the damage was as previously spotted. Both outboard rear mountings need rebuilding as does the offside suspension mounting on the chassis rail. The four dodgy corner MOT repair patches will be removed and repairs done properly, probably with repair panels where we can get them. The only really tricky areas are the two triangular members on the outside of the toe boards, where there has been some previous repair work done without the benefit of having the body off. There will also need to be some repair work to the flanges along the bottom edges of the rocker panels.

The main tub has no further hidden surprises, in fact the worst bits in the rear door apertures looked quite a lot less intimidating once the two were separated.

So the end of day three sees us with a chassis sat on its wheels, a stripped out tub sat on a pallet nearby, and a pile of bits, which I shall be retrieving with a borrowed Transit tomorrow, to free up a bit of space in Paul’s workshop.
 
  • 17062011049.jpg
    17062011049.jpg
    35.4 KB · Views: 1,780
  • 17062011050.jpg
    17062011050.jpg
    48.7 KB · Views: 1,774
  • 17062011053.jpg
    17062011053.jpg
    49.9 KB · Views: 1,780
  • 17062011051.jpg
    17062011051.jpg
    47.8 KB · Views: 1,771
Last edited:
Great work I wanted to take the body off my barn find R6 but was not sure if I could manage it.Perhaps your success will make me think again.
It looks like you have a great project and it will be done to a high standard well done.Gary
 
I must admit that I was a bit apprehensive. Stripping everything out makes it easier and the resultant tub lighter, but as with so many of these things, if you are methodical, then it needn't be too much of an ordeal.
I was thinking of maybe posting a checklist of things to disconnect, etc., having just done it, whilst it is all still fresh in my memory.
 
Great job, I loved stripping down my GTL and labeling little boxes of nuts and bolts...hope to start it again in the autumn if my pickup gets out of the way..

keep up the good work...look forward to more postings

Regards

Andrew
 
Future Progress

Progress won't be quite as spectacular now for a couple of weeks, because I am out of circulation for a few days and Paul will need to assess and decide whether to acquire any repair panels, prior to his making a start.

In early July, I will start to refurbish the various panels and other items stripped off the car and carry out the various bits of welding on the tub, whilst he gets to grips with the chassis, so in a couple of weeks, I should be able to report further and will add some more pictures in.

In the meantime I have to start to think about eventual colours, something that will not clash with the tan interior, and preferably a solid colour so that any future work on scrapes or bumps can be done by yours truly (no experience with metallic colours at all!):)
Quite fancy a white or a cream.
 
True enough - I once repainted Florence in the original colour (same blue) and found that dark metallics showed up every dent especially when sprayed with a bad gun with poor technique (I was only young). Ended up buying a pot of light blue which looked fab.
 
Malcolm's right, Dark metallics, do show every single mistake!

But the colour is lovely, it'll be a shame to see it different.
 
While body is off check (by tapping with hammer) the triangular plates at either side of the foot plate at front of chassis.there is a seam across them where rot starts,helped by trapped mud thrown up by wheels.These plates are a swine to deal with when body is on.By the way,Renault had a typically French(ie,practical),way of carrying out rear chassis repairs.Dont remove the whole body,but instead,remove windscreen & rear doors.then,hacksaw through screen pillars & B posts.Then detach rear section of body + whole of roof.Do what you have to do-then replace body & weld up pillars & B posts.Yes, its official-Ive got it in writing somewhere.Grind-off welds if youre the fussy kind!Incidentally,I have found it best to leave inner front wings in place-they are usually stuck so tight to the scuttle panel they are terrible to remove.They will lift up with the body.
 
Well Barnfind you have inspired me to a better job.
Today I removed all the body fixing bolts and it should be ready to ease off.

When my friend is back from a weekend away to morrow I will ask him to cut me some wedges and I will start by trying your method to seperate the body.
I will then have to work out how we lift it off.
In the mean time I have left the car with a Jack and wooden blocks keeping some pressure on the body you never know it might start to ease the mastic.
Thanks Gary
 
Good on ya Gary! Another trick for removing the body - put a jack under the crossmember at the rear of the boot floor and lift a little - not so much that the rear wheels come off the ground just to get some upwards force. Then use a hot air gun to heat the panels above the sealant starting at the rear. The sealant goes soft when it's hot and the body peels off. Front inner wings will be easy to damage - might be worth pulling those off first.

The wooden wedges are a good idea - the front of the boot floor tends to just bend instead of coming off.
 
Hi barnfind have not heard from you for a while.
Having removed the body from my 6 ( thanks to you) I have decided that there cannot be compromise on the repairs. I have ordered up the repair panels required and when all the welding is finished I will treat all the cavitied with a double dose of Bilt Hamber dynax S50.
There is no point in doing all this work and not making it as good as it could be. Once the body is back on it is on for good and will never be taken off again by me.
I will also fit new clips for all new the fuel and brake lines and the car should be good for many years to come.

Gary
PS I was given this advice on the RCCC forum it may be of some help to you.

Hi there,
I am watching you progression with your 6L. Having owned several 6's and restored 1 by separate chassis/body, I am keeping an eye on how you are doing!! IN total I have done 3 R4 models and a 6 by separation (1964 Fourgon, 1961 4L, 1968 Pleinair and a 1972 6L).
You are doing ok!!
One bit of advise, do not undertake any body panel replacements without the shell being remounting (temporary) to the chassis and basically rebolted. This is especially important concerning rear quarters, sills, and bulkhead. Remember that if such work or partial repairs were undertaken at a profession accident repair centre, the body shell could be mounted onto a jig against technical data mounting points. In this way, alignment is preserved, and any distortion is avoided. Do not be deceived by amateur advice that it will be ok; follow my advice and you will not be disappointed. Finishing seam welding will be ok once vital spot welding is completed in such a manner. Further more ensure you do not single side spot weld, and if the manual expects MIG brazing in places, do so.
When you come to refitting the two units, ensure you use a quality 1K adhesive, not 1K sealer to form the join; ensure you do not use a 2K adhesive. "Fusor" products are the manufacture I would recommend, made by an American company called "Lord". The UK outlet is "Farecla", who will give comprehensive technical support. The same 1K adhesive should be used for the bolt on inner and outer wings. Also complete all your chassis cavity waxing whilst it is still a separate chassis, using a quality product like "Dinitrol"; ABSOLUTELY do not use Waxoyl which become corrosive after about 5 years.
I am only sharing good practise advice from both my personal experience, but also from my professional competence dealing with technical training and development for an automotive accident repair group.

I know the author of this posting and I know he knows his stuff from many years of experience in the industry and close ties with Renault in the past.

Gary
 
Not sure about the comment about Waxoyl becoming corrosive. My car was treated from Waxoyl since new (1984) and the only bits which were rusty were the bits without waxoyl. the bits with Waxoyl are like new - even the bottoms of the doors are good apart from the one which had the drain holes bunged up ! even the boot door and the front corners of the bonnet - all good.

However once 5 years (I would say more like 2 years!) is up there is unlikely to be much Waxoyl left in the places where it matters underneath the car and so will definitely allow corrosion!
(Not sure if this is the reason behind the comment)

Best regards,
Andrew
 
Waxoyl

My own preference is Dinitrol. Waxoyl is too thick straight from the can and needs thinning to soak in properly and creep, plus the OE spray is rubbish.
However, heated up or thinned slightly and applied with a compressor and schutz gun, it can do the job.
On some forums users report that corrosion carries on under Waxoyl. I can only assume that this is because of its lack of absorption into the rusty areas.
I have found the black okay, however, over Dinitrol or similar, in areas subject to abrasion. Of course nothing lasts forever and you will still have to revisit and reapply at the end of each summer, to any areas like wheelarches.

Glad you like the wedge technique for separating the body from the chassis. I did the job on a warm day which helped soften the mastic, if attempting this in cold weather, I suggest a heat gun would be useful to soften up.

I note the comments on body distortion and as an ex Beetle rebuilder, can concur with that. Fortuinately my 4 only needs a couple of small patches which are unlikely to have this effect.
You could, incidentally, get around this by tacking some temporary bracing here and there, if, for example, the area you are repairing is not easily accessible with the body mounted, like, say, around the cills.
 
Inner Wings

Work continues
I have now started to look at the various panels removed from the car.
The two salvaged wings have been stripped and then acid etch primed on the outside and treated with Rustbiuster epoxy mastic paint on the inside.
The offside inner front wing has had its top mounting flange (which had all but disappeared ) replaced with new metal. Fortunately there were remnants still holding the captive screw fixings which I was able to use as a reference point. Similarly the vertical flange along the front edge was also replaced with new metal welded into place.
Picking up the tops of the vertical flutes that stiffen the wing was the most awkward bit and was eventually finished off by pressing the new metal to shape using a mole grip type panel clamp progressively, to recreate the contour and then finishing off with a small hammer. Finished product was okay and will just need a final smear of filler to complete.
A similar but less tidy repair has been done on the other side and I will get the flap wheel on that to see if it will tidy up.
Left hand photo shows the wing as it was initially. Most of the frilly edge disappeared when I got the flap wheel on it. Right hand picture shows welded up replacement flange, ready for final grinding back and general stripping back to bare metal of remainder of panel.
 
  • DSCF1620comp.jpg
    DSCF1620comp.jpg
    177.4 KB · Views: 589
  • Inner wingcomp.jpg
    Inner wingcomp.jpg
    214.7 KB · Views: 584
Look like a decent repair! But you DID know there are replacementparts (weld-in pieces of metal with the right shape) for this kind of repairs don't you? Before you do more elaborate work, it might be worth checking out what's available. Just like the edges where the rear wings are attached to the body, you'll probably find a lot of rust there as well. Those have a really weird shape (curves in both directions) and are really hard to repair without replacementparts. Anyway, check der Franzose or whatsoever supplier you use.

Good thing is that your repair is probably nicer and of better quality (the weld-in parts) don't have a reaaaally good fit.

Anyway, keep up the good work! I'll stay tuned!
 
Back
Top