Clementine's Garage
Clementine the Cat
 
Image of flower
Yellow R4
 
Réparateur d'automobiles

Barn Find Rebuild

Friends Reunited

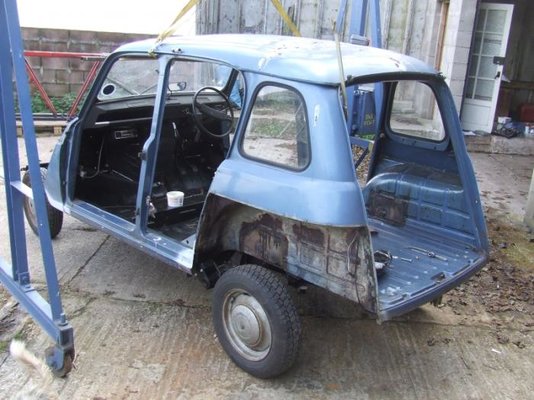
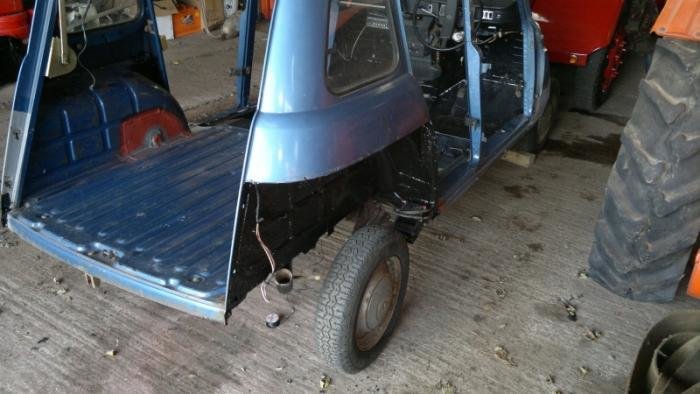
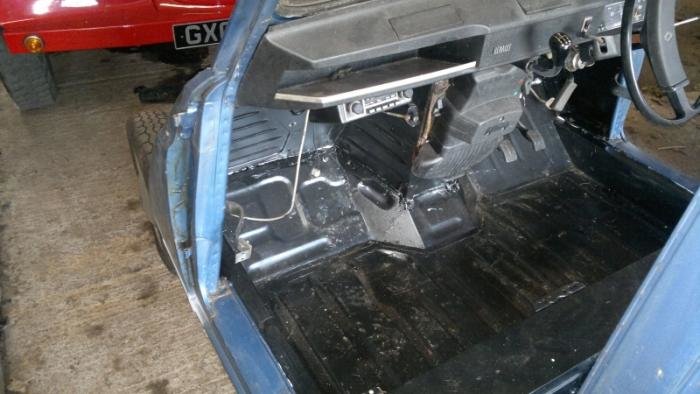
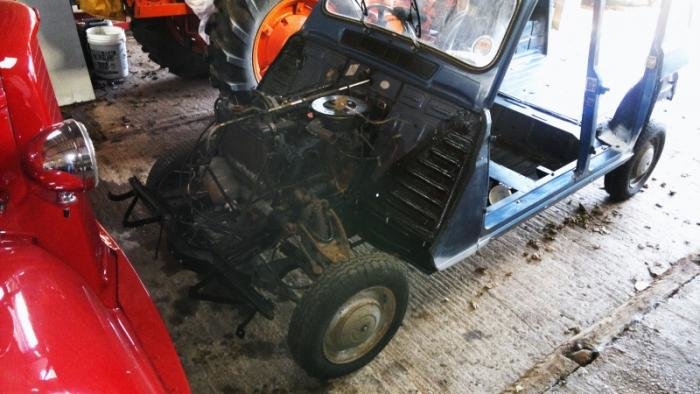
After some head scratching as to the fitting of the brake limiter mounting plate (Should the third mounting have had a captive nut inside the box section? No sign of a hole all the way through on the photos of the original and neither of us could remember having taken the old plate off/ we resorted to a rivnut insert in the end.) plus some further fettling of the tank installation and the main brake and fuel lines, we went for a return of the body tub to its old home.

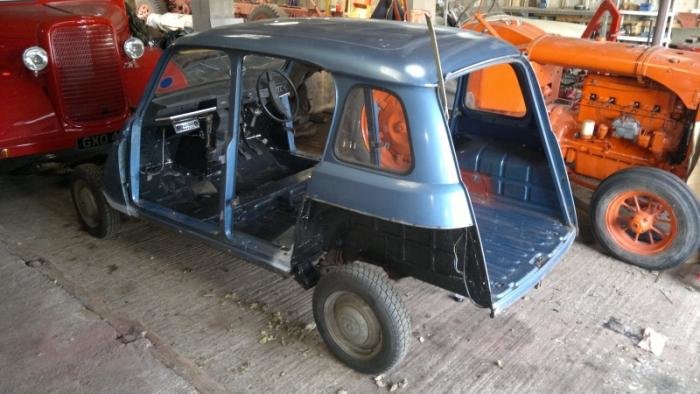
Ideally the tub would have gone off for paint first, but I do intend to pursue the idea of rollering the paint finish, as per my efforts recorded elsewhere on the forum with one of the doors, which I have now extended to the nearside wings and the inner wings.

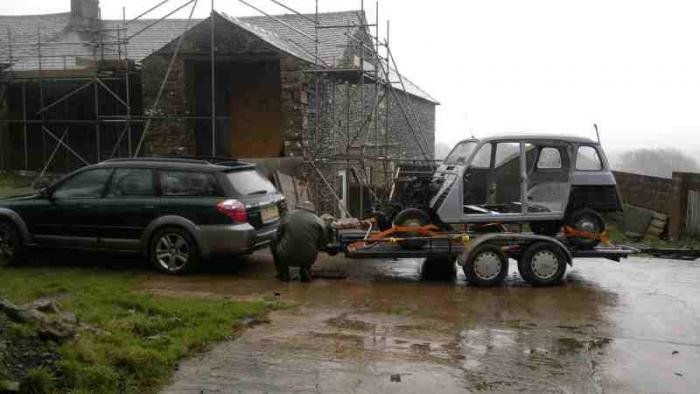
I also need to avoid abusing Paul's hospitality for too much longer, and so it has gone back on, in its raw, repaired state.

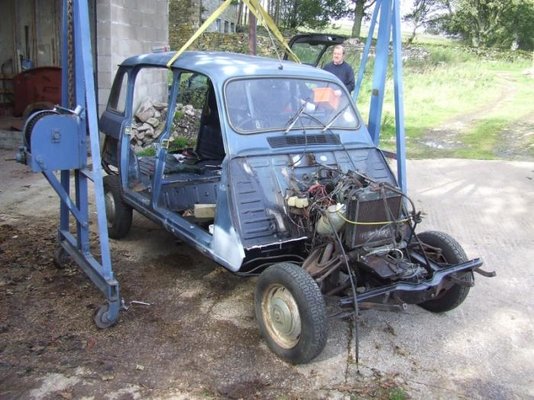
Anyway, things generally went well today, the two components aligned reasonably well albeit the two rear mountings at the back of the boot needed a little persuasion and the two bulkhead bracket mountings on top of the front chassis members were particularly reluctant, in spite of not having been altered at all from their original state. However, after quite a bit of heaving and prising, most of the fixings were aligned and fitted, and bolted down.

To celebrate, I reconnected the steering and the former pile of bits started to feel like a car once more as we wheeled it back inside. A little bit more fettling will be required next week and then I will load it onto a trailer behind my long suffering estate car, and take it home.

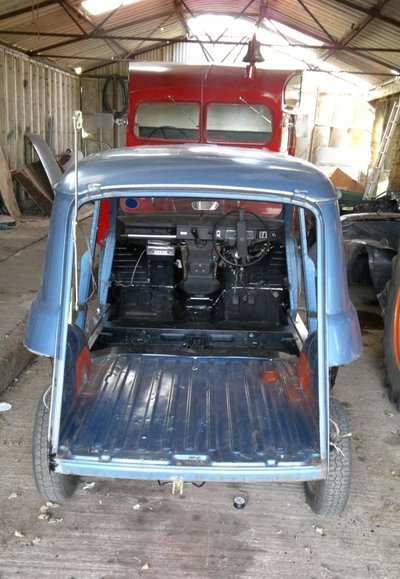
Final question to those of you who are following this, does anyone have a layout of the brake plumbing at the back end? Although I photographed it to death whilst dismantling, I can't quite get my head around the pipework layout, especially how the second brake line to the rear of the car actually works. Does anyone have a simple sketch layout?
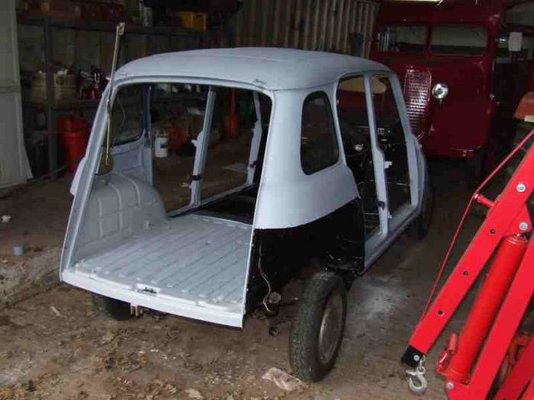
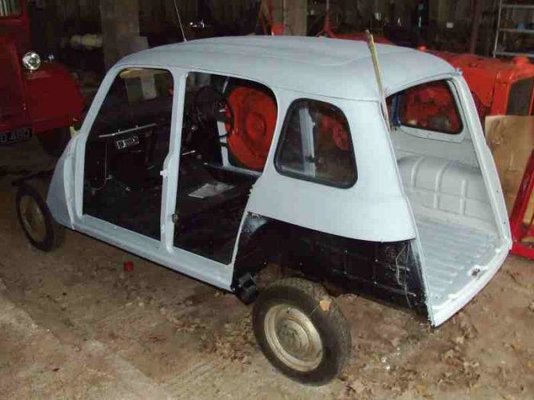
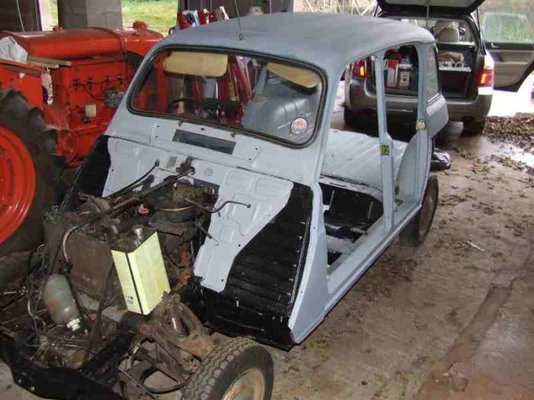
 
  • DSCF1675comp.jpg
    DSCF1675comp.jpg
    65.7 KB · Views: 576
  • DSCF1674comp.jpg
    DSCF1674comp.jpg
    76.5 KB · Views: 578
A Sticky Day

As the R4's time at the Rusty Trucks workshop draws to close, I embarked upon a days consolidation today. It was rather hot and sticky up here as I finished off the bolting down of the tub, reconnected the handbrake and gear linkage and painted a few internal areas.
Finally, I finished chiselling the loose anti stone chip compound out of both rear wheel arches and then painted the whole lot with (even stickier)Rustbuster epoxy mastic, plus a bit of touching up around the front chassis, in particular a couple of patches where the tilter mounts had prevented me getting, a few weeks ago.
The next photos should show me loading the car onto a trailer and bringing it down the motorway a few miles.
In the meantime, a few more pictures, including that '40's Dodge Fire Engine that keeps creeping into the picture.
 
  • small29092011083.jpg
    small29092011083.jpg
    114.9 KB · Views: 544
  • small29092011084.jpg
    small29092011084.jpg
    49.7 KB · Views: 552
  • small29092011085.jpg
    small29092011085.jpg
    44.5 KB · Views: 546
  • small29092011087.jpg
    small29092011087.jpg
    44.8 KB · Views: 544
  • small29092011088.jpg
    small29092011088.jpg
    50.3 KB · Views: 556
  • small29092011090.jpg
    small29092011090.jpg
    214.1 KB · Views: 554
Last edited:
Update

Just a quick update.

Work has built up a bit recently, and so I haven't had time to retrieve the car from Paul's place yet. I have, however, now the use of a trailer, which is having a few odd jobs done to it, and then I should be back in business.

I have continued working on the separate panels, however, and so, I now have a set of repaired and generally refettled doors and wings, outer and inner, with the only remaining effort required on the bonnet and tailgate. The tailgate only needs a coat of paint, the bonnet however, needs a little repair work around the front stiffener below the lights.

Thanks to Steve Hennessy, I also have a good set of bumpers and new irons to replace the tatty existing ones with, and so if anyone needs a set of decent straight rear irons, with some minor surface rust, let me know. The existing inboard fronts are, okay too, but the outer nearside one has obviously been bent and straightened a couple of times and has cracked. In theory, once the final cosmetics have been done to the body shell, we are getting towards the point where the project becomes a re-assembly exercise.

I am still short of a few bits and pieces, mainly the window frame inserts, and am resigned to probably trying to get my hands on a set of later plastic items to replace my steel ones and so, as ever, I repeat my plea that if someone out there has any to dispose of , then I will be happy to have them off you, even if they are still attached to a set of doors!
 
Last edited:
I think, after studying my own and few others' photographs, that I know how it goes back together (haven't done it just yet), but I would be happy to have it confirmed before I start manufacturing the various pipes.
 
Hi

Thanks for this. My brakes actually have a dual line running to the back, the top one of which is tee'd into the feed from the limiter for the offside rear brake, and the other of which crosses under the chassis to the limiter on the nearside.

Obviously part of the dual circuit setup, but blowed if I can understand how it would work.
 
2 Limiters ? that sounds like a recipe for disaster if setup wrong and one cuts in early !

MR175 does have a picture of a circuit with 2 lines to the back tho (But that only has 1 limiter and a t-piece at the back)

Have you got a copy of MR175 ?

Regards,
Andrew
 
Sorry my poor writing style.
There is only one limiter, in the nearside wheelarch. There are two feeds going back to the rear brakes from the master cylinder, both direct to the limiter. One of the feeds has a tee piece which feeds the offside rear brake. The nearside rear brake is fed by the remaining outlet from the limiter.

What is MR175?
 
Ark ok!

MR175 is the R4 workshop manual, it can be found on the internet (but usually in french)

Regards,
Andrew
 
By all accounts I had hoped to have the car back in its home workshop by now, but various things have conspired and the trailer has been awaiting a new brake cable, so it is still in its original resting place.

I have managed to have a further day on the bodywork, applyng some cosmetics to the repaired offside A panel and a small groove on the rear wing and then getting a layer of primer over most of the car.
Things now look a lot more uniform and tidy, with just a few small internal areas to paint in.

I also appear to have a problem with the engine, which doesn't revolve more than 180 degrees in either direction, (see Technical Queries) which is puzzling, and frustrating that I haven't found the time to investigate properly.

Sorry pictures are a little blurry, poor light conditions when photos taken.
 
  • ADSCF1732comp.jpg
    ADSCF1732comp.jpg
    48.4 KB · Views: 577
  • DSCF1728comp.jpg
    DSCF1728comp.jpg
    49.4 KB · Views: 581
  • DSCF1732.jpg
    DSCF1732.jpg
    60.6 KB · Views: 579
Last edited:
On the road at last...on a trailer

At last, having chosen the worst day of the year to drive anywhere, we hit the road in a mixture of rain and low cloud and gusty winds, the R4 was lashed onto a trailer and driven across Lancashire to its new home.

Next steps (once it dries out again) are to paint the shell and then reunite it with its loose panels and interior, hopefully finding out en route, what is wrong with the engine. I shall tackle that prior to putting the front end on, in order to get some better access to the works, starting by having a look under the rocker cover for stuck valve gear, and then pulling the starter motor.

In the meantime, I have almost finished the bonnet, with some welded repairs to the cross member under the grille and a coat of paint. Another final coat tomorrow, and then I will reassemble the lights, etc. into place.
 
  • trailer nov 2011.jpg
    trailer nov 2011.jpg
    40.2 KB · Views: 535
Have left the R4 to drip dry in its new home for a week or so now, but alas not a lot more has happened due to other commitments and the rather cold damp weather which has inhibited my pressing on with painting the main shell.

In terms of 'loose' panels, the bonnet is now painted and reassembled and carefully stored away, all doors and tailgate likewise and all of the wings are ready for installation.
Internally, I have cleaned up most of the trim and looked at a couple of items that will need remaking in the form of the card liners to the rear areas. I have the originals as templates and will need to look for a suitable substitute material.

All of the rubber mats are in good order and just need a clean up before putting back in and I have also cleaned up most of the loose bits of plastic trim such as the door treads, and the parcel shelves. The seats need a good scrub, but I will save that until I get a good bright blowy day.

The engine is in quite clean shape after a 50mph one hour powerwash the other weekend, but I still need to further investigate the apparent interference that stops it revolving fully.
The inactivity is a little frustrating, but hopefully there will be a few more opportunities in the coming weeks to get stuck in again, and once the shell is painted finally, it becomes a more rewarding task of reassembly.

Thanks to everyone who has contributed advice and comments thus far. I still hope to add another car to the (rather limited) stock of Quatrelles on the streets of Lancashire not too far into 2012!
 
Lobster from this Forum is the NW coordinator for the RCCC in your area.
He is hoping to arrange a club stand at at least one of the events in your area so you could set a target to finish and to be there.
I am sure Lobster will be taking his R4 Van.
If there are other R4 owners in the lancs, Cheshire, Manchester, Merseyside or Cumbria areas I am sure Lobster would love to hear from you.
Gary
 
Yes, that would be a good target. The nearest event is the annual Hoghton Tower Classic Car show which is only just over a quarter of an hour's drive away. Unfortunately I missed last year because I booked a holiday that clashed with the date, and the year before that, it was totally washed out and cancelled on the day. Billed by Andrew Greenwood for June 24th this year, albeit not listed on the Tower's own events calendar for some reason?!

Managed to get over and do a couple of hours this week. Painted the door shuts and lower front bulkhead. It was very fiddly and surprisingly time consuming and I was worried about the temperature, which was right at the lower limit for the paint, but it seemed to be setting okay.
Quite time consuming with all of the nooks and crannies to get into.
Alas the weekend looks like a write off. The weather is very poor and we had a lot of snow yesterday and a big overnight freeze. The snow is still here, albeit slowly disappearing, but I suspect that its still only a couple of degrees. Hopefully I can bag a morning later next week, when the forecasters say we might crawl back into double figures.
 
Window Frames

Many thanks to Malcolm for a set of plastic window frames, which I have stripped down and have cleaned up nicely.
Unfortunately, I haven't had time to do anything with the 4 this week, which is a shame because after the big-ish freeze, things have been reasonably mild. However, once the festive Season is disposed of and I have cleared my other jobs, I'll get back on the case.
 
Paint

:) Finally got around to doing some more. The weather was breezy and warm(er) and although I had feared a condensation bloom with warm air on cold metal, the generally draughty workshop was okay. So I had a good morning with paint and now have one coat or more on most of the shell, with the exception of the boot floor.
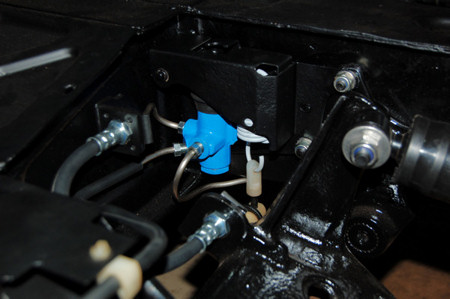
I also managed to fit the windows kindly donated by Malcolm, into the doors, which are ready for fitting as soon as the shell gets a final coat.
Also had a look at the card liners that fit inside the rear load area around the windows. The vinyl has come unstuck from these and at first sight it looked as if some spray upholstery adhesive would save the day. However, the old stuff had become quite hard and brittle feeling and appeared also to have shrunk and was significantly smaller than its card backing. I gave up, stripped the old stuff off and will find some new.
 
Back
Top