


You are using an out of date browser. It may not display this or other websites correctly.
You should upgrade or use an alternative browser.
You should upgrade or use an alternative browser.
Rodeo 5 encouragement needed
- Thread starter mr-reno-139
- Start date
mr-reno-139
AKA Paul Cunningham
- Messages
- 2,247
- Location
- lancing west sussex england
progress has been fairly slow ordered 2.5 litres satin black synthetic chassis paint and got the roller back in action starting with rear axle next day it was dry but too glossy for my liking
Google suggested talcum powder would work mixed into paint but this was from a model making forum
Initial experiment with level teaspoon of Johnson finest baby powder stirred into small amount of white spirit ok and then stirred into 200 ml paint in an old ice cream tub this dried to a much less shiny finish

The floor pan was given a coating of rubber stone chip sprayed on and once everything dry it was axle refit time
This was slightly more of a challenge than I thought and ideas of step by step photo guide went out of the window
As the chassis was lying on it's side lifting axle in was simple but the tension on bars means that getting all bolts to line up was not going to be easy


taking photos and trying to Lever things into place didn't really work so anyone attempting this must use this as a guide and work it out for themselvesI can only say starting with the two lower outer chassis mounts is a good idea

I can only add that an assistant was needed and I gave up and put the chassis flat to refit the remaining bolts I have left the outer slotted bolts loose until I can check the alignment much later on
After about 30 mins I managed to work out by trial and error which bolts to fit first so can't recommend an exact sequence but would definitely recommend an assistant
Gave the floor pan a coat of paint and touched in a few marks from the axle
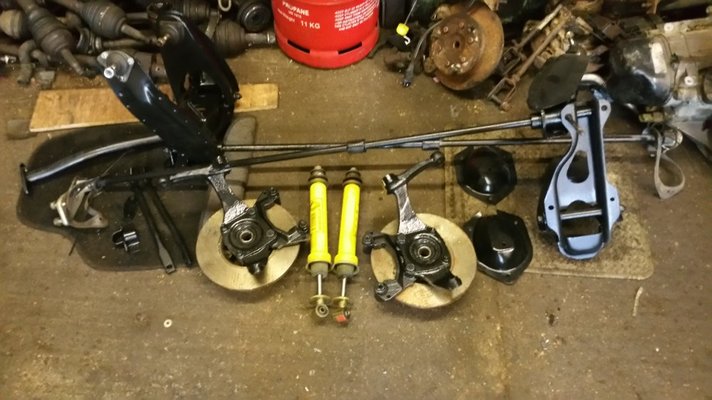
Next bit will be putting front suspension back together using some more nice new bits
Google suggested talcum powder would work mixed into paint but this was from a model making forum
Initial experiment with level teaspoon of Johnson finest baby powder stirred into small amount of white spirit ok and then stirred into 200 ml paint in an old ice cream tub this dried to a much less shiny finish
The floor pan was given a coating of rubber stone chip sprayed on and once everything dry it was axle refit time
This was slightly more of a challenge than I thought and ideas of step by step photo guide went out of the window
As the chassis was lying on it's side lifting axle in was simple but the tension on bars means that getting all bolts to line up was not going to be easy
taking photos and trying to Lever things into place didn't really work so anyone attempting this must use this as a guide and work it out for themselvesI can only say starting with the two lower outer chassis mounts is a good idea
I can only add that an assistant was needed and I gave up and put the chassis flat to refit the remaining bolts I have left the outer slotted bolts loose until I can check the alignment much later on
After about 30 mins I managed to work out by trial and error which bolts to fit first so can't recommend an exact sequence but would definitely recommend an assistant
Gave the floor pan a coat of paint and touched in a few marks from the axle
Next bit will be putting front suspension back together using some more nice new bits
")
mr-reno-139
AKA Paul Cunningham
- Messages
- 2,247
- Location
- lancing west sussex england
Patience tomcat
Face book is easier to upload to I have to resize piccies first on here
Looking for the adjustable rear shocks I've got somewhere I found my yellow gordini turbo rims sadly no nuts to suit at the moment
I thought they would be useful to make the chassis mobile


Next step refit front suspension followed by finding my 1300 5 ts engine which has been hiding for 20 years at the back of a lockup garage
Fortunately the 5 speed ha1 box is near the front of the same location
Face book is easier to upload to I have to resize piccies first on here
Looking for the adjustable rear shocks I've got somewhere I found my yellow gordini turbo rims sadly no nuts to suit at the moment
I thought they would be useful to make the chassis mobile
Next step refit front suspension followed by finding my 1300 5 ts engine which has been hiding for 20 years at the back of a lockup garage
Fortunately the 5 speed ha1 box is near the front of the same location
mr-reno-139
AKA Paul Cunningham
- Messages
- 2,247
- Location
- lancing west sussex england
Had a quick look in another lock up where my engines live and found my 1300 5 ts engine
Last used in a 5 ts I used for grass track racing has got polished and ported skimmed head Kent cam etc
It might even still work
Managed to lift the ha 1 box in my Espace but gave up with the engine and box

Last used in a 5 ts I used for grass track racing has got polished and ported skimmed head Kent cam etc
It might even still work
Managed to lift the ha 1 box in my Espace but gave up with the engine and box
mr-reno-139
AKA Paul Cunningham
- Messages
- 2,247
- Location
- lancing west sussex england
Ok bit more progress chassis now parked on side as space issues hot the front suspension back in
article coming soon
More painting of odds and ends including rear anti roll bar and fittings new vw beetle brake hose clip new rear flexible hoses and compensator valve
Also found new genuine R6 front shocks and motorcraft rears


Also discovered vw beetle flexible steering coupling fits as an exact replacement on to rack
article coming soon
More painting of odds and ends including rear anti roll bar and fittings new vw beetle brake hose clip new rear flexible hoses and compensator valve
Also found new genuine R6 front shocks and motorcraft rears
Also discovered vw beetle flexible steering coupling fits as an exact replacement on to rack

mr-reno-139
AKA Paul Cunningham
- Messages
- 2,247
- Location
- lancing west sussex england

 Not as quick as I would be if I didn't have to earn money fixing customers cars that are taking up space in my workshop
The chassis has been demoted back to being parked on its side
Latest job is cleaning 30 years worth of stale rusty petrol from the tank
Rinsed it out with a hose then with it half full of water tipped 1kg of caustic soda crystals into a funnel in sender unit hole with tank flat outside
Tipped it gently to mix crystals and left it over night
Repeated next day and even more rusty water came out
Final stage where I am now was to repeat process with spirit of salts and today I will find out results of my efforts and whether I need to buy some POR tank sealant
petak
Enthusiast
- Messages
- 1,882
- Location
- Vodice, Croatia
I am really jealous.....you done it in 6 months...i needed 2,5 years to get at same point in restoration.
And remembering clearly day i have decided to put rear axle on chassis.....it was very hard and lot of weight to align bolt holes..
I am really enjoying following your work.....learned some details where can be saving in time and money with high quality finish.
And remembering clearly day i have decided to put rear axle on chassis.....it was very hard and lot of weight to align bolt holes..
I am really enjoying following your work.....learned some details where can be saving in time and money with high quality finish.
mr-reno-139
AKA Paul Cunningham
- Messages
- 2,247
- Location
- lancing west sussex england
 Well all was going well today no loose rust inside tank now but there are still some rust stains inside so will get some tank sealer as we've got E10 fuel to look forward to
 No pics of what state tank was in externally as I forgot but it was definitely more solid than the newer gtl tank that came with chassis
If you go back to earlier post you will see the rust had gone right through it ☺


Found the perfect tool for cleaning the rust from top of tank after removing remains of underseal using engine degrease
This is a plastic abrasive disc which doesn't touch the metal and fits standard grinder
All went well until got the sleeve of my glove caught in it fortunately grinder stopped as it blew fuse when it stalled


Much swearing and thankfully no serious injury but a reminder of how careful to be with power tools


Finally a quick coat of my rust convertor paint
Which has almost run out of a litre can which was £22 from toolstation and has been used for the whole chassis and all suspension components as a primer so pretty good value
Apologies for duplicate pics seems to be pot luck if it loads once or twice and which order ☺
mr-reno-139
AKA Paul Cunningham
- Messages
- 2,247
- Location
- lancing west sussex england
Borrowed a friend to help me lift the 5 engine so I could get it back to workshop and investigate further pretty grubby and decided on a good cleaning session with degrease and neat trafic film remover

Followed by gearbox and starter motor this is s 5 speed ha 1 gtl 5 box
And a guick test proved the starter was ok
Clutch was rusted solid and the plate was new 20 years ago but pressure plate too rusty for my liking
Broken distributor cap to find from somewhere as well as belt tensioner and cam pulley
Dipstick I had a spare on the shelf from a mk2 5 and the Mobil. 1 oil from 20 years ago still like new
Andrew Lewis kindly found me a clutch so should be bolted back together soon

mr-reno-139
AKA Paul Cunningham
- Messages
- 2,247
- Location
- lancing west sussex england
The engine is a 1300 5ts engine I last used in 93 in a car i built for grass track racing 

The gearbox is from a gtl with the higher ratio can't remember numbers now
Going to fabricate mountings at side of box so crossmember doesn't need altering
Ps now you know where the 139 in my username comes from ☺
The gearbox is from a gtl with the higher ratio can't remember numbers now
Going to fabricate mountings at side of box so crossmember doesn't need altering
Ps now you know where the 139 in my username comes from ☺
petak
Enthusiast
- Messages
- 1,882
- Location
- Vodice, Croatia
So bigger engine inside...
Can not help me much describing feeling driving 1.1 with 5 speed gearbox. Combination that i would like to make.
That should be HA1-01G or HA1-02D with 10x31 final drive
One that i am looking for.
Thank you for info.
P.S. Does 139 say something or just random number you got?
Can not help me much describing feeling driving 1.1 with 5 speed gearbox. Combination that i would like to make.
That should be HA1-01G or HA1-02D with 10x31 final drive
One that i am looking for.
Thank you for info.
P.S. Does 139 say something or just random number you got?
Apprentice
pre-moderated
- Messages
- 84
- Location
- Carmarthen
thanks Paul,The engine is a 1300 5ts engine I last used in 93 in a car i built for grass track racing View attachment 14272
View attachment 14273
The gearbox is from a gtl with the higher ratio can't remember numbers now
Going to fabricate mountings at side of box so crossmember doesn't need altering
Ps now you know where the 139 in my username comes from ☺
I AM IN AWE !!
dave