Clementine's Garage
Clementine the Cat
 
Image of flower
Yellow R4
 
Réparateur d'automobiles

Plastic cladding affixing - help needed

Emanuel Botelho

Enthusiast
Messages
7
Location
Portugal
Hello everyone! My 1991 GTL is half-project, half-daily driver, and one thing I'd like to finally address is the lack of the smaller plastic cladding bits behind the front wheel wells.

Screenshot 2022-07-26 at 12.12.16.png
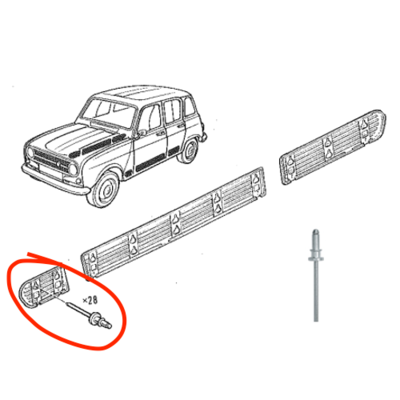
I have the plastic cladding. Have had it for way too long, and I want to finally get this done. How should I go about drilling the holes? I've seen online parts stores sell regular rivets for this (screenshot below) but I don't really understand the process, looking at the diagram; never used rivets before, and I've just started "wrenching" in the last couple of years, ever since I bought the Quatrelle. Any help/suggestions for this would be greatly appreciated! Cheers from Portugal!
full_r4_4l_rivet_pour_baguette_plastique_laterale_GTL_CLAN..png
 
Have you found that rivet from a supplier? Where did you find it? It's special and not a normal pop rivet, but it looks like a normal pop riveter gun can be used to install it. It holds the top of the plastic part. On the bottom you use a self tapping screw.
 
Have you found that rivet from a supplier? Where did you find it? It's special and not a normal pop rivet, but it looks like a normal pop riveter gun can be used to install it. It holds the top of the plastic part. On the bottom you use a self tapping screw.
I found it here, sold in a 28-pack. I didn't order these rivets, mind you, I was just searching for options and I happened to find that link. To be honest I just thought I'd go with self-tapping screws all around, but then I saw these rivets and figured it could be easier to use these. However I don't have a riveter gun and I'm having a hard time understanding the diagram. Should it be installed from inside the body panel? Drill top holes, hold rivets in place from inside, hang plastic cladding piece on the rivets and then use the riveter gun to affix them in place, one rivet at a time? The hard part I can't really figure out is how to access the area behind the body panel with a riveter. Maybe I'm fundamentally misunderstanding the diagram?

Do you think I could use self-tapping screws all around instead? Would these work without a nut securing them in place (again, the whole problem with accessing the area behind the body panel, seems like it will be hard to get even a couple of nuts back there to secure the screws in place)? Thanks in advance!
 
I would use the rivets in your first link. The top of the plastic trim pulls downward to clips into the rivets then the bottom is secured by screws that are covered by small round plastic covers. It's a neat system and you can't see the screws after everything is fitted. Try removing a panel from one of the doors to understand how they fit.

You'll need a riveter gun but they are not expensive. Something like this: https://www.amazon.co.uk/s?k=rivet+gun You need to drill a hole in the panel that the rivet can fit through. Put the rivet in the hole, put the shaft of the rivet into the gun, then squeeze the handle a few times until the shaft breaks off. The rivet will be secured to the panel. For the screw at the bottom you would ideally use something similar to what is used on the plastic panels on the doors. Again you would need to drill a hole, but this time smaller than the screw thread.
 
Thanks for the detailed instructions! I realised I have access to a riveter gun, so that's definitely the best option. I will try to search for cheaper options on this type of rivet with the ribbed tip, these seem a bit expensive and I think I may be able to find something similar in old-school hardware stores right here in my hometown for a fraction of the cost. At a glance that seems to be the only significant difference, and with your explanation it became clear to me how that will work in terms of holding the plastic cladding in place (also helped me understand there's no need to access the body panel from behind, I was really struggling with that visually). I have inspected the other panels in the past to figure this out but didn't venture removing them altogether, fearing I'd break something in the process.

Re: lower holes, I guess if the thread is larger than the hole, that will keep the screws in place without the need for nuts, right? I would love to get a set of plastic covers for the screw holes, I think I only have a couple left (if that), but the last time I checked I could only find very expensive listings for complete sets. I may have those 3D printed someday, shouldn't be too hard to make a 3D model out of an existing one.

Again, thank you so much for all the help!

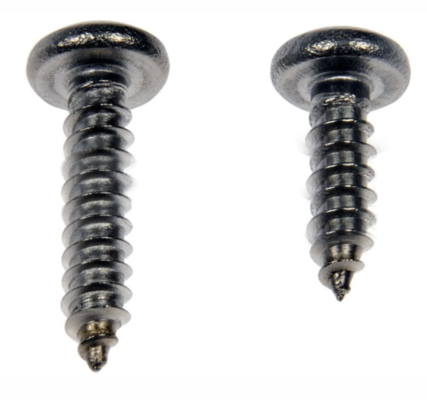
EDIT: do you think I could use this kind of self-tapping screws to do the drilling itself? Or is it preferable that I drill holes first?
Screenshot 2022-07-28 at 15.35.36.png
 
I would use the rivets in your first link. The top of the plastic trim pulls downward to clips into the rivets then the bottom is secured by screws that are covered by small round plastic covers. It's a neat system and you can't see the screws after everything is fitted. Try removing a panel from one of the doors to understand how they fit.

You'll need a riveter gun but they are not expensive. Something like this: https://www.amazon.co.uk/s?k=rivet+gun You need to drill a hole in the panel that the rivet can fit through. Put the rivet in the hole, put the shaft of the rivet into the gun, then squeeze the handle a few times until the shaft breaks off. The rivet will be secured to the panel. For the screw at the bottom you would ideally use something similar to what is used on the plastic panels on the doors. Again you would need to drill a hole, but this time smaller than the screw thread.

I figure you may miss my edit above so I'm leaving it in a separate post: do you think I could use this kind of self-tapping screws to do the drilling itself? Or is it preferable that I drill holes first?
Screenshot 2022-07-28 at 15.35.36.png
 
It's best to drill small holes first. They should be a little smaller than the solid part in the middle of the screw thread.
 
Back
Top