Clementine's Garage
Clementine the Cat
 
Image of flower
Yellow R4
 
Réparateur d'automobiles

Ancient gearbox overhauling

Azazello

habitué
Messages
1,109
Location
Italy
As you may have read on my restoration thread, my 334-10 gearbox (4 speed, old type pre-73) is missing 4th gear: even operating from the shaft out of the gearbox I can't find it.
Today I took the gearbox off the car in order to open it and check what's wrong, and hopefully have a light overhaul (mainly changing gaskets, because oring and oilseals for differential and main shaft have already been changed a few months ago when I first coupled engine amd gearbox).
I fear doing some damage just unscrewing bolts casually: anyone of you experts can give me some advice on how to open safely the gearbox in halves and what to check for in order to solve my problem?
Here it is a drawing of the kind of gearbox I am talking about.
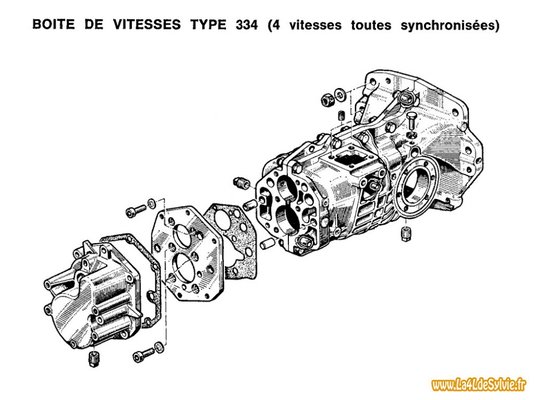
schema-eclate-boite-334-4l.jpg
 
I don't know this gearbox intimately.
Once the end cap is removed you should be able to see the condition of 4th gear. The split part of the gearbox is the original 3 speed box. Turn gearbox onto its side. The side facing you in the diagram goes down on the workbench. Undo the bolts and lift off the casing. I can't remember now, if there are springs, balls etc to go missing at great speed as they fly around the garage. I don't think so, but do it carefully with a towel to trap the airborne bits.
Once the cover is off, you will be impressed by the simplicity and elegance of the design. It is a piece of mechanical art.
The gear sets simply lift out. After working with Austin/Morris/BMC gearboxes, the Renault ones were a revelation. I never touched a British car again!
I used to have problems with my three speed because the long gear lever would wear at the bottom where it engages with the selector forks. Brazing the worn lever and then grinding it back gave a very effective repair.

Maybe this sort of wear could be the problem that you face. I suggest that you remove the lever (4 bolts) and check for wear before pulling the box apart (especially if it was quiet and working smoothly before)
 
Hi David, thanks for your reply...
In the manuals is said as you mentioned to begin from the four bolts that keep the shaft.
I'll make some room in my wookshop and begin he dismantling this afternoon, I think... I will surely add some photos and ask again for your help!
 
I have recently assembled and dismantled the three speed version. In that order - two different boxes.
It is indeed as easy as David says. Nothing flying out though I didn't take the selection shafts apart.

I also have the same four-speed as you have that has a chip in the fourth gear tooth - not a big bother that one - and badly worn first gear teeth. I've been on the hunt for a replacement primary shaft and secondary shaft gears as they need to be matched.

Worth opening it up and having a good look. Just keep track of which side the adjusting shims for the diff come from
 
First - are you sure that 4th gear problem is not due to gearshift lever out of adjustment? The lever turret has four oblong holes so that it can be adjusted precisely in relationship to the earbox casing. The Haynes manual gives some easy to follow instructions on how to do it (weird!).
Second - this gearbox is effectively a "3+1", that is, the 4th gear was added at some time to the basic 3-speed design. The whole assembly can be reached by just removing the cover at the front end of the gearbox, and with a little patience this can be done with the gearbox on the car! Check this out before you strip it down completely. You will have to go that far only if there is a problem with the 4th shift rod, and again, you will only need to split the case apart and take the differential, primary and secondary shaft assemblies out and put them aside - the shift forks and rods are located on the half casing. It's really a simple and clever design as David pointed out.
 
Problem quite solved, it turned out to be just the selector shaft blocked and not shifting as it should, a few drops of wd40 ad a bit of hammering and all seem to work proberly...
But I'd like to change the paper gasket now that the gearbox is so manageable, since it loses some drops of oil... in order to disassemble the gearbox in the two main halves I have to pull off the 4th gears, and it seems a bit of a delicate job...
 
4th gear removed...

So I could finally open the gearbox completely, and now so it lies on my workbench:

Humidity did his work, and a bit of rust is visible, even if gears seem in good shape. Do you think it is something I should worry about?
The part that seems more worn is the primary shaft... but it seems something just superficial to me.


What is the opinion of my wise friends?
 
If the gearbox has stood unused for a very long time it's not unusual to find some superficial rust inside, it's not a problem though. I would check for pitted gear teeth and damaged bearings, both due to humidity / corrosion.
Why was 4th gear selector shaft hard to move? Was it rusty too? It's worth removing all three of them, now that you have reached so far, and checking - cleaning them and their bores in the casing.

Edit: On the first photo, I can see some pitting on the input seal journal, this will make the new seal useless in a few minutes.
 
[QUOTE="angel, post: 50421, member: 83]Edit: On the first photo, I can see some pitting on the input seal journal, this will make the new seal useless in a few minutes.[/QUOTE]

Do you mean where the main shaft passes in the oilseal clutch side?
Is it a big problem? It's likely to make my gearbox useless...
 
At the rear of the input/primary shaft is a roll pin. Drive that out with a punch.
You can put the shaft in a lathe and carefully remove that rust layer.
If you are unhappy with your work, you could ask on the forum if you can get a replacement.
Not too much of a problem, I would think.
 
At the rear of the input/primary shaft is a roll pin. Drive that out with a punch.
You can put the shaft in a lathe and carefully remove that rust layer.
If you are unhappy with your work, you could ask on the forum if you can get a replacement.
Not too much of a problem, I would think.
How much can I remove before making the oilseal useless (because too big)? Or should I need a different oilseal for the new diameter?
 
There are various options...

1. Get another input shaft in good condition.

2. Machine and/or polish this part of the input shaft. Difficult to judge by just one photo if corrosion is too deep. The only way to judge correctly is to turn it down until the surface is perfect, then measure it and check if is too much undersize. If the diameter has been reduced by, say, 0,2mm, an old trick is to use the correct dimension of seal, remove the garter spring, twist it to open, shorten it 1-2mm and reinstalling it. It should put more pressure on the seal lips.

3. If the seal journal has gone seriously undersize, you should find another seal with a proper inner diameter. The next available seal may be smaller, so you should machine the input shaft further. It can be done safely since the seal journal is of bigger diameter than the rest of the shaft, so it's not the critical point of torque transmission.

4. Bearing / industrial supplies shops used to sell "Speedi-sleeves", thinwall sleeves for restoring worn sealing surfaces without having to machine the part or change seal size. I could never find any dimension here, worth checking at your area, though.

5. In the same fashion, your machinist can turn down the shaft and make such a sleeve, if you must keep original seal inner diameter.

I hope I covered you!
 
Thanks Angel, clear and precious as always. A man in a mechanical shop gave me the same advices...
I was wondering abiut the third option, the easiest: e smaller seal could be ruined passing through the splines for fitting...
Whichi is the correct diameter of that part of the shaft (I do not know if I can measure it properly since it is ruined...)? in the afternoon I will try to see how much.

Edit: I had a look on ebay and it seems I can find 16x35x7 and 15x35x7 oilseals (instead of the original 17x35x8, supposing the shaft diameter is 17 mm in that point)... but how can I see if they are suitable for counterclockwise rotation?
 
Hi Azazello, before fitting the smaller oil seal, its best to put tape over the splines so they don't cut into the oil seal rubber
 
I am quite lucky to have a friend with a small lathe;

Now my shaft measures 16.4 mm and looks like this:


Before going further I want to have the right oilseal and machine the shaft until it is suitable for it.
Ordered in a shop 15x35 and 16x35 oilseals, they will be there on friday.
What is the right diameter to be used with them? For the 16x35 the shaft shoul be precisely 16 mm or something more, like 16,2 mm?

The shop is an agriculture suplly, and the oilseal have no rotation sense, they are suitable for both clockwise and anticlockwise rotation. And they seem the same as melun's ones, but way more cheap.
 
You are right, the shaft needs to be machined to 16,00mm.
I hadn't thought that the clutch disc splines will be larzger in diameter and may damage the seal when the cover is being installed, as you pointed out. Cover the splines and make sure the seal is OK afterwards. Also, try to get viton or silicone seal if available, they will last more than normal NBR seals.
 
The gasket set arrived a few days ago but I've seen it misses the paper gasket that should go between the two halves of the gearbox. Asking a friend turned out there wasn't any gasket originally... I thought black silicone was a cheap fix, while it was, as far as I understood, a standard.
I was thinking of putting "non setting" hylomar blue as Paul adviced me for paper and cork gasket; is it the best choice or do you have some sensible advice for me? I planned to close the gearbox tomorrow.
Also: unscrewing the big bolts at the end of the shafts was fairly easy since I used a pneumatic tool; since they have to be screwed at a precise strength I cannot use the same tool to put them back again. I am looking for a proper way to block the shaft while using a dynamometric wrench...
 
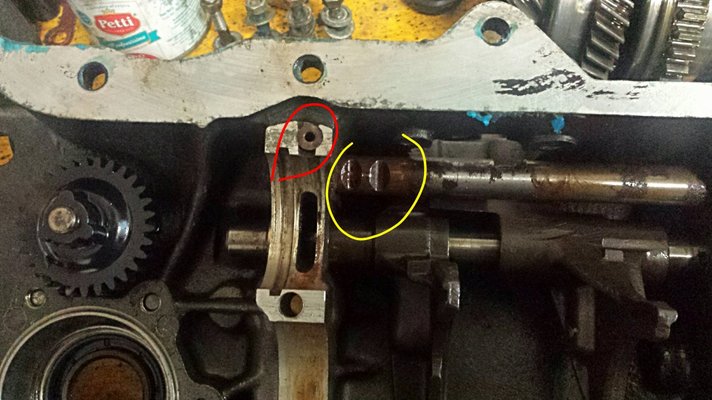
I think I did some damage. While I was mounting all the pieces together I applied a bit too much strenght to the 4th selector shaft and it exited from its place, now runs freely all along.
IMG_20160522_191140.jpg
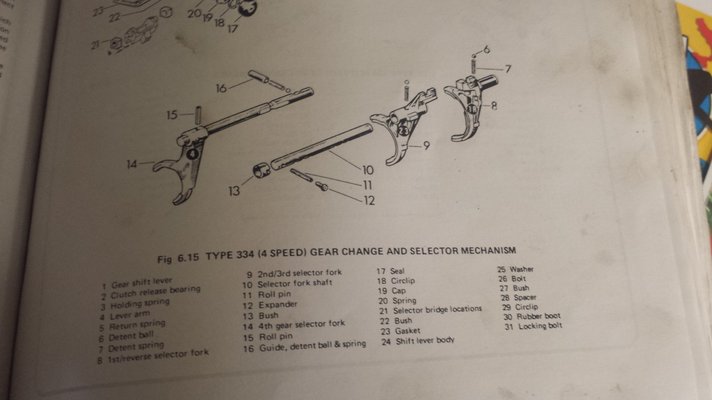
Under the bit in the red circle is a spring and a ball that stops in the grooves circled in yellow.
IMG_20160522_184241.jpg
They should be the parts signed as 16 in the figure.
Very luckily I found the small iron ball lying on my floor, but I wonder how to put it in place again...
I think I should take away the whole assembly and hammer in place again, but I do not know how to extract the locking guide...
Any hint from the expert team?
 
If I qualify as being part of the expert team unfortunately i am also old enough to have been working on R4 when any gearbox issues meant fitting a spare one just lying around in my stores
35 years later if I did take a gearbox apart back then I certainly can't remember anything much about it
Sorry
 
Thanks, Paul...
But I fixed it by myself in the evening!
Found the small ball on the floor (what a lucky guy I am!), while the spring was still in place under its retainer guide.
Haynes manual suggest to extract it punching it down, but there is not enough room in the hole to let it out. So I threaded a 4 mm bolt inside the guide and extracted it a few mm above the line in order to be able to instert the ball again and punched it down again once the shaft was in place.
At 23 o'clock my gearbox was completely mounted on the bench, working (it seems) properly.
 
Back
Top