Clementine's Garage
Clementine the Cat
 
Image of flower
Yellow R4
 
Réparateur d'automobiles

Carb setup

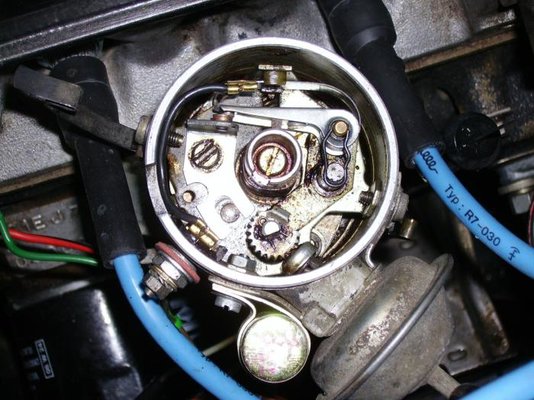
Matt, there should not anything 'officially' in the tube so someone must have put it there for reasons unknown. The only 'restrictor' that Renault did use on some models was a piece of tube at the vacuum end of the distribuor with a tiny hole in it. This was a mod to prevent the vacuum unit from advancing itself too quickly i.e. to reduce the amount of suck. Please do not change the setting on the small cog in the distributor as this is set at the factory.
If the vacuum unit has not been working at all then this may be the cause of your problems. I thought you had checked this out previously.
 
I did check if the vaccum unit was working before by sucking through the tube (removed from the carb end) which did still move the contact but not as much as it does now the paper restriction has been removed - I did not know how much it should move so did not look further than that (ie - in the tube).

It's too late as I removed the vaccum unit and adjuster cog to inspect and did not take note of its origional position :eek: as just as I found out what it doid it had already moved - I presume they would all be in the same position (identical ignition units) ?

There is a small rubber conection on the pipe where it meets the vaccum unit (and carb) but I did not notice a pin hole?
 
The cog is factory set to the advance curve of your engine so not all are the same. As you did not note the original postion then set it half way to the mid position for now.
It sounds as if you don't have the metal restrictor pipe fitted. Don't worry for now. When you get the Haynes manual make sure all the carb settings, ignition timing, compressions etc are correct. Then road test and check performance and if you're happy then leave well alone until you find another F6 owner with the same distributor so you can double check the settings.
Hope your manual turns up soon.
 
OK Steve, will do - I am sure I took a photo of the ignition unit a while back so could see what position it was in maybe from that - I'll have a look now.

Cheers:wink:
 
hi matt
just a thought looking at your clip holding points in there is supposed to be an insulating fibre washer under it, and as clip looks bent maybe it is shorting out and causing problem under vacuum load as it moves ?
 
I agree with all the above plus isn't the clip supposed to be the other way round? plus the contact of the points does not look right either - slightly offset.
 
Hi Mr Reno and Steve - Thanks for all your help -

I have tested the car today (since I found the blockage) and it is 10 times better !:D so am very pleased. The only thing is I need to have the choke slightly on which I know is common on the 4.

The clip is actually not the correct one as the original snapped when I removed it to change the points as it was very week (if you know where I can get another that would be great?) - the clip you can see is the best thing I could find, it's a body clip from an RC kit car !

There is a small dark grey fibre washer under the clip built into the sprung point and can't really be seen in the photo because of the flash.
So the points should in no way make contact with the clip/vaccum pivot point?

Yes your right I noticed that when I first got the car - the points are a little offset and I couldn't work this out ? the new points are the same as the originals (make, length etc - Ducellier by the way but I am sure you can tell). What could this be - could they be the wrong ones?
When the vaccum advances the points though they do align up but I am still not sure if this is correct?
I bought a set from ebay a while back (another set) which were stated for my car - correct year, the same ignition, the same engine size etc but when the arrived were clearly the wrong ones and nothing like mine - I will take a photo to see what you think!

Regards, Matt
 
  • IMGP3919.jpg
    IMGP3919.jpg
    65 KB · Views: 143
Last edited:
the points in the pic are for early 845 small bodied distributor i have aprox 50 spare sets :eek:

after setting dwell correctly
does the reading alter much as revved up, or sucking on pipe at tickover ?
most r4s need timing set slightly different to what book says in my experience and trial and error may be required (although be careful to avoid pinking if over advanced)

it is possible to adjust alignment of points by rotating the central half moon pivot on vacuum unit
not the toothed bit as that will alter the amount of advance for given amount of vacuum

have fun --- paul
 
Hi I do not have any equipment to measure the dwell but have a timestrobe gun to set the timing - at the moment it is set in the middle of the two marks and now as I said runs a lot better than before after removing the blockage from the pipe.

Thanks for the info on aligning the contacts - I will check that tommorrow:D

Cheers, Matt
 
it is possible to adjust alignment of points by rotating the central half moon pivot on vacuum unit
not the toothed bit as that will alter the amount of advance for given amount of vacuum

have fun --- paul

Hi Paul, I've just had a quick look regarding the adjustment of the contacts and can't see what you mean - the only bit I can see that will bring the two contacts inlign (other than the vaccum cam) is the spindle in the middle of the vaccum unit (turn a few turns counter clockwise) but this I suppose would be the same as pivoting the small toothed cam?

Regards, Matt
 
quick reply as short of time - yes the central spindle is eccentric and it should be possible to optimize alignment and will not affect vacuum advance but most modern points are of very debatable quality!!! and may be out of shape
even genuine renault points now have a plastic heel on them rather than hard fibre which is not affected by heat or wears as quickly (unless left dry of course)

paul
 
I have just noticed a strange thing - just got to work and decided to look under the bonnet and noticed small bubbles rising up out of the fuel filter (it is pointing diagonally up) towards the carb - is this normal?
I removed the filler cap on the tank and the bubbles continued the same - they stopped after a f2/3 minutes.

Also, why do you think I have to use the choke a little now after I removed the blockage from the vac pipe?

Kind regards, Matt
 
Bubbles are normal. Now you have your Haynes manual set everything else up as per instructions and stuff that has been mentioned before including inlet manifold gasket check etc. If you still need to use the choke to get decent performance then fit a larger main jet. I had to do this on my car and I got the jets from the Carb exchange. You can also drill it out by one increment at a time with micro drills, fit the jet and road test. I can't remember what size I ended up fitting - it may be in some of my past postings on the subject. All I can say is that it's got lots of ooomph!
 
Thanks once agin steve for all your time - I'll get everything set up/checked ASAP and let you know how it goes - I have the gearbox seals too amongst many other bits (ARB kit, wheel bearings - which I hope is the whats causing the noise at the front I can hear !, gaskets etc) so have quite a bit to do:eek:

I can't seem to get the two contacts to align better than I have but a slight movement of the advance unit and they centralise.

Regards, Matt
 
I'm not sure why your points are doing this but if I can root out a spare ducelier distributor I will have a play with it to see if i can replicate your problem. Saying that, it's not a huge problem but would be better if it were solved. The points are supposed to slide when the vacuum unit operates. On Lucas units the whole baseplate was moved by the vacuum advance unit so the points always stayed in the same position (and got pitted and burnt) but the sliding points never had this problem - they seemed to wear out in a more civilised fashion!!!
 
Here are a few close up photos - as you already know the static point has a bigger surface area than the sprung point. When the car is at idle the full face of the sprung point is over the static one (no overhang) but not in the center (photo one).

in the second photo they are centalised when I apply a little pressure to the vaccum spindle.

The third pic shows how much I have the choke butterfly closed to run at its best - if you can translate this into 0.0mm's so I know how much to enlarge my jet that would be great :wink:

I have not yet adjusted the carb, valves etc by the haynes manual (probably weedend - time permiting) and obviously will adjust the carb last.

Cheers
 
  • Contact alignment.jpg
    Contact alignment.jpg
    41.7 KB · Views: 139
  • Contact alignment with advance.jpg
    Contact alignment with advance.jpg
    45.4 KB · Views: 137
  • Carb choke ammount.jpg
    Carb choke ammount.jpg
    78.7 KB · Views: 171
The 'official' size of the main jet for a IF32 fitted to the smaller engined car is 117. As the 1100cc did not officially have this carb fitted I used 117 as a guide but I still got a little pinking although the performance was ok. As I said earlier, I can't remember the size I fitted to eliminate the problems but I'm guessing it may have been a 119. As I believe your engine compression is lower than the GTL car then try a 115 to begin with or drill out to 1.15mm.

As I have stated before on this web site, I am useless at metric measurements. All I know is that I bought some cheap metric micro drills and one drill fitted my original main jet and the size corresponded with the size stamped into the jet. Not quite sure where to put the decimal point!! Anyhow, I drilled the next size up, road tested etc until I got it as right as I will ever get it.

In my opinion, your 110 main jet is too small so you've got something else to play with now!!!
 
I found your old post and you drilled it out to a 1.18mm I just find it weird that mines a 110 and yours is a 117?

You don't have a spare you could sell me to play around with by any chance?

Doesn't the altitude affect which jets you use?

I have already have a set of microdrills from 1.05 to 2mm on the off chance if I need them after I have set everything up.
 
Last edited:
Back
Top