Clementine's Garage
Clementine the Cat
 
Image of flower
Yellow R4
 
Réparateur d'automobiles

Distibutor timing notch on flywheel? where?

Sprackers

Enthusiast
Messages
353
Location
Tunbridge Wells England
Hi there...again

Right making fist steps to replace distibutor.

First locating the notch on the flywheel

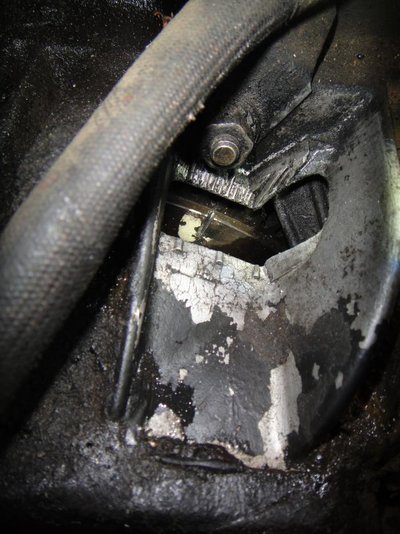
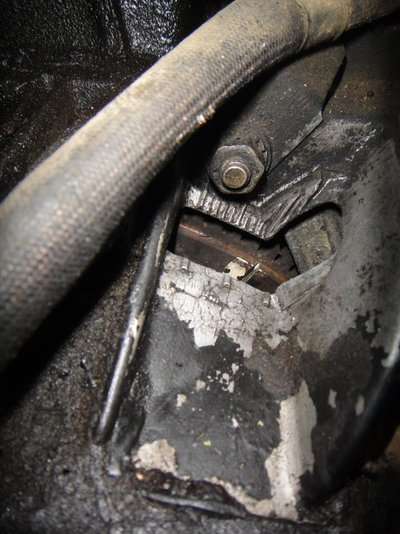
Well I cant see my flywheel!

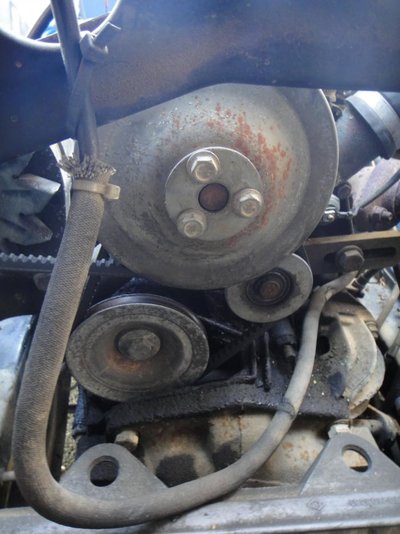
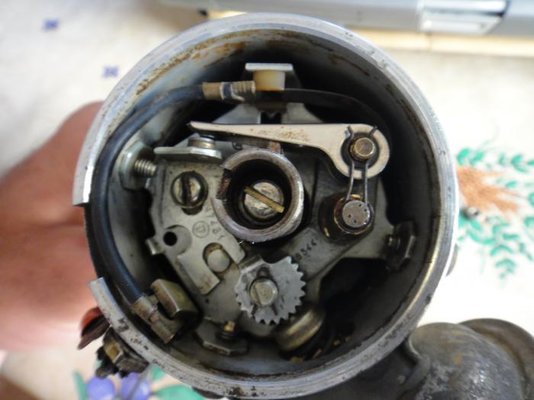
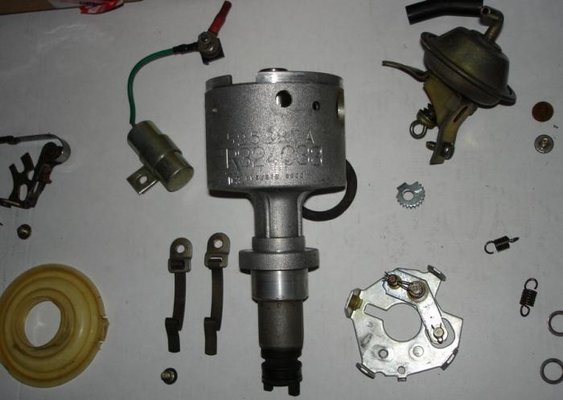
Photo number 1: there are three wheels. Its not them right?


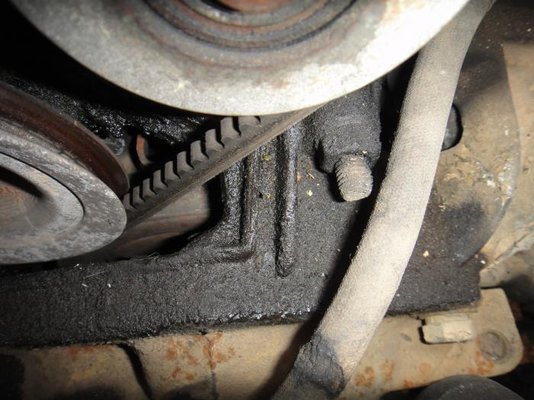
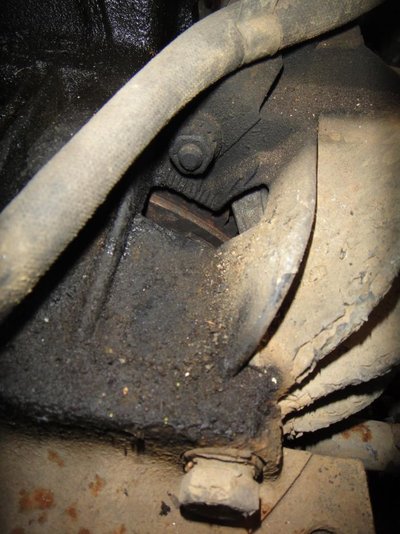
In photo number 2. is that the flywheel through that tiny gap under the other wheels?

And there is not pointer anywhere to line it up with even if there was a notch

According to Haynes Photo the flywheel is open and there is a clear pointer. (page 87).

Mine is totally encased nothing like the photo in Haynes.

See photos

Cheers

Phil
 
  • DSC03526.jpg
    DSC03526.jpg
    77 KB · Views: 231
  • DSC03528.jpg
    DSC03528.jpg
    62.5 KB · Views: 177
I can see it :D

Look behind the belts in your photo and you will see a big steel wheel with teeth on it. Mostly hidden my the gearbox / engine junction.
 
The opening in the gearbox's bell housing is located right behind the long, thin, dirty rubber hose on the right of your pictures.
There you'll see the flywheel, there you'll find all the timing marks you need.

Take this thread as a reference:
http://www.renault4.co.uk/forum/showthread.php?t=3650

BUT - Are you sure that it would'nt be better to have the work done by someone who knows what he's doing?
I mean if you are not even able to locate a flywheel ... :rolleyes:
No offense here, but messing with the timing of your engine is serious stuff!

Anyway - Good luck!

Cheers,

David
 
Cheers Dave

Yup I hear what you say but with the aid of your thread (perfect) plenty of photos, time, patience, Haynes manual and a few beers I am sure I can give it a good go.

IF I had the money then yes I would have already taken it to the mechanic here in France, but they WILL rip me off.

I have a month to go before I have to leave my flat so there is a time a limit of sorts.

Then I set off for Thenay

So its nose to the grindstone and slowely get it done.

Here is a photo of the dizy I bought.

I am a bit worried that the head dowsnt go right down to the lip:

Is that normal?

The guy that sold it to me had another one duclellier dizzy that was exactly the same and he had bought them all as working parts.
Cheers in anticipation of al your help:smile:

Sprackers
 
  • DSC03533.jpg
    DSC03533.jpg
    87.2 KB · Views: 151
  • DSC03534.jpg
    DSC03534.jpg
    32.5 KB · Views: 142
Just had a look at some photos on the internet and it seems this is common.

Anyway here is my Dizzy with new points and new condensateur.:shock:
 
  • DSC03536.jpg
    DSC03536.jpg
    42.9 KB · Views: 144
  • DSC03538.jpg
    DSC03538.jpg
    42.8 KB · Views: 143
You're definitely going to have a problem with that cap.

There's a lug on the inside of the cap that slots into the cut-out in the distributor lip. Twist the cap around a bit to see if it slots in.

At the moment the top of the rotor arm won't make contact with the cap.

If you can't get it to fit, then it's the wrong cap.

Or perhaps the rotor arm has not been fitted correctly. That also has to be turned until it slots in and can be pushed down. Only then can your dizzy cap be pushed down further
 
Last edited:
I agree with Mojo,

You'll need a cap that fits the Ducellier.
Attached is a Picture of my old Ducellier with a proper cap fitted ...
You see - No gap at all.

To swap the Ducellier for the Femsa be aware of that the Ducellier has to be mounted 180 degrees off the position of the Femsa.
(Has to do with the stud underneath the distributor that is off center. There's just one way to put it in properly.)

See that thread as reference on how to do it:
http://www.renault4.co.uk/forum/showthread.php?t=6043
 
  • Ducellier.jpg
    Ducellier.jpg
    38.5 KB · Views: 141
Yes I thought so. Damn it. Even basic engineering can see that the cap should fit snugly right down to the bottom.

The notch in the cap is in the correct position in the photo. And the rotor arm does not hinder the cap as I took the rotor arm off to see if it sat down correctly.

It did not

I can clearly see the lip on the cap is not deep enough for the main body lip of the ducellier.

Now I have already looked on the various websites for a cap and all it says it Ducellier cap.

I cant believe one cap fits all.

Any suggestions so I dont go tooing and frooing buying the wrong cap.


On a plus point Ive not only found the flywheel but also the notch.


"When once I was blind, now I can see"
 
  • DSC03540.jpg
    DSC03540.jpg
    96.1 KB · Views: 151
  • DSC03544.jpg
    DSC03544.jpg
    98.9 KB · Views: 150
Well at least you don't have to worry about not being able to get the help you need to sort your problem out.
 
Some more bad news ...

I think you have the wrong distributor. :?
With the GTL engine you would need the R244D61 Distributor to have the correct advance curve.

The R324C33 distributor's advance curve will not match the GTL specifics.
It is from the 688-11 / C1EJ718 engine off the R4F6.
This specific engine is rated 34hp @ 5000 RPM not like the GTL engine that delivers 34HP @ 4000 RPM.

Your car will run with the R324C33 distributor, but I'm afraid with the wrong advance timing not satisfying at all.
 
It'll be fine - bung it on. Wear over the years and differences in petrol will have as much effect as differences in advance curve. At the very least it might run for more than 10 miles.

It's well worth buying a manual for the car. In the UK they are written by Haynes and are available on eBay.co.uk. Useful for fitting a new distributor as it's not straightforward.
 
Got the Manual already and reading up as we speak. although soemphotos are not the same as my engine.

By the way David my car is a TL but i guess your obsevations still apply.

I think I will get this one in, at least I will be able to move it.

What about the new distibutor head.

there are loads of heads on the internet but all just say Ducellier.

Does one size fit all?

A lot say 55mm diameter.

I assume thats the interior measurement of the distibutor itself.

Am I right?

I have measured the interior of mine (R324C33 - 525387A) and it is 58mm-59mm.

Am I being to picky? have i got it wrong?
 
Hi Angel Malcolm

I was reading with interest an earlier thread you both replied to re: Spanish TL models.

Yes mine is too a TL but with the 688 - 7/91 engine which is a 1.1 you both pointed out.

Angel you wrote back on 2007...

"Your distributor is a very late type (judging from the vacuum advance unit). Unfortunately I don't have any data for the R296, nor could I find engine type 688-D7/91. It seems that someone replaced the engine of your TL with the 1108cc one and it should be a very late one (or maybe Spanish production). It is a GTL high compression engine, so here is the advance curve R324 (also late GTLs, to use as a guideline):

0 deg. @ 1100 rpm
12-16 deg @ 2200 rpm
29-33 deg @ 5000 rpm

Advance figures are taken without considering static timing (that means at 0 degrees static advance) and with vacuum tube disconnected. Speed is engine rpm.
I hope this is helpful."

Does this mean that my Ducellier R324C33 dizzy is actually OK for my car?

Cheers

Sprackers
 
Hi Sprackers,

according to my '86 Renault engine manual the 688 engine will need the following advance curves:

0 deg. @ 1200 rpm
5-9 deg @ 2000 rpm
32-36 deg @ 5000 rpm

It will need the D61 vacuum advance unit, not the C33.
In the manual there's no difference between GTL and TL.

Here's a scan of the page:

attachment.php


But you should give the distributor a try!
As Malcolm pointed out - improvements in petrol quality nowadays and more important - wear of the inner springs that the centrifugal advance system consists of - will change the whole timing over the Years anyway.

Here's a Ducellier taken apart ...
You can see the little springs of the centrifugal advance unit on the far right side of the picture ...

Cheers,

David
 
  • R324C33.jpg
    R324C33.jpg
    36.7 KB · Views: 109
Ok a bit confused here....although I have read all your threads.

In the photo below is my TDC at 0? ie = being the left of the 3 marks on the bottom of the bell houseing according to a previous threads by DavidN.

When starting the timing procedure, some say (Haynes) start by putting your flywheel notch at TDC.

Does this mean '0' on my bellhousing.?

Then all timing tutorials and forums talk of BTDC and I know mine is around the 6º +/-1 (that from manuals and from observing the position of the rotor arm on my old dizzy when it was pointing directly at the #1 contact point inside my dizy and then looking at the position of the flywheel) Both read 7º (see photo)

My question is:

Why start at TDC (ie '0') on the bellhousing, when one knows that you correct position is for example 6º or 8º?

ps. fitted new dizzy and didnt fire up.
 
  • DSC03563.jpg
    DSC03563.jpg
    101.4 KB · Views: 93
Sprackers, line the notch on the flywheel with the 6th line on the back or the middle bump in the front.

At this point your rotor should be facing the No1 cylinder cable on the inside of your distributor cap. If it's not, then rotate the flywheel one more complete revolution.

Then loosen the nut slightly at the base of your distributor so that you can rotate it.

Turn your ignition on!

With the flywheel in that position the points should just be opening. As they open you will hear a click, that's the spark. Turn the distributor until you hear the "click". Then tighten the bolt again and try start your car.

Fine tuning can be done by moving the dizzy when the engine is running(until it sounds right)

Also check that your points have a good surface and the gap is set correctly when at their widest (,4mm)
 
Trying to get the timing right.

Ok all

I have put everything dogether and tried you method Mojobaby.

I turned the notch in the flywheel to the middle mark on my bellhousing

I checked the rotor arm was pointing at number 1 plug lead terminal inside the dizzy

I replaced the head and can hear the click as I twisted the dizzy and as soon as I heard it I tightened up the dizzy.

She wouldnt start.

I checked the gap between the points. (I dont have a feeler guage so im doing it by eye. A credit card is apparently 0.75mm so half is about 0.4)

I opened them a little and then re did all the steps

Notch - middle
Dizzy - pointing at number 1 plug lead
replaced head -waited for click - tightened up.

tried it again and no joy, although after turning the ignition key for about 10 seconds it just started but with no force just barely then cut out straight away.

I then tried with the notch (flywheel) before and after the middle marker but stil with no joy.

What should I try next?
 
Presumably you've now got a different dizzy cap that fits properly?

Have you checked the condition of the points and rotor? not pitted at all and a good surface? Your battery fully charged?

I think you should just tweak the position of the distributor a little. From your description I think you should advance the timing a little. That means turn your dizzy anti-clockwise, just 1-2 mm at a time.

sorry Sprackers, I don't always follow the book religiously, I tend to play it by ear! So that's the way I would do it.

Maybe someone else has a better solution?
 
Last edited:
Back
Top