Clementine's Garage
Clementine the Cat
 
Image of flower
Yellow R4
 
Réparateur d'automobiles

no spark.. changed everything related to the distribution/ignition and still not working!

Gabriele

Photographer - Automotive Engineering student
Messages
22
Location
Reggio Emilia - Italy
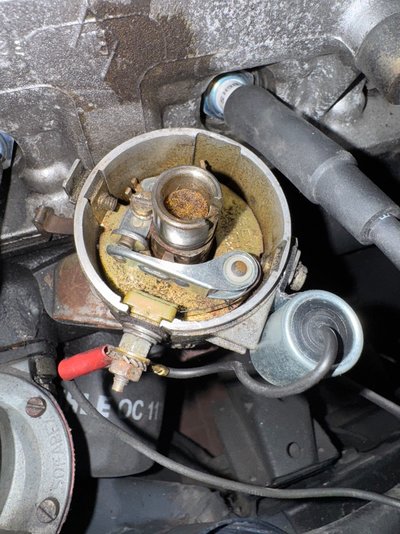
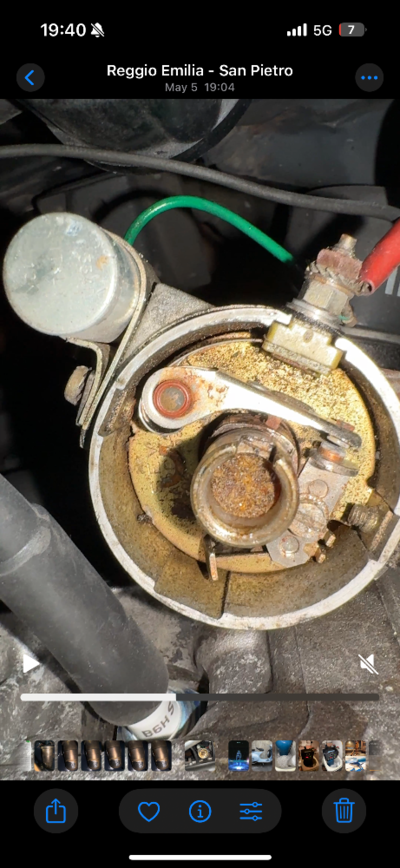
hey everyone! the car in question is a 1982 Renault 4 TL (so 845cc 4cyl 4 speed manual, billancourt engine and sev-marchal distributor). the car has got about 180.000km, has been regularly serviced and we just finished restoring it last year.

a couple of weeks ago, I took it out of the garage it sits in during the winter for a little shake off. I had been there repeatedly during the winter to start it up and make sure everything was fine. taking it out, it started up on the first try with a little choke and took me to the grocery store just fine. once there, I parked it, went in, and when I came back out it wouldn't start.

after about 4 hours of fucking around, it somehow started with only 2 cyls, so I brought it back to the garage (very very short trip, less than 500m) and parked it there. it now won't start at all, unsurprisingly.

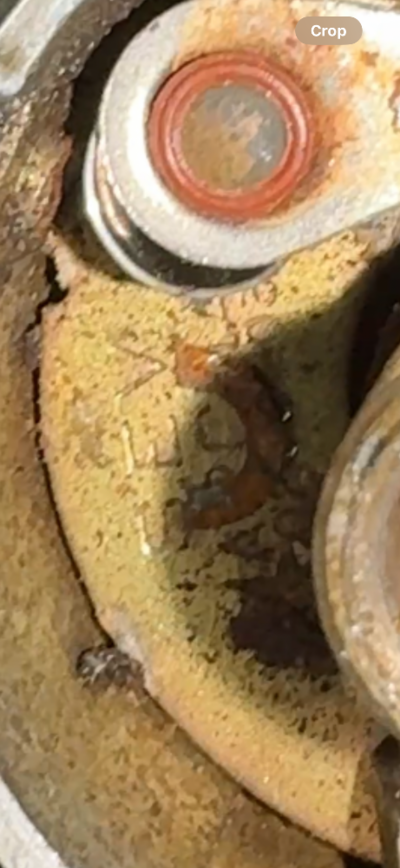
the engine wasn't getting a spark, so I changed (in this order): spark plugs, distributor head and plug cables, distributor contacts and capacitor, ignition coil. battery is good and engine turns, but it's still not getting a spark so it's not starting. fuses are all good. I checked for continuity and the ignition coil should be getting power.

at this point I have no clue what it could be. my best guess is a random cable went bad and I just can't figure out where it is. any of you guys have a better idea about what it could be?
 
Hi

The only ignition part you don't seem to have changed is the rotor arm. Sometimes these develop a hairline crack in them.

Another thing to look at is where the condenser cable makes contact with the distributor body, there is a fibre washer or plastic housing which prevents a shorting out. These can disintegrate over time.

In addition, are the ignition coil positive and negative cables in good shape, break in wire, corrosion/fraying of cables at connector ends?
 
I'd say back to old school automotive engineering :D
 
Hi

The only ignition part you don't seem to have changed is the rotor arm. Sometimes these develop a hairline crack in them.

Another thing to look at is where the condenser cable makes contact with the distributor body, there is a fibre washer or plastic housing which prevents a shorting out. These can disintegrate over time.

In addition, are the ignition coil positive and negative cables in good shape, break in wire, corrosion/fraying of cables at connector ends?
thanks for the reply!
rotor arm was changed a couple years ago by my dad before we got it restored, but I'll have a better look at it tomorrow. I already checked the plastic washer and ignition coil cables, all good. checked with a multimeter, and it does show continuity from battery to ignition coil
 
I'd say back to old school automotive engineering :D
Yes, you need to change only ONE thing at a time! Here we go:

Check the following, in the following order:
1/ Is the timing "spot on"? Check it is and, if it isn't, adjust accordingly.
2/ Remove one of the sparking plugs and rest it on the top of the engine, with its H.T. lead still connected. When the engine is turned over, you should see a blue spark across the plug's terminal. If you don't there's fault in the wiring.

Report back after these tests with the answers. More advice afterwards.....
I did change things one at a time, in the order I posted above. basically try one, then think of what else it could be, go get the new piece and install then repeat.
no spark still, already checked, hence why I'm puzzled. I have 0 idea where the wiring fault could be.
timing should be correct, but for correctness' sake I'll go snag a timing light somewhere and check.
 
Hi again

I re-read your thread and wondered over the fact that after 4hrs of fettling you managed to get the car started but it was only running on 2 cylinders. I'm wondering whether you might have put the HT leads back in the wrong order (easily done in the heat of the moment, when you are caught up at the side of the road trying to diagnose a fault and all you want is for the car to start and get on your way ).The firing order should be 1342.
that could totally be. the rotor arm spins clockwise, right? I'll check that the cable order is right when I go there later today.
 
I did change things one at a time, in the order I posted above. basically try one, then think of what else it could be, go get the new piece and install then repeat.
no spark still, already checked, hence why I'm puzzled. I have 0 idea where the wiring fault could be.
timing should be correct, but for correctness' sake I'll go snag a timing light somewhere and check.
If you've no spark at the plug when the plugs earthed to the engine block & the engine's turning over there's no H.T. current reaching the plug. I'd suggest going back one stage and confirm there's 12 volts at the coil's "+" terminal when the ignition's on. If there is, open the distributor & confirm the same 12 volts is on one side of the distributor points when they're open and zero when they're closed. Report back with the answers to these points and I'll suggest the next course stage......
 
If you've no spark at the plug when the plugs earthed to the engine block & the engine's turning over there's no H.T. current reaching the plug. I'd suggest going back one stage and confirm there's 12 volts at the coil's "+" terminal when the ignition's on. If there is, open the distributor & confirm the same 12 volts is on one side of the distributor points when they're open and zero when they're closed. Report back with the answers to these points and I'll suggest the next course stage......
12v is getting to the coil no problem, but i’ve found an issue with the second test: it’s giving continuity with points open AND close! that means there’s a short circuit somewhere right? what do you think it could be? just doublechecked the plastic washer where the condenser connects and it’s all good.
 
It sounds like we've (you've!) isolated where the problem is. Yes, there seems to be a short-circuit, as the points act like a switch; their opening and closing switches the coil power on and off. To start with, I would remove the points and then re-fit them, making SURE the side connected to the wire from the coil is sitting on a plastic base, and so is isolated from the distributor body. As you've probably found, a good multi-meter is helpful here. Remember, one side of the points are always earthed and the other side alternate between earth and +12 volts.

The points might be defective, so if you can't find out why they're earthing all the time, perhaps you need a new set of points.

Good luck! More help available if you need it!
as you can see from this pic i took earlier, the spring seems to be sitting nicely in the plastic and as such should be isolated. i’ll try removing it and checking better with a multimeter when i get the chance
don’t mind the fact that the points gap is wrong, i fixed it later.
 
  • IMG_2470.jpeg
    IMG_2470.jpeg
    328.7 KB · Views: 11
Hi Gabriele
Is the moving part of the points clear of the distributor body where I've arrowed it?
1747752019456.jpeg
 
that’s an interesting question - i will definitely check that. maybe the new point has a slightly too long spring and it touches the body. maybe the condenser screw is a little too long and it touches.
 
that’s an interesting question - i will definitely check that. maybe the new point has a slightly too long spring and it touches the body. maybe the condenser screw is a little too long and it touches.
these are the old points - besides the distance being fucked up (we had moved them while trying to figure out what was wrong), you can definetely see that the spring is sitting differently and not as close to the body of the distributor. we might have the culprit! will have to check when i get back.
 
  • IMG_2464.png
    IMG_2464.png
    739.8 KB · Views: 10
Hi

Those cams look dry, they could do with a very sparingly light greasing. Add a little drop of light oil to the circular felt sitting in the recess at the top of the distributor shaft for good measure.
 
Condenser holding screw being too long and eventually touching the points spring (after many years of trouble free running) was the most recent breakdown I had on my 845, coincidentally with the same distributor.
 
As the screw's the correct one to use I'd be tempted to add a small washer to the outside, to shorten its length inside the distributor body. In this way everything else would be at tight as before, but the screw would no longer be able to contact the points spring.
 
i’ll definitely check the screw length, but while rewatching pictures i noticed this in the old ones! this was from the first time we opened the distributor, and it isn’t in newer pictures, so either me or my dad took it out, but it definitely looks like a broken washer to me. is there supposed to be an isolating washer underneath the lever?
 
  • IMG_2483.png
    IMG_2483.png
    745.9 KB · Views: 2
This screw acts as the earth return for the capacitor, so must NOT be insulated. The metal clamp around the casing of the condenser is tightly held in place this screw, which earths the body of the capacitor.

The points and spring should sit on plastic; they ARE insulated from the distributor body. The green wire from the coil passes through the distributor body and connects to the moving part of the points, and none of these parts are earthed to the distributor body. The capacitor IS earthed to the distributor body through the screw securing it to the body, but this screw MUSTN'T touch the spring that tensions the points. I hope this helps!
 
Back
Top