Clementine's Garage
Clementine the Cat
 
Image of flower
Yellow R4
 
Réparateur d'automobiles

Brake disc and pad replacement

Paul Narramore

pre-moderated
Messages
840
Location
Aylesford, Kent
Right, about time I replaced the discs and pads on my 1986 GTL so a quick look at Clementine's tips and - what could possibly go wrong. An order to Mr Auto and the parts promptly arrived.

Brake discs - Ferodo DDF016
Brake pads - Ferodo FDB113
Accessories - Ferodo FBA415

Plus a can of brake cleaner.

With the tyres on the ground, central cap off and undid the main nut. Wheel nuts off and car jacked up to a decent height. Now these calipers look odd to me, and unlike any I've come across before. They appear to be Girlings - Bendix must appear on other cars. A decent illustration in Haynes would have been nice. Removed the two tiny clips - new ones in the accessory pack - and using a thin steel drift and copper mallet drifted out the tight wedges (2). I pulled half of the caliper away and rested it on top of the suspension.

I intend, by the way, to clean up the calipers and paint them with yellow caliper paint. There's a lot of rust down there, fortunately not in the chassis or inner wings and these calipers might not have been apart in years.

Right removed the remaining caliper halves. The hexagon bolt heads are behind the discs and don't fit any spanner or socket I have, in fact no socket would fit in the confined space. The hex heads are M18, another bastard size after the M7 I came across earlier, and of course I have no M18 spanners. No imperial A/F spanner would fit either. Down to Machine Mart and I bout the last remaining M18 combination spanner in stock. Arrived home and as the car is outside and it's too dark to start again, I shall return tomorrow to it.
 
They are bendix on that car
You need to pull the front wheel bearing apart to replace discs the 2 18 mm bolts easily accessible once you undo driveshaft nut and using copper hammer tap shaft back 20 mm
Now 3 choices hit disc from behind and if you are lucky it will remove hub bearing and drive flange in one go do not undo 6 13 mm bolts first until it's off
Note the spacer inside hub
If this doesn't work a 3 stud slide hammer very rare tool will pull it off
Or give up remove whole hub and get garage to press apart
Maybe fit new bearings or fresh grease at the very least while you are at it
 
Paul, I wasn't ignoring you, it's just that I haven't been working on the car every day. The two M18 bolts were undone using my newly bought spanner - one taking 45mins to undo! The disc came off with some thumping with my copper mallet. The split bearing is an interesting one as the twelve ball bearings are separated by a fair gap. What I thought was a protective seal is in fact a plastic 'cage' to keep the balls apart. Once further grease is added, the balls have subsequently moved and disappeared under the grease so some had to be removed. Another 30min job which should have taken minutes. I popped the piston out, well I was only going to get it part way out but hey ho, and found that the piston and bore was fine and just needed a clean up. Unfortunately, as you suggested, I must have stretched the rubber dust cover as it absolutely refused to fit back into the groove and then it split. New pack of rubbers on order (Renault 7701201779). With the callipers cleaned up - oh how rusty they were! - a coat of red oxide followed by four coats of Halfords Calliper paint. Utter rubbish and like painting with milk. Even after four coats, the red oxide was still showing through. I am now trying an alternative aerosol version.

The old pads were only 50% worn and could have had some more miles on them but the discs were pretty ropey. The new Ferodo discs look as if they'll last the life of the car. I'm interested to see just how much of an improvement they'll be.

Incidentally the brand new radiator I fitted a couple of weeks ago was an NRF 54683, a British made rad, and available on eBay from ArksGlobal for less than £40.

All work has now come to a halt until the rubbers arrive.
 
We've had rain during the last couple of days and as I have to work on the car outside, little has been done. The pack of replacement rubbers arrived this morning, and then I discovered the set only covered one calliper only. Anyway, never mind, a week to change one disc and a pair of pads isn't too bad, is it? I had a go at fitting the dust cover to the calliper then pressing the piston into the calliper. That wouldn't work and I was afraid of splitting the dust seal (again). Then I attached the seal to the groove in the piston and tried that way. It worked as I simply pressed the bottom of the seal into the other groove. New wobbly springs attached and then spent ages struggling to get the bent wire springs back in place. It's been a week since I took the calliper off. The yellow paint now looks a thorough mess as the few runs still hadn't dried properly. Maybe I'll touch them up once back on place. I've worked on disc brakes over the years but never have I come across callipers as damned fiddly as these Bendix ones. Oh well, if it's dry tomorrow, they can go back on and I can start on the other side. Might even be finished before Christmas.......
 
Well this 'quick fix' is taking for ever. O/S brake caliper painted, pads installed and all back on the car. The Bendix refurb kit turned out to be for one side only, not that the eBay description mentioned that, so I ordered another kit from another supplier. Here we are on 21st December and they've still not arrived. After removing the N/S caliper, (I found that the rubbers were leaking) I decided this time to dismantle it, paint it, and reassemble it in the vice rather than on the car. Much more accessible that way and I can see what I am doing.

With the rusty wheels off I've thought about repainting them. They are in very poor condition and with ageing tyres so I may take them to a tyre depot and have them removed, then take them to a grit blaster and have them painted, or (being a bit lazy) just rub them down with wet & dry and give them a few coats of zinc primer, Silver Wheels and lacquer. But with the car being off the road and up on axle stands for the past ten days, I am keen to get her going again.
 
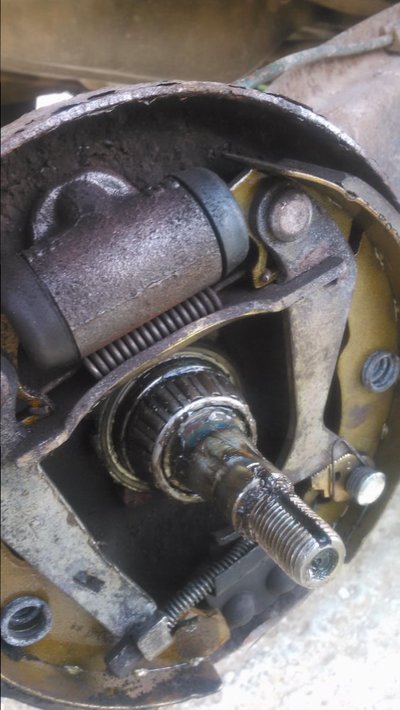
Hello, sorry for hijacking this post a bit, but it's more or less relevant. How do i take off the ball bearing so i can replace it? I'm not able to take it out, am i missing simething or i just need to force it a bit more?
Please, reply asap with any tip regarding this.

20171013_163122.jpg

Thank you..
 
Groot plesier Barry, It is an excellent site, I refer to it very often,Good luck with the grinder:)
 
Back
Top