Clementine's Garage
Clementine the Cat
 
Image of flower
Yellow R4
 
Réparateur d'automobiles

Complete Floor panel renewal.

Lux renault

Enthusiast
Messages
6
Location
Luxembourg
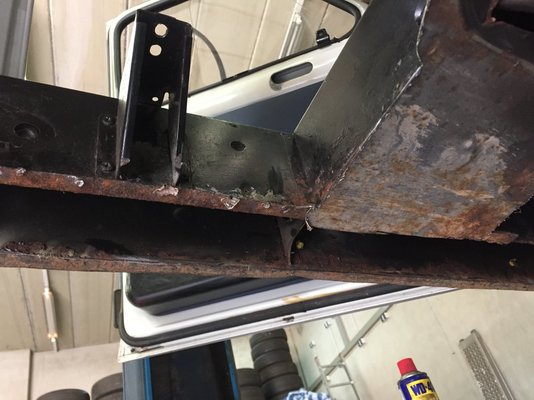
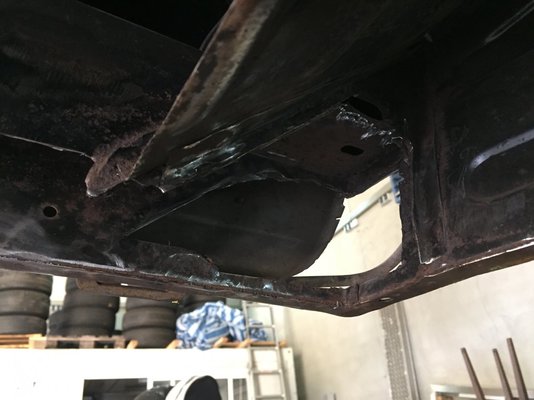
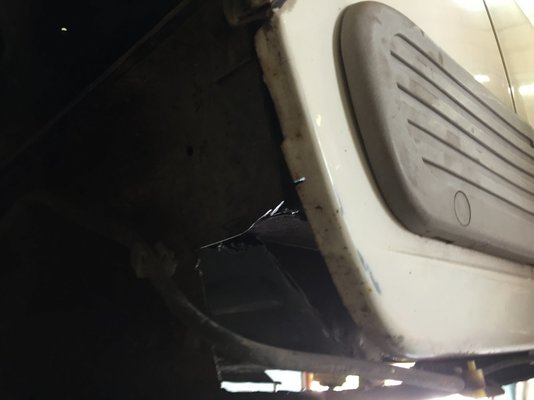
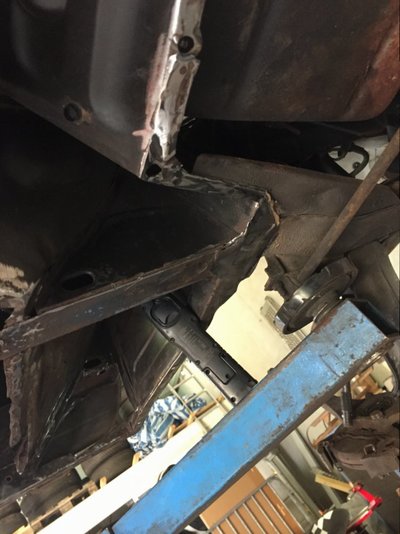
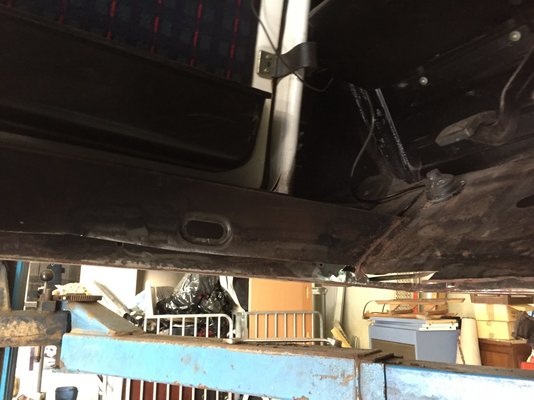
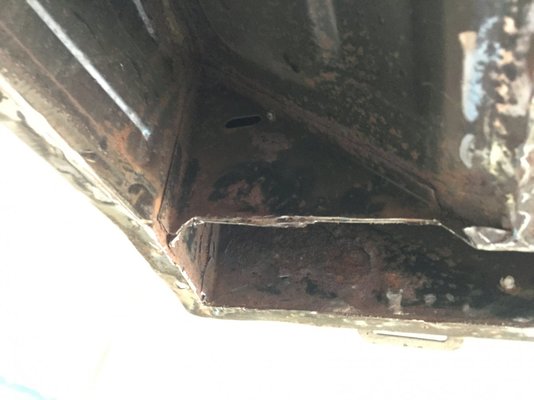
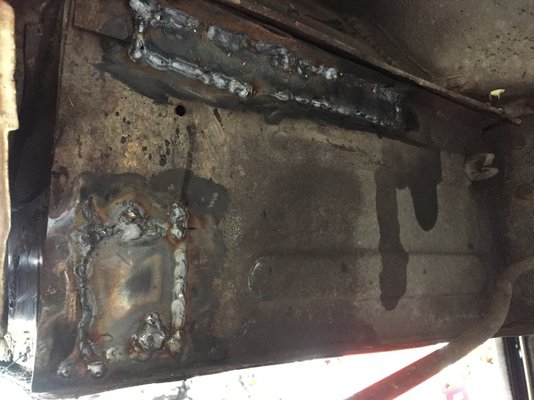
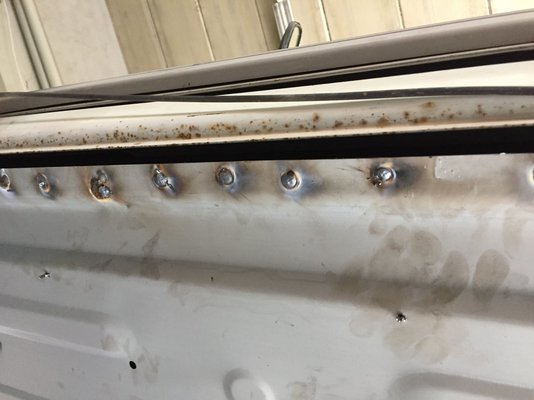
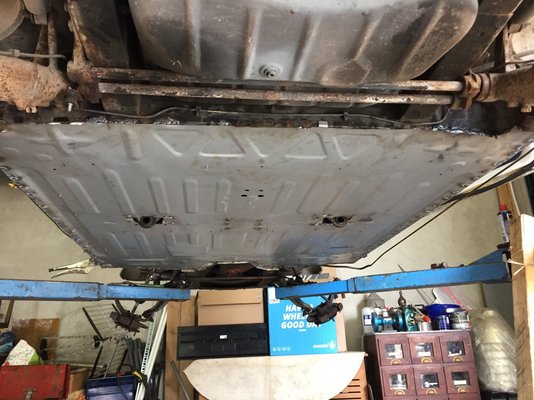
Apologies for having just joined and asking questions straight away, however I am trying to help out a Damsel in distress... she has a Renault 4, aprox ‘76-78 model 4 door that for its 117,000 Ks is in fantastic condition...apart from the floor panel and the rear subframe arms where the rear torsion bars attach.
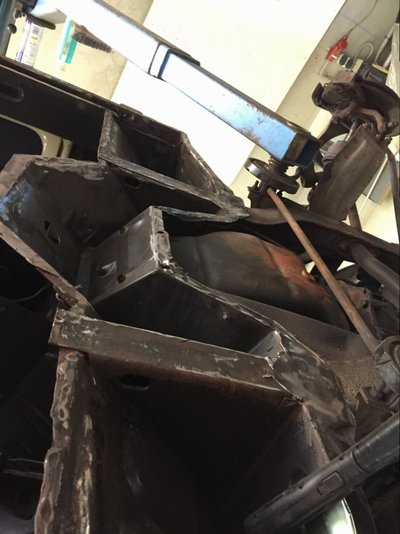
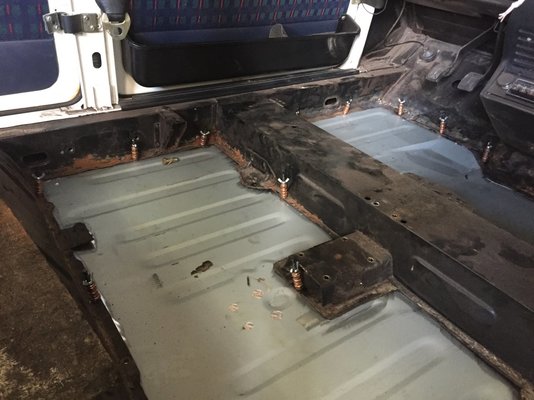
I have bought a complete new floor plan for Francoze.de as this is knackered, and could do with complete renewal, the rest of the lower cross beams and panels/sills are still in great condition. I have read some of the posts here, but was wondering if anyone can offer some advice on cutting out the old floor pan and welding in the new one complete. Will the subframe flex at all on the ramp, (keeping body on) ...two post variety. Also I think another headache will be releasing the front torsion bars... (Haynes manual ordered!!!)
So has anyone done this and have some advice for a guy new to R4’s and as an ex-mechanic was never a French car fan, but this little thing is in such great condition it deserves a worthwhile restoration!
 
Well, very quiet here... so I have set about cutting the floor out... new one ordered, and will clean up what’s left before welding up...going to do it in two steps, floor pan first then the rear subframe...0FAEE2BC-EE5D-43F2-A0CD-7F3805EBED0F.jpegD7598D3B-1DBC-472B-B13B-397192D81E72.jpeg0FAEE2BC-EE5D-43F2-A0CD-7F3805EBED0F.jpeg0FAEE2BC-EE5D-43F2-A0CD-7F3805EBED0F.jpeg0FAEE2BC-EE5D-43F2-A0CD-7F3805EBED0F.jpegC5ACE849-BC04-40E3-A61F-FC9662EE664E.jpeg0FAEE2BC-EE5D-43F2-A0CD-7F3805EBED0F.jpegD7598D3B-1DBC-472B-B13B-397192D81E72.jpegDC4C372B-DDF6-4F1C-90D5-9126A1C4175B.jpegC5ACE849-BC04-40E3-A61F-FC9662EE664E.jpeg2103FEFA-7FB9-43A9-974A-D4A4806DDF3C.jpeg0816FFD3-65C3-4B65-A7F1-969B161C2833.jpegB4A95770-2F0A-4ACE-BC20-2FEA55C831AE.jpeg0FAEE2BC-EE5D-43F2-A0CD-7F3805EBED0F.jpegD7598D3B-1DBC-472B-B13B-397192D81E72.jpegDC4C372B-DDF6-4F1C-90D5-9126A1C4175B.jpegC5ACE849-BC04-40E3-A61F-FC9662EE664E.jpeg2103FEFA-7FB9-43A9-974A-D4A4806DDF3C.jpeg0816FFD3-65C3-4B65-A7F1-969B161C2833.jpegB4A95770-2F0A-4ACE-BC20-2FEA55C831AE.jpeg0FAEE2BC-EE5D-43F2-A0CD-7F3805EBED0F.jpegD7598D3B-1DBC-472B-B13B-397192D81E72.jpegDC4C372B-DDF6-4F1C-90D5-9126A1C4175B.jpegC5ACE849-BC04-40E3-A61F-FC9662EE664E.jpeg2103FEFA-7FB9-43A9-974A-D4A4806DDF3C.jpeg0816FFD3-65C3-4B65-A7F1-969B161C2833.jpegB4A95770-2F0A-4ACE-BC20-2FEA55C831AE.jpeg0FAEE2BC-EE5D-43F2-A0CD-7F3805EBED0F.jpegD7598D3B-1DBC-472B-B13B-397192D81E72.jpegDC4C372B-DDF6-4F1C-90D5-9126A1C4175B.jpegC5ACE849-BC04-40E3-A61F-FC9662EE664E.jpeg2103FEFA-7FB9-43A9-974A-D4A4806DDF3C.jpeg0816FFD3-65C3-4B65-A7F1-969B161C2833.jpegB4A95770-2F0A-4ACE-BC20-2FEA55C831AE.jpeg46AC7F9D-66BB-4357-9901-61AFD16899BF.jpeg0FAEE2BC-EE5D-43F2-A0CD-7F3805EBED0F.jpegD7598D3B-1DBC-472B-B13B-397192D81E72.jpegDC4C372B-DDF6-4F1C-90D5-9126A1C4175B.jpegC5ACE849-BC04-40E3-A61F-FC9662EE664E.jpeg2103FEFA-7FB9-43A9-974A-D4A4806DDF3C.jpeg0816FFD3-65C3-4B65-A7F1-969B161C2833.jpegB4A95770-2F0A-4ACE-BC20-2FEA55C831AE.jpeg46AC7F9D-66BB-4357-9901-61AFD16899BF.jpeg0FAEE2BC-EE5D-43F2-A0CD-7F3805EBED0F.jpegD7598D3B-1DBC-472B-B13B-397192D81E72.jpegDC4C372B-DDF6-4F1C-90D5-9126A1C4175B.jpegC5ACE849-BC04-40E3-A61F-FC9662EE664E.jpeg2103FEFA-7FB9-43A9-974A-D4A4806DDF3C.jpeg0816FFD3-65C3-4B65-A7F1-969B161C2833.jpegB4A95770-2F0A-4ACE-BC20-2FEA55C831AE.jpeg46AC7F9D-66BB-4357-9901-61AFD16899BF.jpeg0FAEE2BC-EE5D-43F2-A0CD-7F3805EBED0F.jpegD7598D3B-1DBC-472B-B13B-397192D81E72.jpegDC4C372B-DDF6-4F1C-90D5-9126A1C4175B.jpegC5ACE849-BC04-40E3-A61F-FC9662EE664E.jpeg2103FEFA-7FB9-43A9-974A-D4A4806DDF3C.jpeg0816FFD3-65C3-4B65-A7F1-969B161C2833.jpegB4A95770-2F0A-4ACE-BC20-2FEA55C831AE.jpeg46AC7F9D-66BB-4357-9901-61AFD16899BF.jpeg0FAEE2BC-EE5D-43F2-A0CD-7F3805EBED0F.jpegD7598D3B-1DBC-472B-B13B-397192D81E72.jpegDC4C372B-DDF6-4F1C-90D5-9126A1C4175B.jpegC5ACE849-BC04-40E3-A61F-FC9662EE664E.jpeg2103FEFA-7FB9-43A9-974A-D4A4806DDF3C.jpeg0816FFD3-65C3-4B65-A7F1-969B161C2833.jpegB4A95770-2F0A-4ACE-BC20-2FEA55C831AE.jpeg46AC7F9D-66BB-4357-9901-61AFD16899BF.jpeg0FAEE2BC-EE5D-43F2-A0CD-7F3805EBED0F.jpegD7598D3B-1DBC-472B-B13B-397192D81E72.jpegDC4C372B-DDF6-4F1C-90D5-9126A1C4175B.jpegC5ACE849-BC04-40E3-A61F-FC9662EE664E.jpeg2103FEFA-7FB9-43A9-974A-D4A4806DDF3C.jpeg0816FFD3-65C3-4B65-A7F1-969B161C2833.jpegB4A95770-2F0A-4ACE-BC20-2FEA55C831AE.jpeg46AC7F9D-66BB-4357-9901-61AFD16899BF.jpeg0FAEE2BC-EE5D-43F2-A0CD-7F3805EBED0F.jpeg0FAEE2BC-EE5D-43F2-A0CD-7F3805EBED0F.jpegD7598D3B-1DBC-472B-B13B-397192D81E72.jpegDC4C372B-DDF6-4F1C-90D5-9126A1C4175B.jpegC5ACE849-BC04-40E3-A61F-FC9662EE664E.jpeg2103FEFA-7FB9-43A9-974A-D4A4806DDF3C.jpeg0816FFD3-65C3-4B65-A7F1-969B161C2833.jpegB4A95770-2F0A-4ACE-BC20-2FEA55C831AE.jpeg46AC7F9D-66BB-4357-9901-61AFD16899BF.jpeg
 
  • 384525CB-BB50-48E1-AA0D-B05B6B8B4974.jpeg
    384525CB-BB50-48E1-AA0D-B05B6B8B4974.jpeg
    188.3 KB · Views: 1
  • 5A651BC0-8DDD-49AB-B781-D58AC3AD7728.jpeg
    5A651BC0-8DDD-49AB-B781-D58AC3AD7728.jpeg
    187.7 KB · Views: 1
Hi Lux, I think that most people opt for the "body off" method when they do this type of repair. Probably because its a relatively straight forward operation, and also because not everyone has access to a lift.
But you seem to know what you're doing and as I've never done it before I look forward to following your progress, so good luck!
 
Thanks, sorry about the mass repeat of pictures, but I can’t seem to delete the duplicates... from the floor up, car is ok, so hence my “body on” option... still haven’t taken the torsion bars off, as not sure how... but Haynes manual comes today...hope it’s not in French!!!
 
You need a special tool in order to remove and refit the torsion bars. They have to come off, they get in the way if you have to replace the complete front floor.
If the rest of the chassis is sound, there is no risk of it flexing when the floor panel is cut off
You will find that it's necessary to remove the body in order to repair the rear arm mountings, there is no practical way to weld correctly at this place with the body attached. It's easy with a two post lift, I remove the doors and lift it from the top of the door frame.
The car is post-83 model year, probably 1986 or later.
 
Hi Lux, first of all a very warm welcome on the forum!

Judging on your photos, I would strongly consider to take off the body, remove the engine, front suspension (you need to do that anyway) & flip over the chassis. To weld a complete floor panel from bottom side up, it would be very very exhausting and will kill your shoulders. I totally understand it will feel like a restoration, but I really think it will save you time and effort doing so!

This was my floor plan, it works much better instead of fighting gravity the whole time :rolleyes:
12182945_1685139418386574_5621435320846305686_o.jpg

1602271.jpg
03-03-16 - 2.jpg

Good luck!
 
You need a special tool in order to remove and refit the torsion bars. They have to come off, they get in the way if you have to replace the complete front floor.
If the rest of the chassis is sound, there is no risk of it flexing when the floor panel is cut off
You will find that it's necessary to remove the body in order to repair the rear arm mountings, there is no practical way to weld correctly at this place with the body attached. It's easy with a two post lift, I remove the doors and lift it from the top of the door frame.
The car is post-83 model year, probably 1986 or later.

Well the floor is all cut away, and no flexing, I left the cross middle member boxed with a part of the floor to give it strength, so hope for no flexing... torsion bars are off, thanks to Mr Haynes Manuel, and floor will be welded next week, got a mate who is an aircraft mechanic, so we will use the pop Fastners they use to attach aircraft skin, to secure the floor and then spot weld it, so as to have it secure and not flexing...!!!E451A120-1C6D-4680-9F89-52F0AC6CA837.jpeg
 
  • BB6CF4C1-3ECE-4F67-8F69-0C11F2C4E727.jpeg
    BB6CF4C1-3ECE-4F67-8F69-0C11F2C4E727.jpeg
    146.9 KB · Views: 2
  • 99AD713D-2984-4C06-9476-3B463BC03A35.jpeg
    99AD713D-2984-4C06-9476-3B463BC03A35.jpeg
    86.6 KB · Views: 3
  • 39F7FA9A-FD8B-40C6-BE18-7FB2E6FBEA52.jpeg
    39F7FA9A-FD8B-40C6-BE18-7FB2E6FBEA52.jpeg
    103.9 KB · Views: 2
  • 94214192-646B-4D02-87F0-A8B78F0D63CC.jpeg
    94214192-646B-4D02-87F0-A8B78F0D63CC.jpeg
    107.2 KB · Views: 2
  • 33A66410-47BA-4183-AA3A-3E17A9A92E7B.jpeg
    33A66410-47BA-4183-AA3A-3E17A9A92E7B.jpeg
    172.4 KB · Views: 2
  • C474CB05-44E0-4829-8BED-CBEC2905488B.jpeg
    C474CB05-44E0-4829-8BED-CBEC2905488B.jpeg
    139.4 KB · Views: 2
Thanks for all the advice! Fitting the complete floor panel was a great success!!! Torsion bar removal was a head scratcher, but with the front suspension disconnected this made it a lot easier, as there was a lot less tension on the bars. The floor was “dry” fitted, and I used skin pins, that are used to attack aircraft fuselages to the ribs on an a/c to securely attach the floor to the chassis, after I had had to cut and weld a few other little bits..., but the chassis in the main was in great condition, and apart from surface rust, was solid. The great advantages of the skin pins is that the panel is still moveable to ensure an exact fit, when in place and then tightening up the skin pins ensures that the floor is rigid, as if it was already welded, hence no buckling of the metal during welding. So drilled a few holes and spot welded the floor. These pice are a bit old now, but the floor has been sealed, and painted and loots great.
C5C55DB8-9B52-4F04-B1D8-4254C09AEDE1.jpegD275D36A-280B-47C2-A0EB-AD11936A9D3E.jpeg0D994922-B8D3-4D6F-8284-5E3A9AE99436.jpeg
 
  • 79FC03B3-7459-4D7F-8D7C-A03CA950487E.jpeg
    79FC03B3-7459-4D7F-8D7C-A03CA950487E.jpeg
    221.8 KB · Views: 1
  • 3087B350-76E6-4043-AF34-C81CCBAC3825.jpeg
    3087B350-76E6-4043-AF34-C81CCBAC3825.jpeg
    193.9 KB · Views: 1
  • C198E37C-9718-4EA9-8DE9-5A1653FCF31B.jpeg
    C198E37C-9718-4EA9-8DE9-5A1653FCF31B.jpeg
    190.1 KB · Views: 1
  • CC2B1087-9103-48D4-B498-4E7E48B2375C.jpeg
    CC2B1087-9103-48D4-B498-4E7E48B2375C.jpeg
    145.9 KB · Views: 1
  • B0521ED0-21A7-4D4B-91B6-48E3A37BB5DB.jpeg
    B0521ED0-21A7-4D4B-91B6-48E3A37BB5DB.jpeg
    112.7 KB · Views: 1
  • 2F76D410-C703-4B8B-AAB6-6BE5D52E9F59.jpeg
    2F76D410-C703-4B8B-AAB6-6BE5D52E9F59.jpeg
    146.6 KB · Views: 1
  • 5C497890-C5E1-4E48-8AB8-576CAD013761.jpeg
    5C497890-C5E1-4E48-8AB8-576CAD013761.jpeg
    227.5 KB · Views: 1
So now need to tackle the rear subframe to weld a few rusty patches, near where the rear torsion bars are fitted... question is, can I remove it ( the whole unit both axles and torsion bars as one whole unit,) without removing the rear torsion bars, or do I need to remove the rear torsion bars as described in the Haynes manual, and then each axle individually? Seems to be a bit of tension on the bolts holding the torsion mounts to the subframe... and axle bolts, but all are free and can come out... but don’t want bits of axle etc flying around the shop if I do. Haynes manual mentions a tool to wind up the axles on the shocker mounts, (which I have removed).
 
Back
Top