Clementine's Garage
Clementine the Cat
 
Image of flower
Yellow R4
 
Réparateur d'automobiles

Rene 'I go, therefore I am, Descartes

Geoff in the Gully

Getting it together
Messages
281
Where to start the story of Descartes rebirth? At the beginning do I hear someone say? Ah yes, but what is the beginning?

I spent a year or so of casual looking during which only two cars were advertised. One was too far gone to attempt to restore and the other was far too expensive (and 2,000 km away) to make sense restoring. I knew that to end up with what I wanted anything I started with I would have to restore.

I wanted to end up with a car that was in as good as new condition, if not better, though not necessarily totally original. This meant I'd strip the body down to bare metal, repair the inevitable rust and give it a serious rust-proofing. I expected to rebuild the engine also - no drama for me there; back in my youth I rebuilt a couple of Dauphine Gordini and four R10 engines.

I say 'casual looking' because I was a little uncommitted to the idea when I started. It was more a case of thinking I didn't have the time for it than not wanting it. Unexpectedly my eldest child decides to move out, the daughter goes overseas for a year, the youngest lad not-so-unexpectedly goes to Uni and suddenly the time I didn't was knocking on the door.

Then my wife, for some reason, said 'Oh shut up about it and just do it'. I might have mentioned my desires a few times. I took her at her word. Sometimes you've just got to do that, don't you?

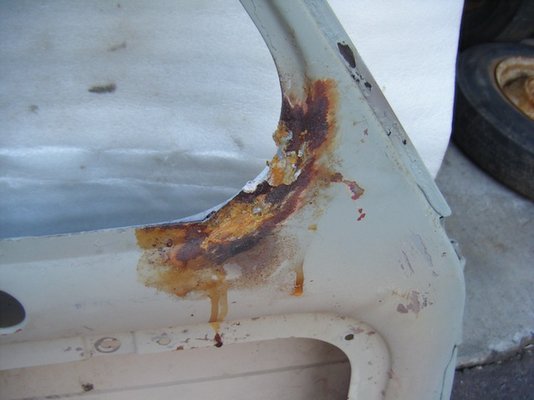
A few weeks later Bruce advertised his wife's R4L he had commenced restoring as he'd found his health meant he couldn't finish the job. Patricia, his wife, really wanted it to go to someone who would restore it rather than to the crusher, which would be a crime. Perfect match I thought - clearly a vehicle in restorable condition, job started, a starting stock of parts. How could I go wrong? Looked alright in the photos. Just a little rust at the drivers feet.

The deal was struck and the crime prevented. A short 1200km trip later - hey, Australia's a big place, we call that short - a long trip is when we have to stop half way! Actually it was a very smooth run. We're 15 minutes from the freeway here in Melbourne and it's freeway grade all the way to Newcastle in northern NSW except for a couple of miles through the edge of Sydney.

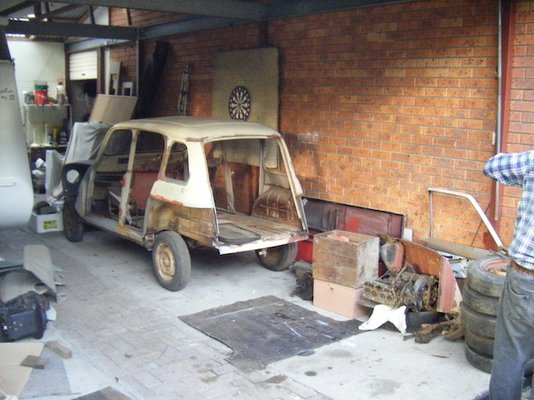
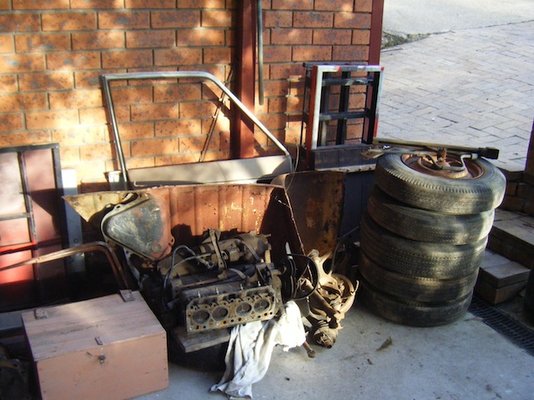
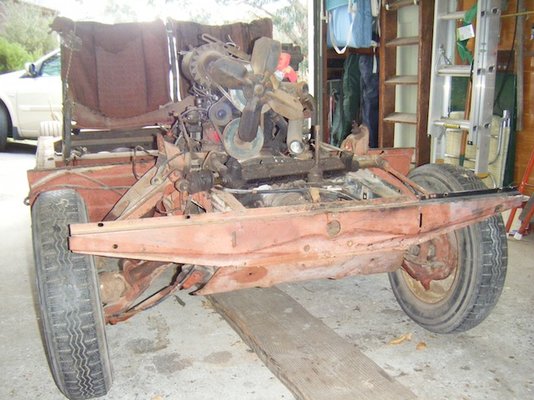
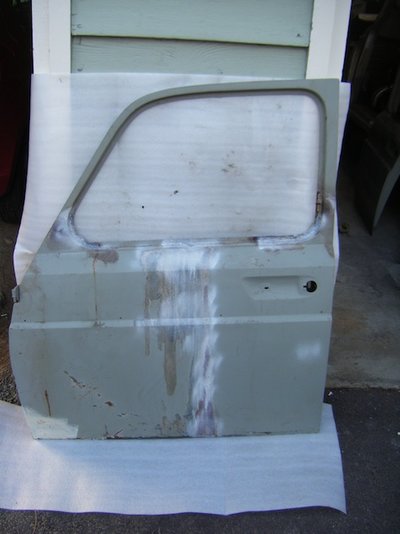
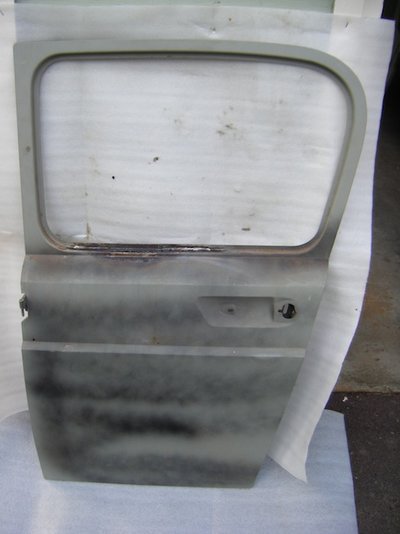
The pictures give you an idea of what I found. The panels, doors and interior was off and stripped. The body was off the chassis - just sitting there. Only the engine gearbox and running gear left on the chassis. And about 10 boxes of loose bits. It doesn't take long to get a car on a trailer - normally. But I can tell you it takes a LOT longer when you do it part by part!

Actually, a good part of the time was taken with allowing Patricia to go through the parting /grieving process. It had been her first car when she was 18 in 1963! How's that, a genuine single owner 47 yr old car. An yes, there were tears but I could understand that. I'm under an obligation now to drive it back to Newcastle when it done to show them. She made me promise. Really.

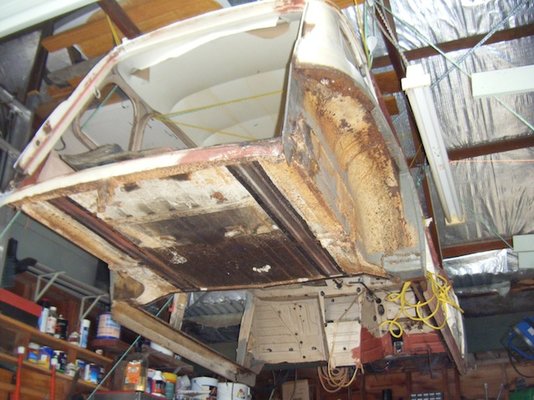
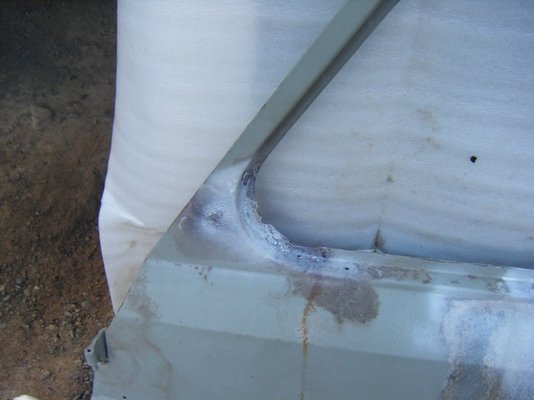
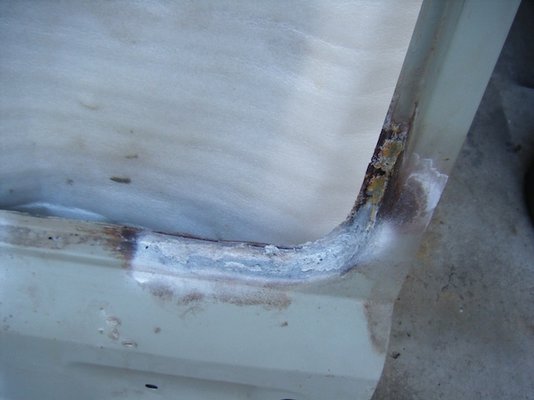
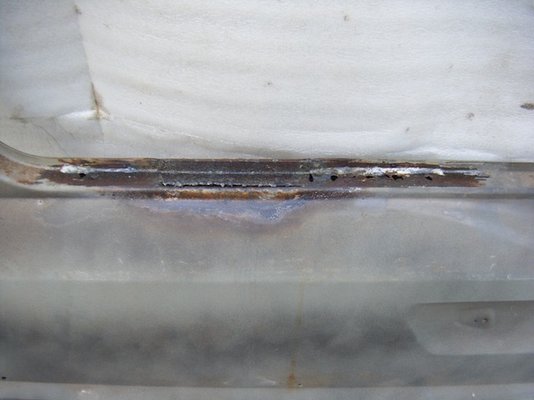
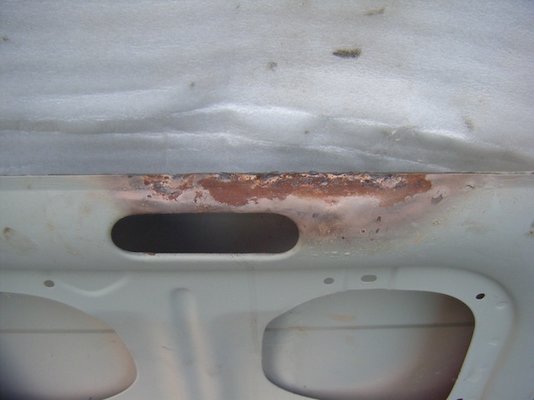
Check out the photos and next post I'll run you through the initial assessment - what 'a little rust' really means. The first three photos are 'as found' and the others are in my garage with the body shell hoisted into the roof out of the way of the moment.

Geoff
 
  • Descartes 1.JPG
    Descartes 1.JPG
    110.3 KB · Views: 324
  • Descartes 2.JPG
    Descartes 2.JPG
    96.6 KB · Views: 324
  • Descartes 3.JPG
    Descartes 3.JPG
    118.8 KB · Views: 316
  • Descartes 4.JPG
    Descartes 4.JPG
    122.4 KB · Views: 319
  • Descartes 5.JPG
    Descartes 5.JPG
    101.7 KB · Views: 319
  • Descartes 6.JPG
    Descartes 6.JPG
    121.3 KB · Views: 325
Last edited:
That has to be an interesting project! Keep us informed.
 
Initial assessment

Yep, Angel, it's certainly got my interest!

First thing to to do was to inventory all the loose bits - which was pretty much all of the car - and assess their condition.

All the body panels had been removed from the shell and the body shell removed from the chassis. Most doors had been stripped off all fittings and trim and restoration started. They were painted in primer and at first glance looked reasonably well on the way to being restored.

There's still a way to go yet. There's what appears to be mild surface rust coming through the primer so I'm wondering now how good the metal preparation was before they were primed. The drivers side doors have had repair skins welded on the lower half but not trimmed up afterwards, and all doors have rust holes in the sills of the windows, which make me think the primer might have been temporary protection while the repairs were being done. In any case, stripping back to mare metal and treating the rust is clearly needed.

Front and rear passenger doors pics
 
  • DSCF0693.JPG
    DSCF0693.JPG
    67.4 KB · Views: 265
  • DSCF0694.JPG
    DSCF0694.JPG
    70.9 KB · Views: 267
  • DSCF0695.JPG
    DSCF0695.JPG
    67.7 KB · Views: 260
  • DSCF0697.JPG
    DSCF0697.JPG
    71.1 KB · Views: 262
  • DSCF0698.JPG
    DSCF0698.JPG
    72.1 KB · Views: 257
  • DSCF0699.JPG
    DSCF0699.JPG
    62.8 KB · Views: 259
  • DSCF0700.JPG
    DSCF0700.JPG
    71.1 KB · Views: 260
  • DSCF0702.JPG
    DSCF0702.JPG
    63.2 KB · Views: 257
More assessment

Drivers side doors have similar issues but also have repair skins welded to the lower halves that hasn't been finished off yet.

picture.php


picture.php


I'll post some pics more when I get this picture posting business sorted out.

The rear hatch door is shot along the bottom edge inside - no surprises there. A repair strip has been put on the lower outside edge but its a pretty dodgy job and I'm not impressed with the work.

Outer guards are in pretty good shape with only a patch or two of rusting in the front ones where they attach to the body or inner guard. They're all primed up but again some surface rust coming through. The rear ones might be new they're in such good condition.

Bonnet is pretty good too. Couple of little dents that'll beat out easily. Main issue is some rusting through near the hinges. That'll need proper attention.

Inner guards, however are another story. The left is whole but has rust patches al over it. The right is half gone. There's been a serious problem where the guard meets the body shell - under the battery and where the brake master cylinder. Obviously some leaks or spills at some stage and not tended too promptly.

The big problem in this lot just would have to be in panels for which there doesn't appear to be replacement or repair parts available. All the other issues have readily available solutions. It's just more work that I thought when I saw the panels all primed up.
 
Body part condition

Continuing the initial assessment, looking at doors and panels

The driver's door is representative of the doors on that side.

Some partially repaired corrosion in the corners of the window frames.
Drivers%20Door%201.JPG

Drivers%20Door%202.JPG

Drivers%20Door%204.JPG


Incomplete patching along the seam where new skin on the bottom half joins.
Drivers%20Door%203.JPG


And what looks like a fair amount of rust inside the drainage channels.
Drivers%20Door%205.JPG


Moving round the back we find some work to be finished. You can see where a repair panel has been plug welded on the bottom. It's got a good cover of surface rust since it didn't get any protective coating when it was done.
Hatch%20Door%20outside.JPG


The inside bottom edge is much worse.
Hatch%20Inside%201.JPG

Hatch%20Inside%202.JPG

Hatch%20Inside%203.JPG


I don't like the repairs around the latch area at all. Since there's a repair panel for the bottom inside and out available I'll redo this work properly.

The grimmest part of the panel work is up front.
The left inner guard appears not too bad - it hasn't been stripped and primed so there might be some grief under the paint but I don't think it'll be much if any. On the other hand, the right inner guard is half buggered.
Right%20Inner%20Guard.JPG


Yuk. That's a more difficult repair given the complex shaping.
 
Not all bad

Good news though, the outer guards front and rear are in particularly good condition. It could be that Bruce had already gotten good replacements and that these are not the original ones.
Left%20front%20guard.JPG
Right%20front%20guard.JPG

Left%20rear%20guard.JPG
Right%20rear%20guard.JPG


They don't look like they need anything more than a rub down. But I want a particularly good anti-rust treatment on the chassis and body. Parts are difficult enough to get for a car this age and getting harder. Makes sense to me to make it as durable as possible if I'm going to do a full restoration. So I'll probably get them all bead blasted and rust proofed to very high standard.

Next we'll look at the body shell.
 
You have a lot of rust to fight...

Just had a thought. As your tailgate has the number plate surround, it could actually be a 1962 model. Would you mind giving us the oval plate number to check it?
 
You have a lot of rust to fight...

And I haven't finished telling you the initial assessment!

Here's the oval and diamond plates. You could be right about the year over there but I got the car off the original owner. It was her first car when she was eighteen, so I guess she'd remember the year. Down here in the antipodes we were probably still selling the previous year's model!
 
  • DSCF0754.JPG
    DSCF0754.JPG
    121.8 KB · Views: 213
and now for the bad news

So how is the chassis? Are the usual problem spots present?
Let's have a look.

The rear suspension mounting points look clean. Still fitted here, but looked just as clean with nothing more than a bit of surface rust when I took them apart.
Left%20rear%20mount.JPG

Right%20rear%20mount.JPG


I guess hot dry Aussie conditions beats ice and salty roads for these bits.

Got a bit of blistering in the front left corner - will have to have a dig around that sometime.
Front%20left%20corner.JPG


Not so bad on the other side.
Front%20right%20corner.JPG


But you can see a bit of trouble with the floor pan near the centre well.
Front%20floor.JPG


Underneath? I could live with this, with a bit of a clean up.
Underneath%20rear.JPG


But this is a different story!
Underneath%20front.JPG


And here's the naked chassis with all the bits taken off.
Chassis%201.jpg


But what's this here?
Chassis%202.jpg


Stay tuned for more ....
 
Grrrrrr

When the engine and front suspension still on the chassis it wasn't so easy to see this clearly. So once the chassis was stripped of everything I tipped it up against the wall to have a good look.

Chassis%203.JPG


One thing I'm really liking about working on a R4 compare to Dauphines and R10 is the separate chassis. It's really easy to get to every thing without a body shell in the way all the time.

A close-up.
Chassis%204.jpg


And in here you can even see the tubes for the engine mount bolts.
Chassis%205.JPG


Getting more unhappy by the minute:(:(:(

A close look here reveals the side member to be fractured between the engine mount and the rearward part of the chassis.
Chassis%206.jpg


This is some serious issue here. Major reconstruction required. Clearly a major spill of battery and brake fluid left untended.

I'm confident about doing the work - well, my brothers anyway. One's got 45 years experience welding sheet metal and doing engineering works, the other 30 years as a motor mechanics (he's my tool box:hug:).

It's just that it's a lot of work and tricky. And it would be nice if it were strong too!

This particular issue brought my original plans to a sudden halt.
I was going to start with the chassis. Bead blast it, patch it and rust seal and paint it to start with.
And then gradually add running gear, engine, body etc restoring each as I went.

Now, I'm still deciding how to tackle this problem. My first thought, based on what we used to do with the R10 and Dauphines, was to find one that was damaged in the rear and cut the side member off it and replace it.

That plan's not working. All the chassis and cars I've seen in my hunt have been far too good in overall condition to chop up. It seems that after nearly 50 years, the only ones left around are those in good condition worth keeping! What is really pissing me off is that now that I have gone 1400km to get one I'm seeing lots around my area that are as good or better:mad: I looked for ages and nothing appeared.:!:

In any case, it's going to take time to sort.

So here's a couple of questions for you chaps.
Given the problems that you seem to have with the back half of the chassis, are the chances of there being a good front half that could donate a RH form side member?

And if so, is it economically sensible to ship to Australia? What do you reckon it would weigh?
 
Given the age of the car (yes it's a 1963 model by the way), chassis condition is not that bad! What is hard to repair or fabricate is the rear suspension mounting points and front chassis legs, both of which seem OK on your R4. I think that most (if not all) repairs can be accomplished with sheet steel pieces.
If you are concerned about 100% original look you have to find a way to make the swaging too.
 
Chassis cut and paste

Hi, I will be cutting up and jettisoning a '72 chassis later in the summer. I think the bit you are after is still OK so you are welcome to it. However as Angel says, a bit of plate and a MIG welder sorts most of it out ...... bon courage ! Simon
 
Thanks guys, very encouraging that you think the chassis is not that bad. I don't feel like I'm off on a fools errand! But Angel, what do you mean by 'swaging'?

Simon, I'll keep your offer in mind. I might need to change the front cross member too as I want to put a 4-speed gearbox in.

Does the early 4-speed fit with the original straight cross-member?

Geoff
 
Sorry if I didn't use the correct term, I meant if you want the chassis to look exactly as the original you must find a way to remake the pressed-in pattern on the floor.

ah, I understand now. Yes, I want to keep them as they add rigidity. I've already got a set of replacements floor panels (from Melun Retro Passion) that have the same pattern as the original.

I looked at only replacing the front parts but there's actually enough small holes and patches in the rear to make me figure it would be just as easy to do the whole floor.
 
The Body Shell

The body shell is a bit like the chassis - quite good except for a nasty bit and a few
There doesn't appear to be any corrosion to speak of in the common problem areas around most of the base of the pillars.
Driver%20base%20front.JPG
Left%20base%20front.JPG


There's been a repair for the rear one on the driver's side.
Not sure I'm happy with the work yet - might decide to redo it
Driver%20base%20rear.JPG

Driver%20base%20rear%20behind.JPG

I need to clean the paint off to see what's underneath. I've become a little cautious about trusting that the primer is over well prepared metal.

Front apex panels are shot along the bottom edge. They're a rather weak design, in my view, and must be a very common failure point.
Apex%20Left.JPG

Apex%20Right.JPG

Not going to try to repair them; easier to replace them.

The big issues are at the bottom of the hatch door.
On the left...
Hatch%20base%20left.JPG

There's another of those patches I'm not happy with there, and more work to do.

It's a more complete looking patch on the right . . .
Hatch%20base%20right.JPG

Hatch%20base%20right%20outside.JPG

. . . but when I look closely it's mis aligned.
The repairs also don't deal with the underneath of the sill. it's only intended to 'look right' and won't provide the proper strength.
There's repair panels available for the whole bottom sill (above and below) so I can do the whole thing properly with some confidence in the result.

Like the doors, there's a few pinholes in the one of the rear window sills. Not much but a bit of work to add to the list.
Rear%20quarter%20window.JPG


I plan to take the same approach to each of the chassis, body shell, doors and panels. I'll repair the main obvious issues then send them off to be bead blasted. This will strip them right down to bare metal. The bead blasting with low pressure won't distort the panels like sand blasting would. Immediately after blasting they'll be sprayed with a sealer. This sealer rustproofs the metal and is clear. You can see the state of the metal, find and do further repairs (you can weld right through it) and paint straight over it. It's pretty good stuff for this kind of operation.

I got repair panels for the complete floor pan, left and right apex panel, the hatch door sill, the bottom of the hatch door and for the edge where the right rear guard attaches. I'm all ready to start this work.

Well, I was all ready to go but then I got distracted by 'Lucille'!. Tell you about her later.
 
Well that's the state of the metal-work. What's the rest like.

The suspension and running gear is straight all round but with a good coating of surface gunge and rust. From prior experience and judging by the visible condition I expect all the bushes and rubber items to be perished or near enough to it. As a general principle, I'll replace all rubber items, especially those that are hard to get to - they're only a few bucks each.

Front%20Suspension%20assembly.JPG


Ball joints and shockers are an automatic replacement but even if they weren't they're all worn and loose. I don't know about the drive shafts. I don't have any real experience with them so I can't judge them by looks and since the little beastie doesn't go I can't listen to them for clunks and knocks.
CV%20Closeup.JPG


I am a little surprised that there's no boot over the joint at the wheel end. Is this normal or is it just a case of being long gone and not replaced?

Can anyone judge the condition from the picture? The boots at the gearbox end are intact but brittle - actually I split one getting it out but I was expecting to need to replace them at least. Having got them out once I don't foresee any dramas doing it again when the car is all together

Brakes are a given to rebuild so their state is not important - I doubt even the master cylinder is not corroded. I might keep the brake lines but I'm not betting it that. Pressure limiter is an example of the general condition.
Brake%20limiter.JPG


Don't know much detail yet about the state of the engines and gearboxes - an extra one of each came with the car. The 800-01 one that was still on the chassis is seized. The water pump is so full of corrosion silt that it has split the metal along the seam! That doesn't auger well for the interior of the engine. Pictures are of the second engine, 680-02 model here, and it's previously removed head.
Engine%202.JPG

Head%202.JPG


Doesn't look like it's in the pink of health either. I expected to rebuild the engine anyway so all this nasty stuff is not an issue in itself. The real issues are going to be the state of the crankshafts, camshafts, head cracks and flatness etc.

Gear selection works on both gearboxes but I want to put a 4-speed box on it. I have one of these (came with Lucille) bit it's in bits so I don't know if it's really complete. But it might be my first try at gearbox restoration - use whichever one works best while I do the 4-speed up. Given how tough the gearboxes seem to be, I think there's a fair chance one of the two 3-speed ones is in good enough condition to use initially.
Gearbox%202.JPG


The interior was already removed and packed in boxes so it's hard to judge it as as whole. Clearly the seats could do with a but of upholstery. The lining panels from the doors and around the rear quarter windows are faded but intact. Head lining is intact except for a small area but rather brittle. I doubt I can successfully remove and replace it without stuffing it up completely. Could be a bother as I gather from this forum that replacements are hard to come by.

Seats.JPG


Dash is a little worn but undamaged as is the steering wheel and instrument console. But no idea if the instruments work. I think though that getting the interior looking as new is likely to actually be the hardest part of the restoration. Time, skill and effort is all the body work needs and replacement mechanical parts should be findable eventually. But there's a lot of unique bits in a cars interior for which 'functional' equivalents aren't suitable because they don't look right or fit well. Like this steering wheel boss...
Steering%20Boss.JPG


On the other hand, I do seem to have some light lenses, trim, hubcaps and the like that are in nice condition.
Front%20Lenses.JPG

Rear%20Lenses.JPG
 
Last edited:
Nice to see early R4s returning on the roads...If I were you, I would keep the 3-speed gearbox, it's certainly a part of the charm of early 60's R4s.

Some driveshafts with double crosspin outer joints had been fitted with a rubber gaiter, some others not.

I was impressed by the 680-02 engine's serial number!

Luckily the R4 interior is simple with very little trim, so you have relatively little work compared with a more luxurious car of that era...On the other hand, it's not easy to find parts.

Have a look at this:
http://cgi.ebay.fr/RENAULT-4-L-CENT...76?pt=LH_DefaultDomain_71&hash=item3a6606c774

and this (though I think it's not correct for your model year):
http://cgi.ebay.fr/siege-arriere-an...66?pt=LH_DefaultDomain_71&hash=item1c1bceca76
 
Yeah, 1369 is a pretty low number. The 800-01 is not so low - what do you think of this number?
Engine%201%20Serial.JPG


Thanks for the link to the steering boss. I wish my french was better and I could search better myself.

Since taking on this resto, I've been learning so much about R4s and restoration technique there's no room in the brain to fit much french. It's a pity I got put in the half of the class that got taught German instead of French in high school!
 
So that's the starting state of the car, though since it came to me already mostly in pieces I should really say that's the state of the 'car kit'. Some assembly required. . .

Next question was 'What's the target? What am I hoping to have at the end when Descartes finally 'goes'?

Well, I wasn't aiming to get him into concourse condition with every little thing perfectly exactly as original. Couple of reasons for this. First, I wanted a car to get around in rather than something akin to a piece of artwork mainly for showing. Nothing against presentation pieces, mind you, just not what I wanted. Second, I doubted I'd be able to find all the necessaries to get it into that condition. Now, before you wise lot go to a lot of bother correcting my misapprehension, I now know that there actually is a pretty good chance of getting everything needed. I just didn't know that at the time.

But I still reckon an R4 is like a working dog - it's meant to be used, in one way or another, and will pine away if not active. And I don't reckon many of you would disagree. Make them nice and pretty to look at certainly but let them run around. So I'm still looking to tootle around in him as much as possible.

Actually, the State in which I live has recently changed it's registration rules for 'car club registrations'. Now, if you are a member of a car club you can register your car and use it for up to 90 days a year without any extra permits. Previously, you could only use them on 'club events'. This means you can now use your car for what it was originally intended! 90 days a year is nearly every weekend! Cool! Also, since the rego fee is a quarter of a normal car rego, you could four club regos for the same prices and drive all year with a choice of four 'daily' drivers. Even cooler!

So, as my daughter says, I want a car to use for funsies. I also thought there were some things that could be 'better' - some 'deficiencies' that would detract from the 'fun' might be 'remedied'. That's a lot of 'quotes' I know - just means I know that they're all a matter of perspective.

My first car, which 15-plus cars later is still one of my favourites, was a Dauphine Gordini. I also had non-Gordini Dauphines in the family at the time and could compare the difference that 'Gordini' made. It was older than me - my Dad said at least one of us (me and the car) needed to have some experience - and required a lot of fixing this and fixing that to keep going. I got frustrated with the persistent battle with the 6-volt electrics so I sold it and upgraded to an R10. Last I heard the bloke I sold it to had not had a problem with it six years later - dang! But the R10 was so much easier to live with. I don't want to end up with a car that gives me that sort of irritation - that would take some of the funsies out of it.

Since Descartes is basically a big box of parts, and all need a measure of restoration, I have considerable freedom in deciding the end state.

I like the look and character of the early 4L. I'd like the improvements to not detract from that. Essentially, they should blend in and not be noticeable or look like they could have been like that in the original car.

So, as I restore the various parts I'll consider my options.

The general plan of attack before doing the detailed assessment was to start with the chassis, add the suspension and running gear to get a rolling chassis that's easy to move around. Next the engine and other mechanicals. Body shell after that but keep the body panels separate so they don't get damaged while the rest is being done. Interior and exterior peripherals as the last major group followed by final assembly.

That changed a bit after I found the major chassis corrosion problem.
 
Back
Top