Clementine's Garage
Clementine the Cat
 
Image of flower
Yellow R4
 
Réparateur d'automobiles

1975 Renault 6TL - the fine line between brave and stupid

Drive belt for water pump I would suggest 10 x 666 long as most likely or 671mm either will work
Presume you've got 10x 640 mm alternator belt set up
 
  • 1460635755552.jpg
    1460635755552.jpg
    65.4 KB · Views: 3
And if that doesn't fit check out the position of the tensioner pulley just visible in Paul's photo. :whistle:
 
Cheers for the info :) The tensioner pulley is on the wrong way around, I'll be taking it off to make sure it actually adjusts and refitting it the proper way around. Was hoping nobody would notice that :P I also fitted the brace that goes over the starter motor today, so you'll be pleased to read that's back on.

Bit more progress done today. Been trying to get as many things connected as possible and use up as many of the fixings as I have in packets from when everything was taken apart. Today I got the choke and throttle cable/assembly reconnected. Speedo cable also connected. Clutch cable couldn't be connected, I'd forgotten the end was broken when we removed the engine so that needs replacing. Importantly, put the requisite amount of oil in the engine and fitted the new oil filter which is adorably tiny.
20160414-01.jpg


Figure out the routes for some of the coolant hoses and even some of the electrical bits and pieces so they were connected up. Steering rack also reinstated. Haven't yet fitted the new points, rotor arm or distributor cap.
20160414-02.jpg


I did make one mistake which was to put the gear lever brace in before connecting the gear lever up so I'll have to remove that and refit in the correct order. New air filter fitted too.
20160414-03.jpg


Not sure if I mentioned it before, the steering wheel wrap was one of the first things I removed after getting the car back from Wales and revealed a perfect condition steering wheel.
20160414-04.jpg


The green repaint hasn't faired particularly well and in places is rubbing off. I'm okay with this. Accelerated a little on the rear quarters because what I expected to be temporary duct tape covers ended up rather more permanent. Again, I have no problem with this.
20160414-05.jpg


What I am sad about is that even though the car has been covered the stickers in the tailgate are all disintegrating. There's very little of the original dealer sticker left and even the P&O one is flaking off. Replacing them all with new ones just won't look right so I have to accept this as just the ravages of time.
20160414-06.jpg


The keen observer will notice that the car is no longer outside. I put the driveshafts back in today and was going to roll it in on it's wheels, the upper ball joints were still able to be used so this shouldn't have been a problem. Then I remembered we had to cut off the lower ball joints and there's nothing to hold them together. Cue much faffing with my brother being gaffer and Mike and I pushing the car with the front end resting on two wheel trolleys across the uneven yard.

The reason for the car going indoors is to make the next few jobs easier. I need to order a pair of lower ball joints to get the wheels on properly. I've got brake discs that, as far as I can tell, are correct but I need to order some pads too because I'm not using the old pads on brand new discs. If I have indoor space for long enough I'll also tackle the gutters and eliminate all the rot, holes and sharp edges at the same time, that job is fairly important.
 
If you do an eBay search for QSJ651, you'll find cheaper upper balljoints - they're the equivalent of Renault 7701451904.
R4s after about mid 66 and Mark 1 R5s use the same part.
 
Brilliant, that confirms a Jolly Good Car Spares listing someone else linked me to which is the cheapest out there. £13.36 for a pair, delivered. Can't grumble at that!
 
See we are all keen to help sometimes 671mm ends up close to end of adjustment should be ok
Try your local factors and at least you can take it back if too long maybe cheaper especially if they have got old stock
 
I have to pick up some fuel hose so I'll see if my local guy has a belt in stock too, shouldn't be too pricey. The help from yourself and others has been invaluable on getting this sorted out, it really has. Been great to have some car stuff going smoothly as I'm fighting through a lot of frustration with my daily, a Rover 414, which has decided that it doesn't want to disarm its immobiliser, looks like new fob and reprogramming time on that one.
 
I didn't get as far as getting the hose and belt today, ended up doing the following instead.

Cor, another update! We're making good progress on this little car. Engine bay is filling up nicely.

20160415-01.jpg


20160415-02.jpg


It's amusing how many wrong parts I've managed to buy for this car. The new distributor and rotor arm are on and the new spark plugs in (had to remove the alternator to fit one of them). Here's the incorrect distributor cap I bought in its box next the correct new one fitted.

20160415-03.jpg


Couldn't fit the points either because, guess what, wrong parts again. I have the old ones on my desk so I can compare with other sets and make sure I get the correct ones this time. Old on the left, incorrect new on the right.

20160415-04.jpg


There's an ever diminishing selection of parts. I found these two rather substantial looking brackets and I can't for the life of me figure out where they go. The book wasn't helpful (as usual) and neither were the pictures I'd taken. I'm sure they're out of the engine bay, they have the right kind of look about them and oil on them. I suspect they're to do with the engine mounts but I can't figure out how. Also shown here are the front hub caps and the front brake dust shields.

20160415-05.jpg


This bracket, on top of my new brake discs which look to be the correct type, I believe attaches to the gear lever brace, I just haven't figured out how yet even with my photos for reference.

20160415-06.jpg


Another thing that happened was Crapaud's face was put back on and the bonnet refitted. Since getting the car the bonnet has always scraped the grille and the latch hasn't worked. A liberal dose of carb cleaner followed by lithium grease got the latch working beautifully and careful adjustment of the hinges and washer thicknesses got the bonnet to clear the grille.

20160415-07.jpg


One problem I do have is the headlights. I have been sent 2 right hand drive units, which is excellent. Trouble is the headlight fixings on the front are handed so I now have 3 drivers side headlights and one passenger side with no lens and almost no silvering. At the moment, my plan is to split the right hand drive lenses off the old backs and buy a new set of left hand drive lights (which are much easier to find) to bond them back on to so I have a good set. The headlights are one of the most difficult things to source for this car.

20160415-08.jpg


John Deere sent me the old spotlights from the ex-Dollywobbler Prelude (Autoshite forum members) so I could get them working and use them on the Renault. My guess was actually even better than expected when they were mocked up on the front of the car. They look in keeping with everything else too so shouldn't look like a new addition while giving me some better lighting on the front to see by.

20160415-09.jpg


Another present was this Bettaware sun visor extension. It is terrible. The vision through it is distorted and the filter not at all appealing. Of course it's staying with the car, it's too terrible not to.

20160415-010.jpg


So, we're looking a bit better. There's some wiring connector repairs to do before we can connect a battery and test things, I just ran out of time to do that today. Perhaps over the weekend we'll get that far. Here's an overview of where we're at.

20160415-011.jpg


20160415-012.jpg


20160415-013.jpg
 
I found these two rather substantial looking brackets and I can't for the life of me figure out where they go. The book wasn't helpful (as usual) and neither were the pictures I'd taken. I'm sure they're out of the engine bay, they have the right kind of look about them and oil on them. I suspect they're to do with the engine mounts but I can't figure out how.

Those heavy brackets are to help support the gearbox.
The small hole side of the bracket bolts low on the block, just above where the sump joins. The front of the bracket with the larger holes are where gearbox bolts are used. Their may also be a thin sheet of metal sandwiched between the gearbox and the brackets. The metal plate covers the flywheel from the rear. Presumably it helps to keep the clutch/ring gear free of road grime (and to protect ignorant fingers?)

I hope this helps.

PS
I think that you will find that the left hand bracket (in your photo) should be fitted to the right hand side of the engine beneath the alternator.
 
Thank you, that description makes a lot of sense of what I've got. There are a couple of bolts that match holes in the block I couldn't figure out and with your description I can visualise where those brackets join up. I've already fitted the metal plate, which I assumed was to protect the flywheel from stones. I think there's enough space to put the brackets on with the engine and gearbox still in, it'll be tight but should be doable.

Today the upper ball joints arrived so I've got the full compliment of four now. The brake pads have been ordered and should be here early next week. That gives me enough to get the car back on his wheels at the front. It looks like the pistons in the front calipers might be stuck so I'll see if I can strip those down and get them working again. Will likely also need front brake hoses, the ones on look okay but would benefit from a refresh.
 
Got loads of good h20150918_113049-1.jpg eadlamps just ask
This one's new hope you can decide which side it is
 
:O I should just ask you first first for anything I need, shouldn't I? ;)

I need the one with the fixings like the one on the left in the below picture.
20160415-08.jpg


The headlight in your picture matches my drivers side lights. The skinny tab on the top left of your pictured headlight is what dictates which side they go on and is what's stopping me putting the spares I have on the passenger side.

Let me know a price and I'll furnish you with some cash in exchange for lumieres.
 
I would of happily supplied you with everything I had that was surplus to my needs very cheaply
I have been hoarding renault parts since about 1980 but obviously some bits I needed for my rodeo project which included suspension and brake hoses etc

Anything exclusive to R6 is available and unless the man from Ireland reapears it will be going to Holland in September
Btw those engine brackets will be fairly tricky to fit with engine in car as passenger side will need engine mounting removed to fit bolts
 
Yeah, I found out today I can't do those brackets in situ because of my spade hands, annoyingly. The only 6 specific things I need that I'm aware of is that headlight and door lock grommets. The headlight is the important one if you do have a spare passenger side at least.

---

Update time again. The upper ball joints arrived and I collected some 6mm fuel hose and a pair of wiper blades the other day. Today is not the day I fit those though.
20160417-01.jpg


I did figure out where the long bar goes and in so doing where the missing bumper iron bolt was.
20160417-02.jpg


An attempt was made to fit the sump-to-bellhousing stiffener brackets with the engine in situ. Because of the size of my hands this proved impossible so I shall be lifting the engine out just far enough to bolt the brackets on before putting it back in again. Not too difficult a job really. Here's an idea of access and visibility.
20160417-03.jpg


What I really wanted to do today was some welding, specifically gutter repairs. They hadn't got any worse since I applied the seam sealer a year ago but they also hadn't got any better. They were fragile for most of the length so I decided to get rid of the perforated rusty bits. Easiest way to do this was to fold them down against the bodyshell lip/platform the roof is spotwelded to and take a flapwheel to the edge to trim off the old gutters.
20160417-04.jpg


20160417-05.jpg


The A pillar gutters were still in really good shape so I left those alone. The roof still had lots of spot welds holding it down too.
20160417-06.jpg


Well, apart from the middle third where the gutters had practically disappeared.
20160417-07.jpg


This is all that's left of them.
20160417-08.jpg


I was originally going to tidy up the surfaces and make up some new gutters, welding them in carefully as per factory. Then I thought sod it, lets do this the easier way. There's that much work involved in replacing the gutters I deemed it pointless so instead decided to deseam the Renault. A section at a time I ground back the gutter ledge until it was not quite flush with the roof skin, then tacked the two pieces together before moving to the next part so the whole roof didn't just spring off. Then, taking my time so things didn't get too hot and having just two small fires when stray welder sparks hit a dust sheet, I seam welded the join.
20160417-09.jpg


20160417-10.jpg


After going back a couple of times to address any pinholes where I'd missed, it was deemed ready for filler. A lot of the big roof dent this side came out with the heat of welding, which was useful. A skim of filler was applied to smooth out the weld line. The roof skin surprisingly didn't warp, I suspect this is down to the brace that runs on the other side keeping the shape.
20160417-11.jpg


20160417-12.jpg


I'll finish sanding the filler another day. For now I'm happy the rust is gone and the car doesn't look that bad for being de-guttered. If I want to fit gutters in the future I can do so with ready made sections spot welded to the edge that is currently smoothed out. I tidied up the A pillar bit of guttering with the old damaged stainless trim cut down to suit.
20160417-13.jpg


Other items of note are that the door mirror was found to be adjustable and perfectly functional and I refitted all of the side trim. I do need some more side trim clips, the ones on the car are very fragile and not really good enough to hold the trim on the car at speed.

I'll likely not be working on Crapaud again until Tuesday when my new clutch cable and brake pads are due to arrive. I'll turn my attention to getting the brackets fitted, the new brake parts on and the new ball joints in so the car can go back on his wheels again.
 
Mike and I hauled the engine and gearbox out of the engine bay again so we could fit those stiffener brackets that go from the engine mounts to the bellhousing. This was a chore and I wish I'd known what they were before the engine went in the car. What's more, with brackets fitted it's nearly impossible to put the nut on the bottom of the driver's side engine mount because access is something that happens to other cars. Had to remove the bonnet, gear lever brace and steering column to get the engine and gearbox out as well as putting the lifting straps on in such a way that they cleared the locations we needed to fit the stiffener brackets. This was not a particularly fun job.

20160419-01.jpg


20160419-02.jpg


That done, a bit of info on the headlights. They are handed and have very specific fittings, not at all what I'm used to seeing.

20160419-03.jpg


On the outer side at the top there's a spring that the tab that makes the lights handed sits in.

20160419-04.jpg


On the inner side at the bottom is a clip of sorts that holds the bracket that doesn't have an adjuster in it.

20160419-05.jpg


Frustratingly, the two headlight mounting brackets are mirrored, which is why I can't use the spare headlights I've got in this hole.

20160419-06.jpg


So, I decided that I'd take the wire wheel to the passenger side bowl to see if it could be cleaned up to be repaired. Results were less than satisfactory and I stopped almost as soon as I'd started.

20160419-07.jpg


What I did notice is that the brackets that make these lights handed are just spot welded on. With care I can very likely remove them from the above bowl as they're in much better shape than the rest of the unit. I can them convert one of my spare drivers side headlights to a passenger side one. Since the brackets aren't fixed to the actual reflector bowl but the decorative surround I don't need to worry about damaging the silvering either as it shan't matter.


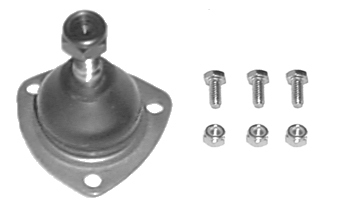
With that out the way I turned my attention to the ball joints. This was to be another horrible job. Started on the driver's side and learned by trial and error how best to remove the two rivets holding the ball joint in place. The third fastener was a captive bolt, the nut for which came undone surprisingly easily. After some effort with spinny tools and hammers, the old ball joint was off.

20160419-08.jpg


On fitting the new one, before I'd even finished tightening it, one of the bolts sheared.

20160419-09.jpg


Never mind, I found another suitable bolt and nut and had the lower ball joint all buttoned up and ready to go.

20160419-10.jpg


The upper ball joint put up more of a fight, this one has three rivets holding it in. I was thwarted in my attempt to fit the new ball joint because the upper collar I need to remove is also spot welded to the upper arm and to be honest I just hadn't the patience to deal with that. I had been at the unit at this point for six hours, much longer than intended, most of which was faffing about getting the engine in and out again. Here's one dead old upper ball joint.

20160419-11.jpg


In other news, I found and reinstated the factory jack. I'd hidden it under the back seat.

20160419-12.jpg


Got the gear linkage properly secured and fitted the throttle return spring. I think the throttle cable needs replacing, it's not only frayed but has a habit of sticking when you've pressed the pedal down because the cable doesn't move smoothly in the sheath. I also fitted the two tiny pieces of new fuel hose needed, I just haven't put clamps on yet as I couldn't find them.

20160419-13.jpg


Can anyone tell me what this is and where it goes? With it sat on top of the air filter the wire is pretty much at maximum extension so I assume it must go on or near the carburettor, I just can't find anywhere it looks to fit. Seems to be some sort of sensor.

20160419-14.jpg


Tried out the seating position properly today and the gear change. I like the latter but not so much the former, the pedals and steering wheel are very offset which has caused me problems with cars in the past. I might get on with it, I might not, I shan't be driving the car enough for it to cause me the problems the Maestro did.

20160419-15.jpg


The only thing that's jammed on the dashboard is what I assume is the heater control which is stuck on RED. I haven't attempted to force it for fear of breaking it, it's jammed so firmly it's like it's been bolted down. The choke pull works, it could just do with a little fresh grease to make it smoother to operate.
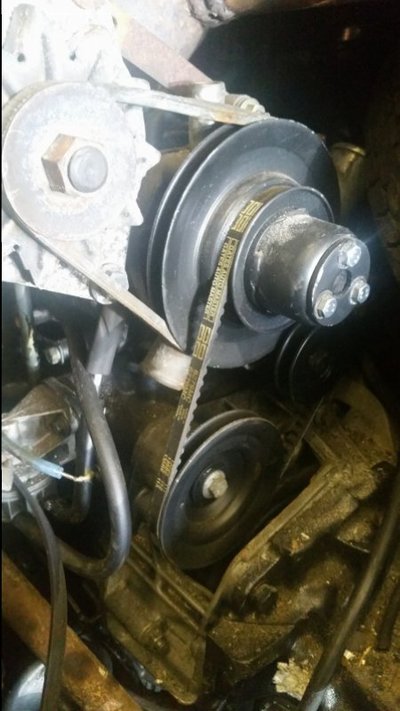
20160419-16.jpg
 
The sensor bolts to back of cylinder head by rocker cover manifold side it puts the red overheat lamp on
Shared with oil pressure circuit
 
Oh, now I know where it goes! There's an empty bolt hole exactly where you described that I couldn't figure out either that looked like something goes there. At least it's not totally impossible to get to, just difficult. Thank you again.
 
Headlamp not forgotten just too busy to gain acess at moment you can guess which box they are in at friends warehouse
The one at the bottom of the stack also they were only put there temporarily and every visit I make I get asked when i am moving it all
 
Back
Top