Clementine's Garage
Clementine the Cat
 
Image of flower
Yellow R4
 
Réparateur d'automobiles

1975 Renault 6TL - the fine line between brave and stupid

Might I suggest you use 2-stroke oil on the Bowman cables for the heater and throttle? If you slowly drip feed it into the cables it should help. 2-stroke oil is much less viscous than lubricating oil & I've used it to ease cables like these in the past. WD40 (or equivalent) might be worth a spray, too.

Loving this thread and delighted to see this lovely little car coming back to life!
 
That's okay, whenever you have the time :) The small thing you want is always in the box at the bottom of the pile as my stash of Princess spares is always happy to prove. I reckon it'll be a couple of months yet until the Renault is MoT ready, got to hope I can find someone local that's able to balance the wheels when I get the new tyres fitted. There's going to be plenty of little obstacles like that slowing me down.
 
Andrew: you may suggest it and I shall try it too. You jogged a memory about my brother using it on something 70s moped related, possible brake cables? It was a long time ago.
 
If i may offer some advice re your ball joints bolts they should be high tensile steel ,you should not be able to break them like that.
 
20160421_153418.jpg Good quality bolts will have markings on them 8.8
10.9
12.9 etc which is tensile strength
8.8 made in China will snap whatever they've got stamped on them
 
I'm not at all pleased about the 'bolts' that have come with the ball joints, they won't be staying.

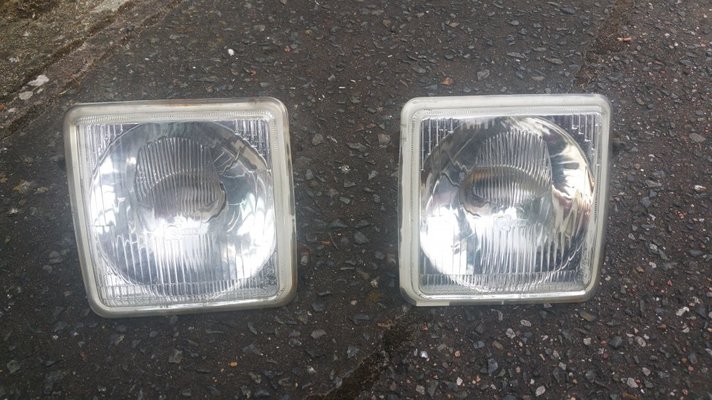
Are they the headlights that are available, Mr Reno? They look better than any of the ones I've got, even the one on the car.

---

Made a bit more progress on the Renault today and intended to have all the front suspension rebuilt, mainly because recently the new shocks arrived.
20160501-01.jpg


For two reasons, the upper wishbone was removed from the car. The first was that it should make getting the spot welds drilled out easier, the second that I thought it might make getting the shock out easier too.
20160501-02.jpg


With both upper wishbones on the bench drilling out the spot welds for one side was fairly easy and it was ready for the new ball joint in no time. The other one, however, was the most difficult set of spotwelds and rivets I've ever had to remove. It didn't matter how you went about it, it just didn't want to let go. You can also see the lower passenger ball joint just to the left which was just a case of unbolting it, someone had replaced this many, many years ago and made my life a lot easier.
20160501-03.jpg


Strange heads though. Rather than a hex bolt or, as in the case of all the new ball joints, screw-headed bolts (both flat and cross type) they were a smooth D shape which meant making use of some mole grips.
20160501-04.jpg


I'm going to replace all the 'bolts' that came with the new ball joints, I don't trust that they're up to the job in all honesty. Threads pointing down because that matches what was on the car and seemed to fit better. Upper wishbones refitted for now to make sure I don't lose any fixings, they're very easy to fit and remove really.
20160501-05.jpg


20160501-06.jpg


Mike managed to get the top nut off the shock on the passenger side but we couldn't get the bottom bolt out, there just seems to be too much tension on everything. We'll figure it out. On the driver's side I could get a spanner on the top nut of the shock but couldn't figure out how on earth Mike managed to move it on the passenger side, there seems to be just enough space to get the spanner in and nothing else. I do hope I don't have to remove the inner wings to replace them.

Finally, one of the old brake pads was removed and tried against the new ones I'd bought. Previous owner certainly got as much use as he possibly good out of the old pads. As you can see I've managed, yet again, to buy the wrong part even with cross-referencing of brake type, car year and all the rest. Trouble was, there were two brake pads listed wherever I looked for my car and nobody knew exactly which I needed so I took a gamble on the ones that looked right from memory... and got it wrong. No great loss, it was only £8 delivered for a full set of pads and I'm sure I can rehome them along with all the other wrong bits I've bought.

20160501-07.jpg
 
Spanner on top nut of shock rotate shock with mole grips
You will need jack under lower arm to take tension off torsion bar first and keep there to change shock or arm wiil twist right down causing injury
You need bendix pads never ever seen r6 with girling you bought
Lamps for sale 10 each
 
I have now bought the correct pads. I picked up the girling ones because I'd seen girling stamped on other brake components. I should have removed the old ones before buying really. Also, if I put the jack under the lower arm the torsion bar lifts the car off the stands, which is quite alarming!

Perfectly happy to pay £20 for the pair of headlights. Can you let me know the postage cost and give me some payment instructions so I can sort you out with cash for them? Sussex is quite a trek from Middlesborough else I'd suggest collecting them to save you the hassle of posting. Not sure when I'll be down south again either, I do travel there infrequently, usually Maidstone.
 
You need to put jack under arm at the outer most point by swivel just until it starts to lift car off stand I would of changed shock with rest of suspension assembled as then you get more leverage by jacking under hub itself
Wiil wait until you need something else maybe before posting lamps
Unlikely to sell any r6 stuff to anyone else in the meantime
Ps you will need yo cut threads shorter on those bolts you have used as they will get bent and possibly shear if left as they are
 
Mr Reno: the bolts that are currently fitted are not permanent. I shall be pick up a full compliment of proper bolts this week that are half the length, I'm really unhappy with the bolts that were supplied with the ball joints, properly sub standard stuff. Sensible idea with holding onto the headlights, I'm bound to need something else aren't I? You don't happen to have a throttle cable do you?
 
Sort of a big update today because things are going quite well. Over the hump of everything being in bits it's now the more pleasant task of putting the car back together again. First job was to get the shocks swapped over, I was struggling to get tools and hands into the gap so Mike kindly got the old ones off and the new ones on. The old ones were deader than a dead thing, all the rubber parts were just flat and deformed.

20160502-01.jpg


New ones fitted and everything went together fairly easily. I couldn't get the bolts I wanted for the ball joints today because it's bank holiday Monday, but when I do get chance to get them I'll go round the car and replace the ten that I need to so that the ball joints are held in with proper bolts and not the rubbish that was supplied.

20160502-02.jpg


Of note is the outer driveshaft boot on this side. The old spring wire clip thing had lost its spring and we didn't have a suitable clip in to replace it so I used a tie wrap instead. As far as I know this is perfectly fine as a solution, it holds the boot in place and keeps dirt and oil on the correct sides of the rubber. I'm going to order some new CV/driveshaft boot clips anyway but again, Bank Holiday Monday put paid to getting any today.

20160502-03.jpg


The temperature sender was reconnected, the bolt for it was even still in the head. Bit of a bugger to do as access isn't great, but it's done.

20160502-04.jpg


20160502-05.jpg


Alternator fitted and new drive belts on too. Couldn't fit the tensioner because I dropped the nut and it vanished, you wouldn't think it could, but it did. I'll get a new nut, I didn't have any in stock.

20160502-06.jpg


20160502-07.jpg


Just plonked the radiator in the hole to keep it out of the way for now. I've got some wires to connect, the radiator to flush and connect, and a new clutch cable to fit under the bonnet. Once that's done I can actually test fire the engine, which I still haven't done. I want everything to be right first and with the engine having lots of lovely oil in it I'm not worrying about it seizing or anything in the meantime.

20160502-08.jpg


Took the spotlights I was given apart to check them out. They're past the first flush of youth but serviceable. Used the Rover to provide power and they work perfectly fine, don't even need bulbs.

20160502-09.jpg


While the Renault has been in the unit drying out and being bashed about there's a lot of dirt appearing on the floor. Quite a lot of it is in the rear of the bodywork so all of this will need a really good clean out. I need to clean up and refit the mud flaps too, they're both fine it's just that one fell off and one has nearly fallen off.

20160502-10.jpg


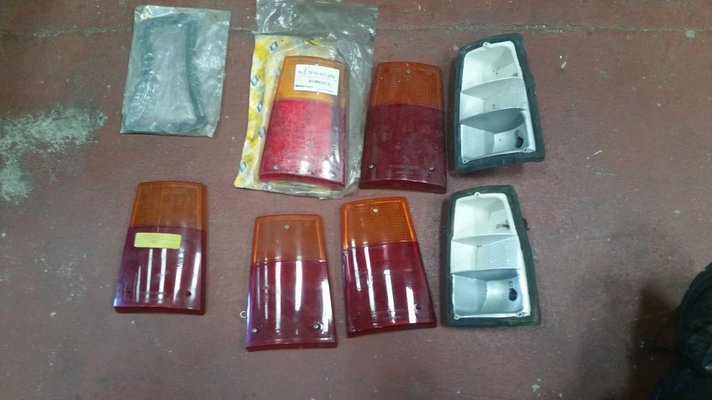
Since I'm down to much smaller jobs now I started checking various little things. I noticed the rear lights didn't look quite right, look at where the screw holes are in the passenger side lens.

20160502-11.jpg


That would be because it's a small back and the lens doesn't fit it. I reckon this is an earlier style light cluster with a later lens bodged on top. I'm seriously tempted to fit an early light lens this side just because.

20160502-12.jpg


The other side hasn't got extra holes, but it looked like there might not be reflector fitted.

20160502-13.jpg


Nope, no reflector! I can cut a new one from a spare Princess lens I've got, seems like a sensible solution to that problem. I don't know where the old reflector has gone and this is the first time I've had the rear lights apart so I suspect it's not had one on this side for quite some time.

20160502-14.jpg
 
Because I had so few things left to put on the car now I cleared it out, put the rear seat back where it should be and put the mat back down.

20160502-15.jpg


Persuaded the driver's door card to sort of go back on. I've got a better card on my spare door that I'll fit because it's the same colour and nicely aged.

20160502-16.jpg


What's left of the front mats were plonked in too. I need to buy a scrap of carpet to redo the carpet bits, that shan't cost me much.

20160502-17.jpg


Loosely put the lower cowling back under the steering column, all the screws for it have gone missing. I'm still trying to figure out what the neat rectangular hole in the side of the dashboard is for where those wires are coming out. I haven't found any likely spare parts or switches for it, my suspicion is that someone had a fan over ride switch installed and have since removed it.

20160502-18.jpg


This is all that's left to go on the car now.

20160502-19.jpg


Loosely put the sill trims back on. They really need a clean and some of the wire clips replacing. I've got all the end caps too, they're in the boot.

20160502-20.jpg


The front end sits higher than it did, I'm sure of it, and is much firmer than it was since fitting the new suspension parts. I didn't disturb the torsion bars so I hope it's just that it now sits at the normal height rather than it's sitting too high.

20160502-21.jpg


20160502-22.jpg


The wiper arms were removed - the easiest I've ever removed on any car - for when I test the electrics. I don't want the wiper arms accidentally mangling things or themselves if there's anything wrong with the wiper motor.


Next big mechanical job is the exhaust and front brakes. I have no idea if the master cylinder is any good and won't find out until the new brake pads arrive. The discs I bought do appear to be the correct ones, we compared old and new before refitting the driveshafts. I've brought the old headlining back to see if I've got enough fabric in stock to redo it and, since I want to take the windscreen out to cure the leak it strikes me as sensible to do the headlining at the same time if I can.


To my knowledge, for the MoT I only need the following, providing everything else I've fixed is good:

Headlight (sourced)

Throttle cable

Battery

Brake fluid (in stock)

Gearbox oil

Tyres
 
Two different manufacturers for rear lamps seima and gelbon screw holes different spacings got loads of both types
Acc cable only supplied as a kit of pieces now
Used most of mine but massive box cables unsorted if you get stuck
 
I'd prefer to replace them if I can and looking at the two designs I'd say the passenger side one is the better type. I didn't see any markings on either from the outside so I don't know which is which. Seems strange there'd be two manufacturers for the same light unit.

If you have them, I wouldn't mind fitting a matched pair of lights on the back, doesn't matter if the lenses are faded so long as they still seal properly. I noticed the incorrect rear lens had a lot of dirt and moss on the back where it doesn't mate up to the back properly.
 
I bet if I go back far enough I reckon over the last 3 years I've offered to supply 90% of all you needed
Having just seen your identical questions about this project on the renault classic car club I guess I could of answer them there as well.
 
I copy-paste the content cross forums. To keep things moving I've just been buying things as I find them, it's been the most convenient solution for me. Until the engine is running and the MoT attempted there's not much else left to find and fix. I'm down to the following handful of items and with the exception of the headlights none of it is vital I'd just like to replace them with good items.

Headlights - which you've got
Rear light unit/lens - which you've got
Accelerator cable
Radiator
Rear shocks
 
Back
Top