Clementine's Garage
Clementine the Cat
 
Image of flower
Yellow R4
 
Réparateur d'automobiles

Instalation electronic ignition into Ducellier distributor

petak

Enthusiast
Messages
1,877
Location
Vodice, Croatia
Hello to all!

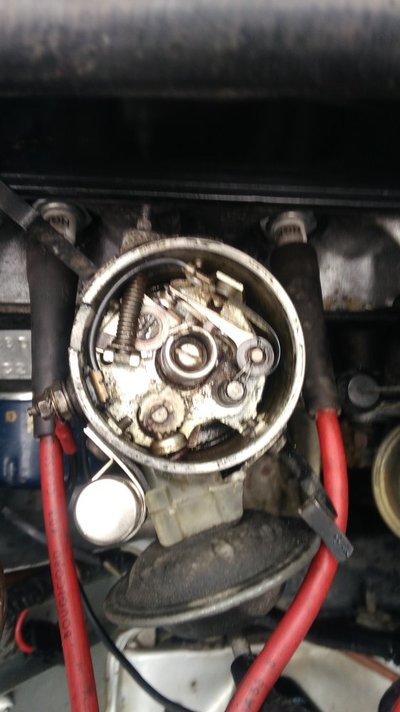
Here i will try to explane how to install electronic ignition into Ducellier distributor on R4.

For starter i must say that there are few electronic ignition systems available.
This one was cheep enough for me to try it.

My car is Renault 4 GTL (1128) from 1992 with engine 688 D7/12 and Ducellier 525187B R244 D61 distrbutor

Car identification
R4 GTL - pločica.jpg

Engine indentification
P1040866.JPG

Dizzy identificarion
P1040832.JPG


After many reading and asked question i have decided to buy AccuSpark ignition kit for Duccelier on ebay.co.uk.

There are awailable 2 kits for Duccelier
KIT20
http://www.ebay.co.uk/itm/Renault-1...e=STRK:MEBIDX:IT&_trksid=p2060353.m1438.l2649

and
KIT23
http://www.ebay.co.uk/itm/Talbot-Si...hash=item2a1cd173e9:m:mT_XkeL-EndNbqUstJq-yOg

Do not know what is difference between them. Price is the same.
Ask Accuspark about difference but did not get answer.

I bought KIT23

This is what you get
20160610_123021.jpg

Short instructions and precautions that need to be taken before installation
20160610_123029.jpg

And parts inside kit
IMG_20170922_143540.jpg
 
Engine bay

Taking apart points and cond in dizzy

Take note how wires are connected in original so you can take it back any time

dizzy and coil
IMG_20170922_143709.jpg

Wires on coil.
- gray goes for ignition key to "+" side of coil.
- black with red pin goes to dizzy from "-" side of coil
- black with black pin. Do not know what this wire is for (some R4 odes not have it at all) but ore so i left it as it is. Car starts normally even if i remove it from coil

IMG_20170922_143722.jpg

wires on dizzy
- green is from cond
- black with red pin is coming from "-" on coil

IMG_20170922_143735.jpg

Removing cap
IMG_20170922_143742.jpg

IMG_20170922_143759.jpg

Removing rotor arm
IMG_20170922_143806.jpg

Removing dust cap (some dizzy do not have it)
IMG_20170922_143812.jpg

Now you need socket 7(or wrench) to take of cond and coil wires
IMG_20170922_143856.jpg
IMG_20170922_143932.jpg

IMG_20170922_143959.jpg
 
Next step is to remove bolt that connects points and coil/cond

You need socket 10(or wrench)
IMG_20170922_144032.jpg

Here you can see points connection and small insulating shim. Do not lose it as you may need it sometimes.

In same time you can remove cond from dizzy. You need flat screwdriver to do so. Be careful because same screw holds vacuum unit
IMG_20170922_144128.jpg

Next step is to remove points
First small spring that secure points. Be careful as it is small and it is hard to remove it with big fingers. Use small flat screwdriver
IMG_20170922_144231.jpg

Point without securing spring
IMG_20170922_144301.jpg

Remove points (both parts). YOu will need flat screwdriver
IMG_20170922_144526.jpg

Here is point when we start to put our ignition inside dizzy

First base plate.
It is designed to fit inside in only one way.

IMG_20170922_144924.jpg

Before you apply heat-dispersing past (white thing in plastic bag) test fitment of base plate
There is bulge on plate inside dizzy where points sit. Base plate is curved in such way that lay down on that bulge
IMG_20170922_145206.jpg

Applying past
IMG_20170922_145102.jpg

And putting base plate in place
IMG_20170922_145301.jpg

Use small cross screwdriver to tight baseplate in place. screw is made of steel so magnetic screwdriver will be got thing to use
IMG_20170922_145325.jpg

Base plate is where it should be
 
Now we will put pick module inside.

IMG_20170922_145347.jpg

Wires need to be puled thru hole in dizzy.
I had to bend pins little bit as could not go thru hole when flat.
IMG_20170922_145409.jpg

Red one thru hole. Hole is one that we removed screw from at the beginning.
IMG_20170922_145423.jpg

Black
IMG_20170922_145444.jpg

Rubber bellow that keeps moisture out of dizzy.
IMG_20170922_145459.jpg
IMG_20170922_145551.jpg

Base plate has two threads where module is screwed in.
IMG_20170922_145325-2.jpg

To screw module you will need 2,5 allen key. unfortunately (or deliberately) allen screws are mane of stainless steel and magnet wont help you.
So put screws on model before you put it inside dizzy az there is so little room to work. Especially if you have big fingers.
Be careful not to lose allen screws while putting module in place.
IMG_20170922_145616.jpg

Module screwed in place
IMG_20170922_145708.jpg
 
Next step is to connect vacuum livers with module. There is white "thing" that do so. Obviously there is some kind of movement sensor inside that recognize movement of lever when vacuum do the job.

IMG_20170922_145710_1.jpg
IMG_20170922_145742.jpg

Do not forget to put secure spring back in place


Now we have small ring that need to be put on shaft.
IMG_20170922_145825.jpg

Shaft is not round but has 4 hills that are moving point when old system (points and cond) is inside.
IMG_20170922_145920.jpg

Ring has same 4 hills (or slots) inside
IMG_20170922_145904.jpg

So ring must be placed on shaft is such way that slots sits nicely on hills
Like that
IMG_20170922_150116.jpg

Now we need to close our dizzy.

Dust cap, rotor arm and cap
Press rotor arm little bit harder than usually. It looks like ring does not allow rotor arm to be put in place easily. Do not use hammer. It just need to be press little bit more.

If you do not put rotor arm all the way in there is possibility that rotor arm grind of cap.
When you start engine and rev it up little bit you should hear some "wrong noise" from dizzy.
At that time i could not recognize where that noise is coming from. I have removed cap but could not see anything wrong.
Only few days after i opened cap and saw brown dust inside dizzy. And noticed that cap was grinned little bit.
My cap was not so damaged so i have it still.


At the end you nee to connect red and black wires from this module.
Red one goes to "+" side on coil.
Black one goes on "-" side of coil.

IMG_20170922_150613.jpg

When everything is in place you need to turn dizzy and set timing back to +7°.
Point where points are picking spark and point when module is sensing hill on shaft is at different place.

I have left old parts (points, cond, screw with all parts) in box.
IMG_20170922_151338.jpg
You need 15-20 minutes beside road (if you have tool)to turn back electronic ignition to points.
That way you eliminate all expensive cost is electronic ignition fail (at any point in his lifetime)
Good thing is to mark old timing (points) and new timing (electronic ignition) on engine block so you know how to set timing without strob light.


I am driving with electronic ignition for some 1000km for now and benefits i have noticed are
- much easier cold and hot start of the engine.
- easier idle setting.
- quiet, softer engine run.
- It looks like it rev up much-much easier than before.

80-85km/h in 3rd gear is not problem. 100km/h is really easy to reach and keep. Overtaking someone driving 80km/h is not an issue any more. Before i would not dare to do it. Accelerating from 80 to 100km/h is in hip (keeping in mind that we are talking about R4 and mighty 34KS :D


And that is it my friends.

If you have some questions i will be glad to help and explain it.

:waving:
 
Must say that I was postponing installation of this device for whole year.
One reason was that i wanted to set car as it should be with points and then switch to electronic as i wanted to note real benefits of it rather than masking some other problems that i had while was setting ignition as it should be.
Second was laziness. :D. My car was working nice and did not wanted to ruin that fiddling with points.

Than there BORGEB (member of this forum) came to Tribunj (place near me) and persuaded me to try it.

So it was nice afternoon fiddling with electronic ignition, talking to forum member and drinking cold beer afterwards.

Till next beer. :waving:
 
Hi Petak,
I'm very surprised to see that your '92 GTL has a real 688D7 Cleon :clapping: normally you would encounter a C1E engine on the last series..
Great to see you've got a real 688 :drunk:

s ljubaznim pozdravom, Joop
 
Great summary and pics, did the exact same to mine with the same kit and looks identical :-)
Hi Rich and Petak and jjad,
I'm curious about your findings in term on your Hall-sensor ignition experiences.
Personally I'm a purist as I've driven 500.000 kilometers in the old days on the old style ignition settings and hardware.
But nowadays, as fuel compositions are alternated by the big companies, I start to get sceptic and maybe I will turn to the tuneable 123-ignitionjust like Robert (harbourseal) did...
Regards, Joop
 
I can confirm I also purchased Kit 23 after Accuspark looked up my disi and said this was the one for the car.
Joop - look up my posts on the topic I have good feedback, however like Petek I didn't push the rotor arm down enough and caused a little damage to the inside of the disi cap so a new one is on order. The car starts much better, idles smoother and pulls better, I can't talk about fuel economy yet as have not driven it very far. The kit cost about £35 so not a large investment and can be reverted with ease.
I've read your post on the topic Richnd, but I'm curious about the more long term and 100k+ milage experiences ;)
Regards, Joop
 
Joop, I plan to run it out on a long run soon so will certainly report back, will even try and take my go pro and video a few miles :-)
 
JdeW....nice to see you are triing croatian.:clapping:

Believe that all Slovenian came from factory with 688 engine.

I was strugling with myself to put it or not.
Was tempted with experiance of certain forum members about electronic ignition.
All other products was too expecive just to try it.
This accuspark was relativly cheep and i decided to try it. One more benefit is that you do not need to cut anything but just remove points and put module.
If anything goes wrong i can put points back in les than 10 min.

Will drive it long time (until it works),so you will get regurarly report how it works.
Even thinking buing another one to have spare if this fails for any reason.
 
For anybody wishing to fit the Accuspark ignition on a Ducellier distributor with externally adjustable points (mostly late production 845s), be aware that it will not fit easily. There is a slight difference in the fixed point screw position on the points baseplate, that causes the ignition module to foul the magneic ring when installed. I didn't try to reposition the module on the aluminum plate, instead I took the baseplate off a 1108 distributor and fitted it on the existing distributor body. It was not straightforward, one of the three tapped holes of the baseplate did not line up correctly with the hole on the body, so I had to drill another one.

What's more, I had to use the cap and rotor from the 1108 distributor, the 845 cap was shorter and would not accept the extra height the magnetic ring puts on.

So it's OK now, I have to put some minor parts back on the car, including the body, in order to be able to test how it works.
 
I'm really tempted to take this kit,
I have a project in mind to build a fully electronic ignition with double coil and without distributor, but I never have the have time to work on it. :(
So bad the seller doesn't ship in Italy.
 
I bought the kit and installed on the car few days ago, it cost me about 50 euros.
I didn't do much miles but the first thing I can see is how easy it's to start the engine!
Also on the road the car feels ready and drives very good.
I now need to test it better.
 
  • P_20180308_145437.jpg
    P_20180308_145437.jpg
    168.1 KB · Views: 6
  • P_20180308_163216.jpg
    P_20180308_163216.jpg
    84.8 KB · Views: 8
Back
Top