Clementine's Garage
Clementine the Cat
 
Image of flower
Yellow R4
 
Réparateur d'automobiles

Restoration 1984 R4 GTL Rutger-peer

Rutger-peer

The restoring Dutchman.
Messages
257
Hey everybody,

I promised I would keep a restoration thread, so here it is!

I actually started with the restoration last weekend, for I stripped the interior of the car then but the real disassembly started today. I will keep it short this time since the photographs say enough for themselves. Tomorrow I will continue disassembly, probably take off the inner wings, remove the engine and the windows, even might make a start taking of the body. But I think that'll be quite a challenge since I guess I will be working alone. But maybe I'm going to improvise a bit with some ropes and catrolls etc.

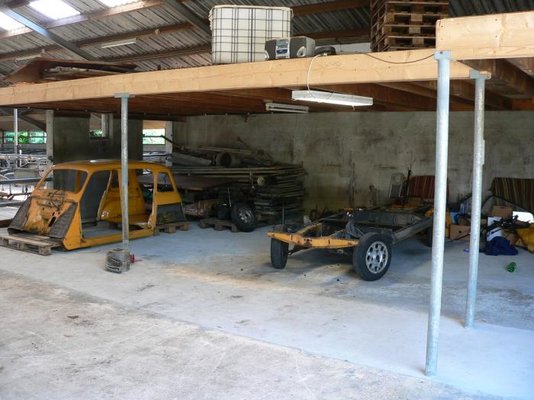
Anyway, here are the pictures of what I did today:


imgp0991.jpg

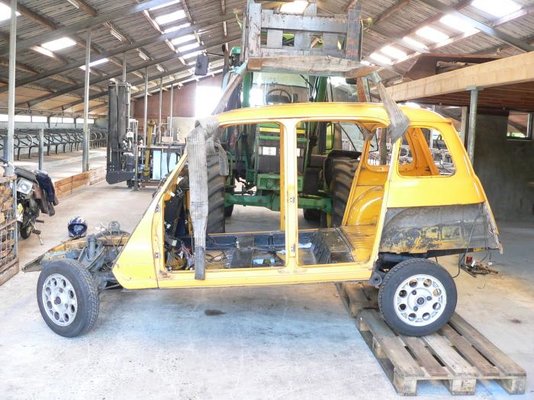
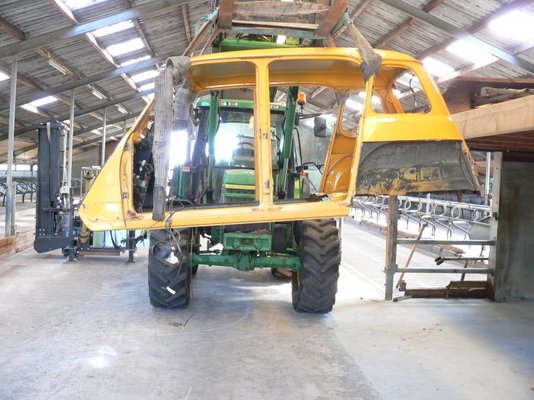
At about half past 3 my R4 looked like this
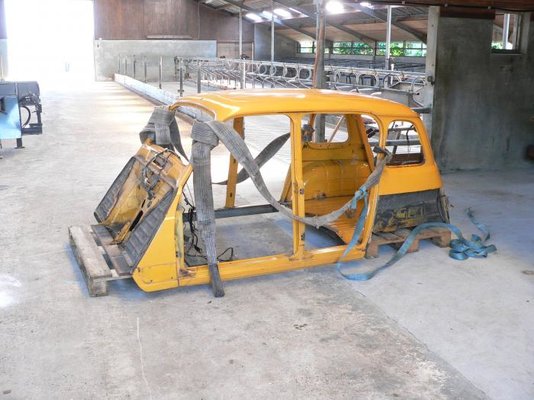
imgp0994f.jpg

The inside

imgp0995u.jpg

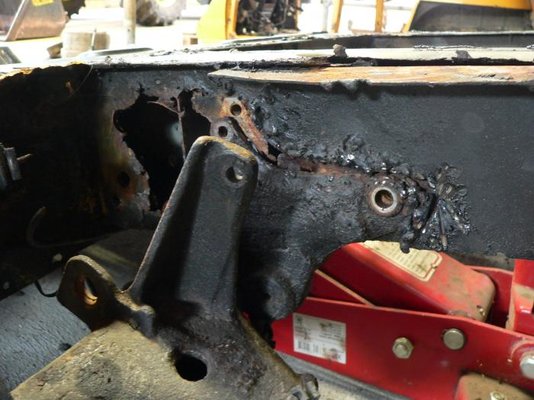
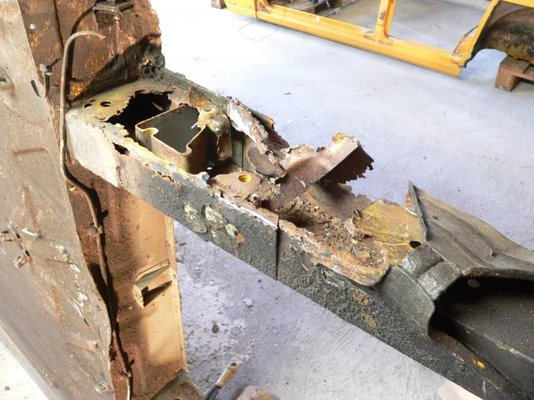
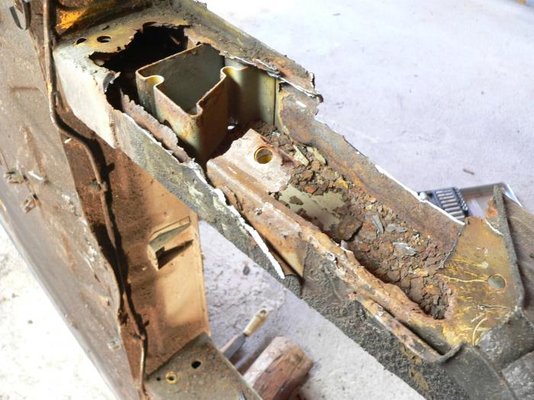
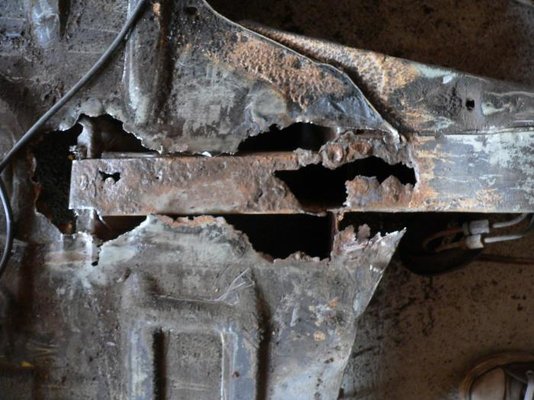
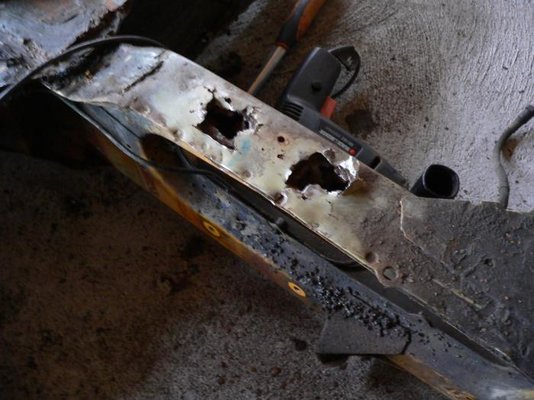
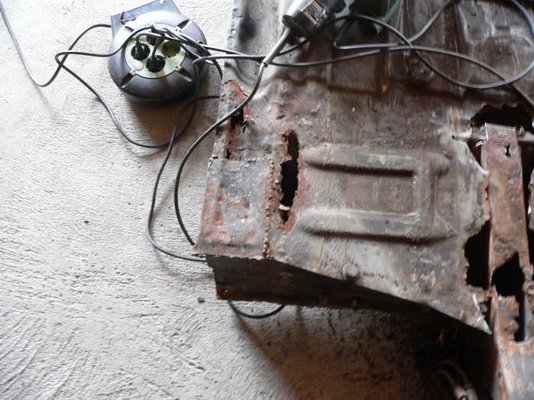
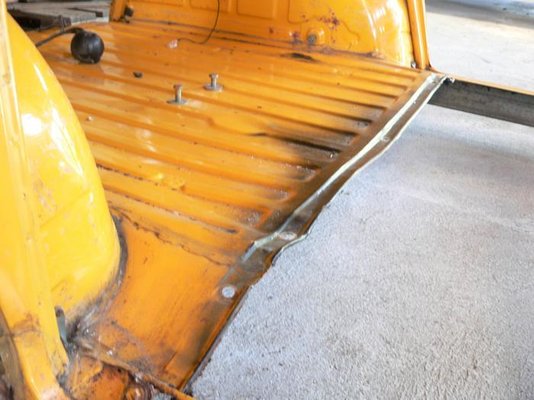
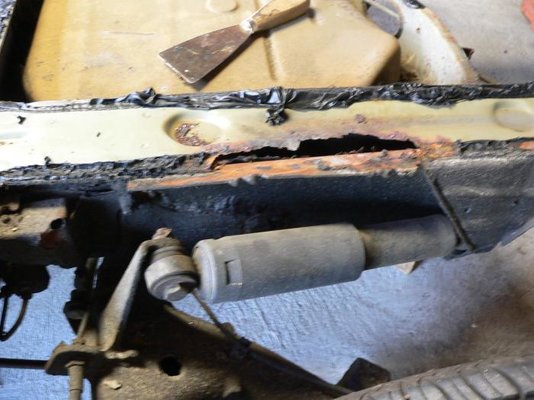
Rot in the backfender. I'm going to repair that with a repairstrip like Malcolm did on his Gordini (okay, only on one side ;)).

imgp0996.jpg

Minus Grille and bumper.

imgp1002j.jpg

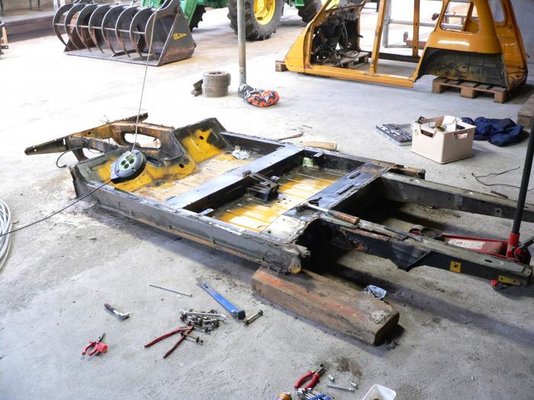
Quite a step forward

imgp1006o.jpg

Goes without saying.

imgp1016.jpg

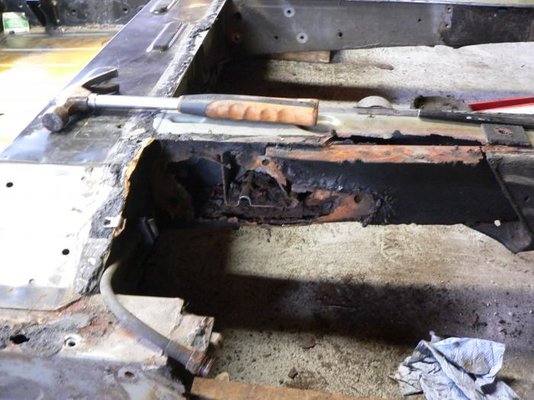
At the end of the day

imgp1017.jpg

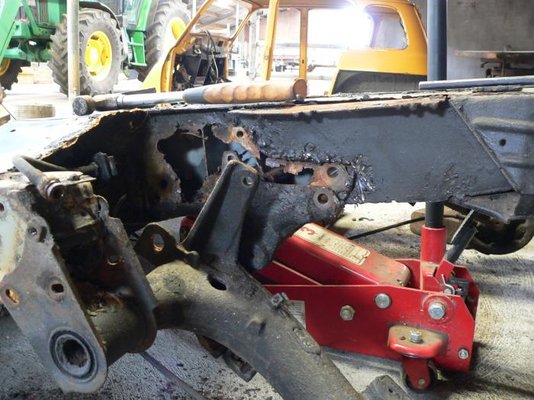
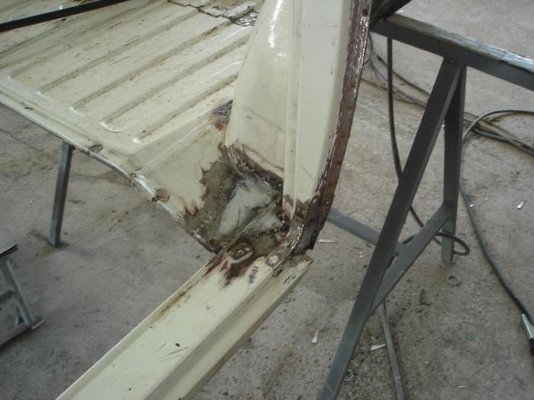
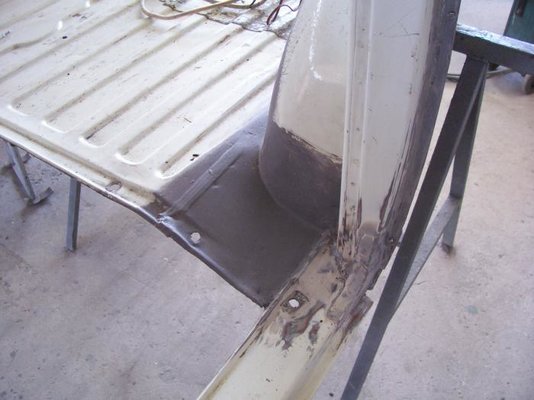
Very good wheelarch (unlike the other side).

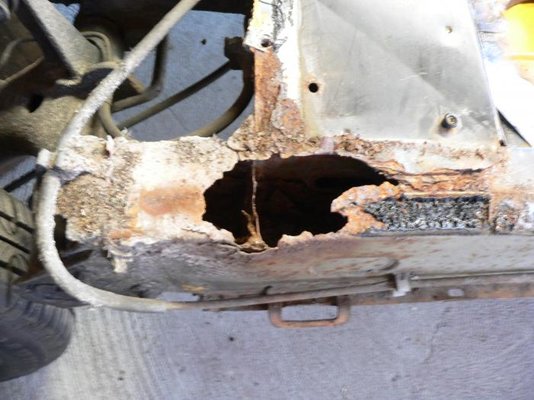
I had the occasional breaking bolts ofcourse, as well as kinda rotten inner wings, a front door with 2 very bad hinges (in fact, there was a bent nail put through the holes of the hinge in stead of the original pin) and some other minor things.

Anyway, tomorrow will see more progress. I'll keep you updated!

Bye!
 
The car looks like a great base for a project - pay attention to the rust proofing and sealing and it should last for ever. Most of my project cars have rust in the seams - it is too late for them. Yours looks like the 1985 cars we have in the UK which were much better protected.

My only worry is your garage looks a bit too small. :D Looking forward to seeing the progress.
 
Hey!

Well, yes, the garage is a bit tiny indeed! I planned to go there this morning by freighttruck, guess what, it didn't fit!

(Well, actually, I had to think of the biggest vehicle I could come up with now and I am still lying because I'm quite certain that even very large trucks would easily fit. I'll post a picture of the entire building just to show you why ;) and yes, i now think of Caterpilars and things like that ;))

Well yes, I think it's a good base too! I certainly plan to seal everything very well so I don't have to mind about rust and rot!

Anyway, I have been busy today, mostly things that don't really catch the eye so it might look like not much has happened.

I haven't taken the engine out yet but chances are I will tomorrow!

A few pictures:

p1070472b.jpg

Some rust. I still need an example of what this is supposed to look like without rust, so if anyone has a picture... I'll have to weld in some fresh metal there I guess.

p1070473.jpg

Etc.

p1070476.jpg

The rotten inner wing, which will be repaired with a welding strip.

p1070483d.jpg

Backside

p1070484.jpg

Back bumper and the tow bar.

Well, more tomorrow!

Goodnight!
 
Hello!

Nice R4! I hope all will go well with the restoration and you will enjoy it again soon!

Here are three photos from my archive, I hope they show well what you need to see. The third one has been shot from where the rear left mudflap would have been.
 
  • DSC01967.jpg
    DSC01967.jpg
    47.4 KB · Views: 1,664
  • 100_2602.jpg
    100_2602.jpg
    44.5 KB · Views: 1,669
  • 100_2603.jpg
    100_2603.jpg
    38.1 KB · Views: 1,660
Ah thanks! That's what I was looking for! I think mine does look rather ok if this is what it's supposed to be like. Very useful, thanks.

Well, today I've been busy again but got a little ill as the day went on, had a very bad headache and started sweating and getting all warm and dizzy so I called it a day at 6 p.m. but still managed to get some things done and of course I took some pictures.

So here's the progress for today:

- Took out the windows with a little help from someone who repaired a lot of R4's when he worked in a garage back in the days.
- Took out the radiator with accompanying tubes.
- Took out dashboard, heater etc.
- Disconnected one steeringarm (or how you call that?), the other side is stuck so we'll have to heat that with a gasflame the next time.
- Disconnected steeringrod
- Disconnected inner wing passengerside but still have to take it off, which means getting it off that sticky sealing

It goes without saying that it always takes more time than you would think in advance since you always encounter the occasional stuck, hidden, sealed-in or broken bolts, as well as figuring out how things can be disassembled and the right sequence to take things off. So at the end of the day you always are a bit disappointed with how much progress you made ;).

And I'm sure I did a lot of other things which I can't recall right now.

Anyway, some pictures:

p1070562t.jpg

First a picture along with my 1977 Zündapp GTS50 bike, my means of transportation between my parent's place and where the car is now (bike was restored in 2005).

p1070565i.jpg

As I promised to Malcolm: a picture of how huuuge this building is ;). It's a cow pen, probably obvious, which is not in use anymore.

p1070566u.jpg

View from the other side. Guess I'm not going to have to worry where to put my stuff ;).

p1070579k.jpg

What it looked like at the end of the day

p1070580.jpg

Engine bay.

Well, maybe not the most interresting pictures because it may seem like there's not been much progress but well... you guys'll have to make do with that ;).

Regards!

Rutger.
 
Hi everybody!

Been making progress today! Here's what I did:

Removed inner wings with a blowtorch, the sealings were very sticky so I burned them off, worked fine!

I took out the steeringcolumn, pedals and the brake cilinder (and did not first detach that from the pedal-board, very messy and stupid).

I took out the driveshafts, first trying but not succeeding, only to find out it would make sense to take out the lower steering knuckle... anyway

Also bolted loose the whole body but did not manage to take it off yet on account of that nasty sealing.

Some pictures:

p1010105k.jpg

Without the inner wings
p1010106.jpg

Same
p1010107k.jpg

Some rust in the sill but that'll be taken care of.
p1010108cj.jpg

A rusthole due to defect seal.
p1010110z.jpg

At another angle.
p1010117y.jpg

Ghost R4, spooky picture of the R4 without the engine.
p1010118wp.jpg

And again.


I'll have to take off the body next but I am afraid about doing it with the tractor (which has got a hoe-loader ... how do you call that in English) because I'm afraid it will generate too much force on the body and will bend the body. Is that a possibility?


Well, that was it for today!

Rutger.
 
Best way to break the seal between the body and chassis is to either lift the body with an engine crane or hoist just enough to allow the sealant to break loose overnight. You can use a jack and piece of wood in the same way. Also use a blunt knife to ease away the sealant and the body will eventually come off. Just be patient and very gentle and you won't do any damage. If you stand inside the body and press on the roof with your shoulders, you will see how light the body is. Just get a friend to help you lift the body off and place it on trestles along the length of the sills.
 
Thanks for the tip!

But we did it kind of the hasty way and everything went well, except the boot floor has been bent a bit (or actually, quite a bit). It would have made a lot of sense to do it the way you describe it but we kind of got in a thing of "let's get this over with" so ... well, nevermind. I guess the bootfloor can be bent back in place quite easily.

Pictures tonight or tomorrow.
 
Blowtorch works wonders on the body to chassis seal. But no problem - the boot floor will straighten when you sit it back onto a chassis. :D If you are welding the body while it is off the chassis be careful to fit the boot lid and check alignment.

Looking forward to photographs of the lift.

PS - could you load the photographs directly onto the forum - Imageshack can take a while to load and they might be gone when someone else wants to learn from your restoration in 10 years time. Easy to put the photos on here: http://www.renault4.co.uk/forum/showthread.php?t=2531
 
Ah, ofcourse! This forum is more modern than the Dutch one. I keep a thread on both forums so I just copied the image-links for both. But I see! I will do that, even better!

I'll post the pictures of the lifting now. We did the lifting yesterday with a tractor. Here they are:

Please ignore the bad quality of the images, I can't seem to handle my dad's gigantic camera (and that's only his old one) with it's manual functions etc. ;). My own camera is broken so ...

Anyway, I found some huge holes in the chassis too so there has to be some welding there too. I think I'll start with the chassis, once that's finished, I'll take care of the body, put them together, clean up the engine and if needed overhaul it, put that back and then put in the interior, something like that I guess. But I've got a fair image now of the work that needs to be done to get the GTL ready for action again!
 
  • P1070585.jpg
    P1070585.jpg
    78.3 KB · Views: 2,250
  • P1070587.jpg
    P1070587.jpg
    76.3 KB · Views: 2,164
  • P1070590.jpg
    P1070590.jpg
    70.3 KB · Views: 2,160
  • P1070595.jpg
    P1070595.jpg
    61 KB · Views: 2,154
  • P1070598.jpg
    P1070598.jpg
    52.2 KB · Views: 2,153
  • P1070600.jpg
    P1070600.jpg
    55.7 KB · Views: 2,144
  • P1070615.jpg
    P1070615.jpg
    59.4 KB · Views: 2,116
  • P1070608.jpg
    P1070608.jpg
    55.5 KB · Views: 2,124
Thanks! Will do. And if I get tired of the work, there's always the motivation that I really look forward to driving the car again so I think that'll keep me going anyway ;).
 
Did some work today (only 2 hours or so):

Removed the fueltank, removed some of the sealing and removed part of the front suspension. I didn't really make any serious progress because I forgot my camera and thought it was good to make some pictures to remember how things are supposed to be assembled.

Tomorrow I will probably take off the front suspension and the torsion bars and remove the rear wheels.

Actually, I already relieved the tension from the torsion bars by unnolting everything in front and then unbolting the dampers, the torsion bar then has no more resistance and springs loose. I put some wood blocks underneath to make sure it wouldn't be too violent a movement.

Now I have to make sure I put them back on the same way.

More pictures tomorrow.
 
Hello everybody!

Haven't posted anything for some days so I thought it was time for an update!

In the meantime I have taken off everything from the chassis, suspension and wheels and stuff. I made a start today with cutting out bad parts. But I found a bad surprise also; the driver-side chassisbeam on the backside is really really bad! I'd say you'd rarely see them worse but probably you've got plenty examples of ones that are or were worse ;) (at least I hope so, otherwise this would be a harsh start for an R4-rookie like I am ;)).

Anyway, we'll probably fix it anyway, maybe with some use of some kind of home-made allignmenttool like Malcolm used (bar with plates of metal to get the holes in the beams in the right place).

The brake-distributor on the back appeared to me as if it was broke, judging by the amount of rust it was covered in. Also one of the rocker-attachments of the rear-axle had it's best time so that needs to be replaced.

There was a plate of metal welded (well, kind of welded) to the beam to cover up the hole/give structural support. This was baked a bit to the attachment of the rear axle so I had to grind and use force to get the rear axle off. Then I took off the plate and found what you can see in the pictures. Also there was kind of nothing behind the brake distributor, just rust. Basically it makes you wanna replace the whole beam. The underneath-side of the beam isn't okay either. Only the side where the spare wheel would sit is okay. Aren't there supposed to be replacement/weld-in parts for the backbeams? Can't find them at Der Franzose right now. Also one rocker attachment beam is quite badly damaged but I'll get pictures of that another time.

Could use some advice on the engine-story though. I'd like some adice about what I should do with the engine. It ran quite smoothly when I took it out. It had some trouble starting but with the choke on and keeping the ignition on for a second or 5 to 10 it usually came to life. Only thing was: it shook quite annoyingly while driving about 50 km/h. I think it was an ignition problem.

I planned to overhaul it totally but a lot of people thought it was unnessecary. But some adviced to check the valves, replace some of the oil rubbers inside the engine (don't know the english word) and check the clutch etc. Does anyone have advice as to what to replace or what to not replace?

And another question: since the rust in the rear chassisbeam has advanced onto the attachmentpoint of the rear damper, is it wise to take of the attachmentpoint and to weld it back on later?

Ah well, pictures (not for the faint-hearted):
 
  • P1070658.jpg
    P1070658.jpg
    57.9 KB · Views: 1,306
  • P1070662.jpg
    P1070662.jpg
    69.9 KB · Views: 1,270
  • P1070663.jpg
    P1070663.jpg
    72.5 KB · Views: 1,274
  • P1070664.jpg
    P1070664.jpg
    61.2 KB · Views: 1,263
  • P1070668.jpg
    P1070668.jpg
    65.4 KB · Views: 1,281
  • P1070670.jpg
    P1070670.jpg
    65 KB · Views: 1,267
Hi Rutger-Peer,

I can almost feel your disappointment watching the last pictures.
I went through the same road with my F6. In the end it all will be good!

For the welding, take a look at this side...
http://renault4.weebly.com/achterbalk-slecht.html

Maybe you could e-Mail Roberto for some more tips or help.
He's from the Netherlands as well!

In general...
Try to do your work in little steps.
Don't open up too many "construction sites" at a time.
Do one thing/step after another.
Keep a journal of what to do next and in what order to do the restoration.
Finish one step before starting with the next one.

Otherwise the chances of getting frustrated are pretty high and it's getting pretty hard to bring that restoration to an end.


With the engine...
I wouldn't touch it until the chassis & the body has been finished.
And even then just do a little clean up, replace necessary seals, maybe a bit of fresh paint and that's it. To replace sparks, ignition cables, points, rotator cap & -finger and to adjust the ignition timing and the valve clearance do wonders!

As you may have seen it in my restoration thread I did not much with my engine. It is running now for about 2k Kilometers with NO problem so far.

And to swap the engine some day is not that big of a problem!
(At least after you got very familiar with the whole car by doing a complete restoration.)

Good Luck!


David
 
Hey David, thanks for the reply and the tips!

I "know" Roberto, I'm on the Dutch R4club-forum too and I've seen his name come by every now and then and I see him replying. Thanks for the tip and the link, maybe I'll ask him but the pictures are also helpful.

I'm considering now to replace the rocker carriers in whole because they are both rusty and rust has formed between the metal layers so I figure it's hard to get that all nice and clean again. Moreover, one side has a huge hole in the beam also and it seems that on that side the carrier itself is bent and distorted too so it would make sense to buy a replacement weld-in part from Der Fransoze or the like and maybe I'll just do the other side then too.

But I found more holes in my chassis, I think it's a pretty bad chassis, even to R4 restorer's standards but I'll get it up and rolling again for sure, I don't plan to give in to a bit of rust ;).

More pictures of the other holes in a while!
 
Have been studying now for a few days so haven't been working on the car but I've got a few more photographs of yet some more holes in the chassis, I attached them.

I also found another Dutch site with some kind of guide to restoring the backbeams of the chassis, very uselful I'd say: here . As you can see, they made a replacement piece, located where the holes would have to be, drilled the holes and put in the bolts and bolted them tight, then they welded in the new part.

I was only worried whether it would be alligned properly, because the bolts are probably able to move a bit since the "holes" in the reinforcementpiece they go through aren't very tightly fit around them. Does anyone of you guys think this will pose problems? In other words: is this the right way to do such a repair? How precisely do the holes have to be placed actually? Does it have to be on the millimeter precise?

Also, if I have to replace the rocker carriers, I'll have to have some kind of allignmenttool (or are there other ways to allign the holes properly?). I read about Malcolm's Rear suspension Jig but due to various reasons I think it will be hard for me to get the dimensions right as he described it (I'm afraid I haven't got the means to work that precisely). My question is: would it be sensible to make it the other way around? So, make a rod with 4 pieces of sheetmetal, spaced apart with the right dimensions from the tutorial Malcolm made, then putting that on a good chassis and drilling the holes into the sheetmetal pieces through the holes in the good chassis? Effectively just copying the dimensions from another chassis? I happen to know someone who has a bare chassis to copy the holes from. Copying it from my own chassis will be trickier I guess, since those backbeams are damaged themselves and I'm afraid the rocker carrier on at least one side has just bent out of shape, don't trust it being alligned as it's supposed to anymore.

And do you guys think it would make sense to, if I'm going to make such a tool anyway, wait with repairing those backbeams till the jig is there?

Well, lots of questions but I got to figure out the way to do this right.

Regards from a bloody hot Netherlands (although it rained cats and dogs today, yesterday didn't quite pay hommage to our country being a "frog-country" with 35 degrees Celcius ;)).

Rutger.
 
  • P1070673.jpg
    P1070673.jpg
    63.7 KB · Views: 660
  • P1070682.jpg
    P1070682.jpg
    55.5 KB · Views: 663
  • P1070684.jpg
    P1070684.jpg
    68.6 KB · Views: 668
r4 chassis repair

unless you realy like welding and have a jig to make sure it all goes back in the right place-i think you need to find a new chassis or at the very least a good second hand one- i fear that ones buggerd-been there done that-it will be quicker too-just my 2 pence worth :(
Reg
 
Hey, you're probably right. And more people suggested that option. But I decided to go along with this one and get it on the street again. I've been offered a decent second hand chassis for 300 euro's but my point is more like: if I replace the whole chassis, then I replace almost half my car and that's not really what I had in mind with restoring my car. It's probably gonna be a pain in the ass to get the chassis up and going again but I think that's what restoring a car is about (at least, I'm trying to comfort myself that way ;)).

It's more a feel-thing.
 
Rutger i know what you mean-if it was a high value car i could understand-i have a 1970 280 sl and padoda people are crazy for being original but nobody has tyres brakes etc that are-they make them perfect and then dont drive them any more - mad. buy that second hand chassis as a standbuy and good luck-i do understand what your thinking
Reg
 
Back
Top