


You are using an out of date browser. It may not display this or other websites correctly.
You should upgrade or use an alternative browser.
You should upgrade or use an alternative browser.
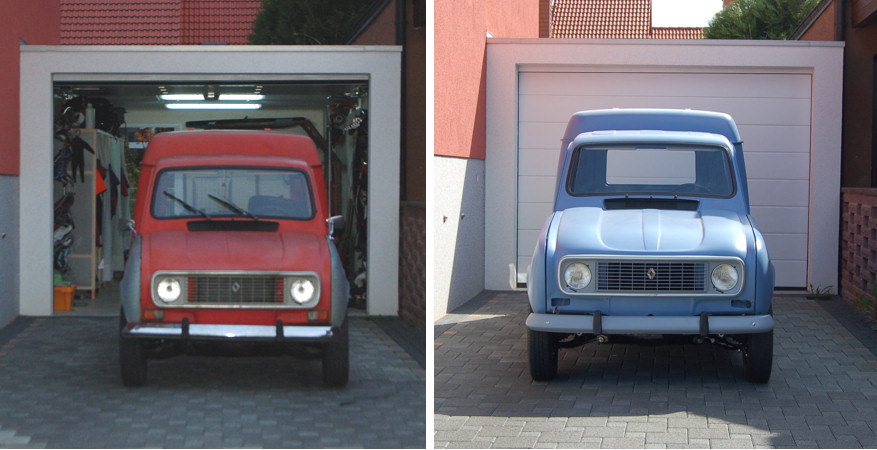
1985 Renault R4 F6 restoration project
- Thread starter DavidN
- Start date

DavidN
Enthusiast
- Messages
- 488
It has been 6 month since my last posting on this thread.
I once again try to keep the story on my F6 van up to date.
In July I was happy to stumble upon a set of rare "Seral" alloy wheels.

After trying "regular street tyres" first and not liking the looks I ended up mounting the mud-tyres with the Seral alloy wheels.

The whole story can be found here:
http://www.renault4.co.uk/forum/showthread.php?t=5604
I once again try to keep the story on my F6 van up to date.
In July I was happy to stumble upon a set of rare "Seral" alloy wheels.
After trying "regular street tyres" first and not liking the looks I ended up mounting the mud-tyres with the Seral alloy wheels.
The whole story can be found here:
http://www.renault4.co.uk/forum/showthread.php?t=5604
DavidN
Enthusiast
- Messages
- 488
Since it's restoration the van has been unusually high.
Especially at the front it looked more like a 4x4 Sinpar than a std. Renault 4 van.
I couldn't think of any mistake I made when I did the restoration back in 2009/2010.
When dismantling the front axle I put marks on the torsion bars and all the corresponding parts.
When re-assembling I set all the suspension parts back to where they have been but nevertheless the van has been that high at the front.
When comparing the before and after shots you barely notice a difference in the angle of the lower wishbones.
My guess (and only explanation) is that one of the former owners had played with the car's ride height to fit his preferences.
First I liked the looks and in combination with the mud tyres it kind of fit the big picture.

But after 3 Years and about 10k Kilometres the extreme ride height had put too much stress on the drive shafts.
I noticed that both of them had established a knocking noise when changing from acceleration to deceleration and vice versa.
So the front axle had to be lowered ...
The whole story has been a few days of try and error until I found out how to correctly set the ride height rotating the splined torsion bars of the front axle.
In the end I lowered the front axle by turning the front torsion bars 6 splines on both ends from the original setting.
That made a difference of 33 Millimetres.
The Renault special tool Sus.311 turned out to be a massive help here!
Here it is - lowered in the front to a more moderate height:

Ride height thread:
http://www.renault4.co.uk/forum/showthread.php?t=3643&page=3
Especially at the front it looked more like a 4x4 Sinpar than a std. Renault 4 van.
I couldn't think of any mistake I made when I did the restoration back in 2009/2010.
When dismantling the front axle I put marks on the torsion bars and all the corresponding parts.
When re-assembling I set all the suspension parts back to where they have been but nevertheless the van has been that high at the front.
When comparing the before and after shots you barely notice a difference in the angle of the lower wishbones.
My guess (and only explanation) is that one of the former owners had played with the car's ride height to fit his preferences.
First I liked the looks and in combination with the mud tyres it kind of fit the big picture.
But after 3 Years and about 10k Kilometres the extreme ride height had put too much stress on the drive shafts.
I noticed that both of them had established a knocking noise when changing from acceleration to deceleration and vice versa.
So the front axle had to be lowered ...
The whole story has been a few days of try and error until I found out how to correctly set the ride height rotating the splined torsion bars of the front axle.
In the end I lowered the front axle by turning the front torsion bars 6 splines on both ends from the original setting.
That made a difference of 33 Millimetres.
The Renault special tool Sus.311 turned out to be a massive help here!
Here it is - lowered in the front to a more moderate height:
Ride height thread:
http://www.renault4.co.uk/forum/showthread.php?t=3643&page=3
DavidN
Enthusiast
- Messages
- 488
The chrome insert of my grille has been in a very bad shape.
During the restoration I painted the grille to match the bumpers and just re-used the old trim.
(The trim is just clipped onto the grille and can easily be removed/replaced.)
Recently I replaced the chrome insert with the new and shiny trim piece of a repro-grille that I ordered from "Der Franzose".
BTW - The fit and finish of the new repro grilles that you can get from CiPeRe / Franzose are terrible.
I would always prefer a good used genuine grille and paint it instead of using one of these repro things! @ Alexandre


DavidN
Enthusiast
- Messages
- 488
Floor carpet
I added a nice floor carpet in black velour with a grey whipped seam.
There's even a Renault logo embroided which in my opinion is a touch too much, but I have to live with it.
As I only could get a set for the R4 sedan I had to cut the small carpet for the rear floor and the large piece for the "cargo area" by myself.
I had a sewing shop do the grey whipped seams to match the front floor carpet.
I am very pleased with the outcome!


DavidN
Enthusiast
- Messages
- 488
When I prepared the engine in February 2010 I mounted a blue powder coated valve cover.
That was before I decided to paint the whole car in a smurfish blue.
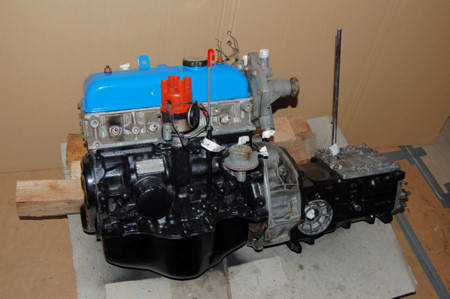
At first I liked the colour of the powder coating.
But as soon as I installed the engine I found out that the blue of the valve cover didn't match at all with the blue of the body.

The colours kind of "bite" each other and I never really liked it.
I finally got the chance to paint the valve cover in black mat when I had it removed to re-adjust the tappet clearance a few weeks ago.
That was before I decided to paint the whole car in a smurfish blue.
At first I liked the colour of the powder coating.
But as soon as I installed the engine I found out that the blue of the valve cover didn't match at all with the blue of the body.
The colours kind of "bite" each other and I never really liked it.
I finally got the chance to paint the valve cover in black mat when I had it removed to re-adjust the tappet clearance a few weeks ago.

Steve Hennessey
Moderator
- Messages
- 1,406
That's better ")
mojobaby
Enthusiast
- Messages
- 1,328
i remember buying a chrome repro bumper for my Beetle in Cape Town and it started rusting after a month,
I really like the finish on your rocker cover and also the air filter. They now match perfectly!
May I ask you about the air filter intake pipe at the far side? In the one photo its silver and the other photo its grey. is it something you made yourself? I've got to replace mine at some stage
I really like the finish on your rocker cover and also the air filter. They now match perfectly!
May I ask you about the air filter intake pipe at the far side? In the one photo its silver and the other photo its grey. is it something you made yourself? I've got to replace mine at some stage
Snoopy1974
Enthusiast
- Messages
- 412
"I would always prefer a good used genuine grille and paint it instead of using one of these repro things! @ Alexandre "
I do agree with you David I thought buying parts at Cipere would be a great idea and I would have good quality parts but... If I found a real Renault grille or a good condition one, maybe I'll painted it in the same grey than the bumpers...
... question on the bumpers: can you confirm me that it's the Renault 677 grey ???
I do agree with you David
I thought buying parts at Cipere would be a great idea and I would have good quality parts but... If I found a real Renault grille or a good condition one, maybe I'll painted it in the same grey than the bumpers...... question on the bumpers: can you confirm me that it's the Renault 677 grey ???
DavidN
Enthusiast
- Messages
- 488
...
May I ask you about the air filter intake pipe at the far side? In the one photo its silver and the other photo its grey. is it something you made yourself? I've got to replace mine at some stage
Sure!
The grey tube is a 45 Millimetre inner diameter composite special air tube.
It is made of 3 layers (paper-aluminium-paper). It's called Westerflex PAP 45.
I don't know if you can get it in France though.
The silver flexible tube I used prior to the Westerflex was made of aluminium only.
I got it from an autoparts shop but it didn't last very long.
It cracked in several spots because of the constant vibration when the engine is running.


DavidN
Enthusiast
- Messages
- 488
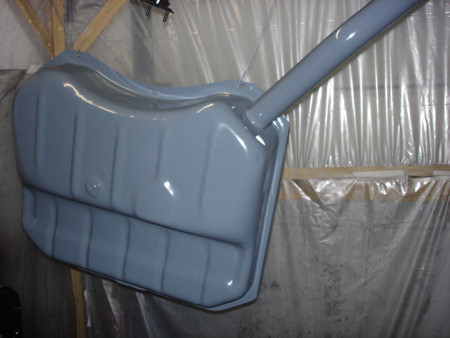
Fuel Tank Restoration
The current project I’m working on is the fuel tank.
When I did my restoration back in 2009/2010 due to a lack of time I only drained and flushed the fuel tank of my F6 van and just cleaned and painted the outside:
I never removed the sender unit and so I couldn’t get a look inside the tank to check for rust.
As I left the inside of the tank untouched I am running a 2-filter-setup since the van got back on the street.
In addition to the regular fuel filter in front of the carburettor I fitted a second inline filter right in front of the fuel pump.

DavidN
Enthusiast
- Messages
- 488
Both of the inline filters fill up with grainy, brownish, rusty residue every few thousand Kilometres.

That residue is so microscopic that it even partially makes it's way through the filters and ends up in the carburettor.
When I did the restoration I thoroghly cleaned the carburettor and all the jets and pipes!
And here’s the inside of my carb after the first 4k Kilometres after I finished my restoration: :eek:

So I had to do something against the rust inside the tank.
I bought a good used fuel tank off eBay. That way I can work on the tank and still use my car.")
That residue is so microscopic that it even partially makes it's way through the filters and ends up in the carburettor.
When I did the restoration I thoroghly cleaned the carburettor and all the jets and pipes!
And here’s the inside of my carb after the first 4k Kilometres after I finished my restoration: :eek:
So I had to do something against the rust inside the tank.
I bought a good used fuel tank off eBay. That way I can work on the tank and still use my car.

DavidN
Enthusiast
- Messages
- 488
The tank I bought will be prepared thoroughly.
The inside will be completely cleaned and sealed to protect it permanently against rust.
First I drained and flushed the tank.
After that I cleaned the outside and removed the old sending unit.

To remove any residue that has built up on the inside I filled the tank with half a Litre of fresh petrol and added a handful of clean screws and nuts.
Then I closed all the holes and gave the tank a good shake for about 10 Minutes.
You won't believe how filthy the mixture was when emptied out of the tank. :eek:
After that I flushed the tank again to clean it from any dirt and grease left inside.
After the tank had dried out I fought the rust inside ...
I filled it with a handful of clean screws, gave it a very good shake and emptied the screws and the rusty residues.
That step I repeated several times and the picture below shows what came out of the tank.
Here a cement mixer would have come in very handy as discussed in this thread:
http://www.renault4.co.uk/forum/showthread.php?t=5950

After a few times of filling in screws, shaking them around and emptying them out again, the inside became clean of rust and less and less of the rusty powder came out of the tank together with the screws.
Here you can see the dry, clean, and mostly rust free inside of the tank:
(It was a bit of a challenge to get a good picture through the small opening though.)

After that I gave the outside of the fuel tank a coating with cheap rust primer.
It is just a quick shot out of a spray can and will be removed again after the inside of the tank is properly sealed.
The tank was zinc plated in the manufacturing process and therefore needs a special etch primer specifically for zinc plated surfaces.
It's just nicer to work on a clean and freshly painted tank.
The inside will be completely cleaned and sealed to protect it permanently against rust.
First I drained and flushed the tank.
After that I cleaned the outside and removed the old sending unit.
To remove any residue that has built up on the inside I filled the tank with half a Litre of fresh petrol and added a handful of clean screws and nuts.
Then I closed all the holes and gave the tank a good shake for about 10 Minutes.
You won't believe how filthy the mixture was when emptied out of the tank. :eek:
After that I flushed the tank again to clean it from any dirt and grease left inside.
After the tank had dried out I fought the rust inside ...
I filled it with a handful of clean screws, gave it a very good shake and emptied the screws and the rusty residues.
That step I repeated several times and the picture below shows what came out of the tank.
Here a cement mixer would have come in very handy as discussed in this thread:
http://www.renault4.co.uk/forum/showthread.php?t=5950
After a few times of filling in screws, shaking them around and emptying them out again, the inside became clean of rust and less and less of the rusty powder came out of the tank together with the screws.
Here you can see the dry, clean, and mostly rust free inside of the tank:
(It was a bit of a challenge to get a good picture through the small opening though.)
After that I gave the outside of the fuel tank a coating with cheap rust primer.
It is just a quick shot out of a spray can and will be removed again after the inside of the tank is properly sealed.
The tank was zinc plated in the manufacturing process and therefore needs a special etch primer specifically for zinc plated surfaces.
It's just nicer to work on a clean and freshly painted tank.

DavidN
Enthusiast
- Messages
- 488
The next step was to eliminate any grease inside the tank that might have withstood the cleaning process so far.
I used some industrial heavy duty dissolvent with lots of hot (very hot!) water and flushed the tank a few times.
Right after that I fought the little remains of rust inside the tank the chemical way, using oxalic acid.
I completely filled up the tank with a mixture of oxalic acid and hot water.
Then I put an immersion heater into the opening of the fuel sender for about 30 Minutes to keep the acid hot.
After that I removed the heater, closed all holes, removed the least bit of trapped air inside the tank and left it that way over night.
The next morning I drained all the acid, flushed the tank again thoroughly with hot water and used a hot-air gun to speed up the drying process.


Snoopy1974
Enthusiast
- Messages
- 412
Hi David,
I'm totally admiring looking at the quality of your job, and the ingenuity of your system to clean your tank, if you read my thread on my R4 TL you will notice that I have exactly the same problems as you ! I should do the same job on my own tank, but I don't have an heather like yours, and where do you find the acid you use ???
I'm totally admiring looking at the quality of your job, and the ingenuity of your system to clean your tank, if you read my thread on my R4 TL you will notice that I have exactly the same problems as you ! I should do the same job on my own tank, but I don't have an heather like yours, and where do you find the acid you use ???
DavidN
Enthusiast
- Messages
- 488
Hi Alexandre,
I purchased the oxalic acid off eBay. It is a white powder and I used 1.5 Kilogrammes for the job.
To heat it up just speeds up the process but is not necessarily required.
You can fill up the tank with cold acid and leave it for let's say 72 hours and you will have the same results.
The better - but more expensive way - is to order the complete POR15 Tank Sealer Kit.
That kit will come with the dissolvent (they call it Marine Clean) and oxalic acid (they call it Metal Ready).
I used the 1Quart can POR15 but that was overkill! I think half a Litre would do the job as well!
And here we go ...
I cleaned the inside of the tank one final time with silicone remover.
(Poured in half a litre rolled the tank around and emptied the tank completely.)
After that I was absolutely sure that all contamination, all dirt and all residue (gum & varnish) and all grease have been removed.
The inside of the tank was absolutely clean and bare metal with no traces of rust whatsoever.
After the tank has dried out completely I poured the whole Quart of POR 15 into the tank.


DavidN
Enthusiast
- Messages
- 488
... then I closed all the openings and "rolled" the tank around for about 10 Minutes.
That is important for the sealer to reach all areas inside the tank to cover every Inch of the inside surface.
The sealer kind of "sticks" to the metal like a glazing and you'll get a complete coating of the entire inside of your tank.
After that I drained the remaining sealer back into the can.
The picture shows how little of the sealer was used to coat the complete tank. :eek:
After most of the sealer has drained from the tank (it is virtually impossible to drain it completely) I rolled the tank around for about an hour. :?
That way I prevent any puddles in the tank that will weaken the coating.
The sealer now needs 72 to 96 hours to dry completely.
