You are using an out of date browser. It may not display this or other websites correctly.
You should upgrade or use an alternative browser.
You should upgrade or use an alternative browser.
I've ordered a new chassis for the F4 van!
- Thread starter malcolm
- Start date
malcolm
& Clementine the Cat
- Messages
- 4,641
- Location
- Bedford UK
My wood burner is only to make one room feel warmer in the winter. I get through between 1 and 2 cubic metres a year.just as a rough meter, if your heating is fueled by wood, how much wood are you using per season?
(I understand this may be not the place for such a conversation)
malcolm
& Clementine the Cat
- Messages
- 4,641
- Location
- Bedford UK
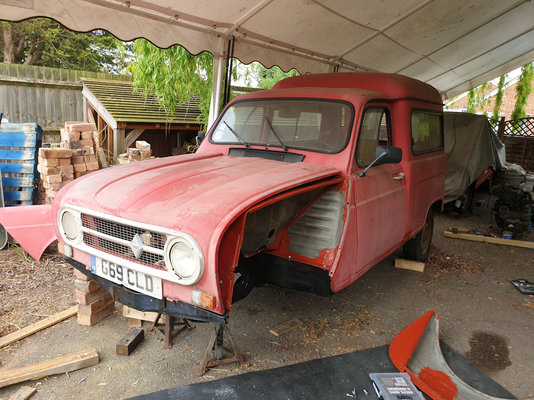
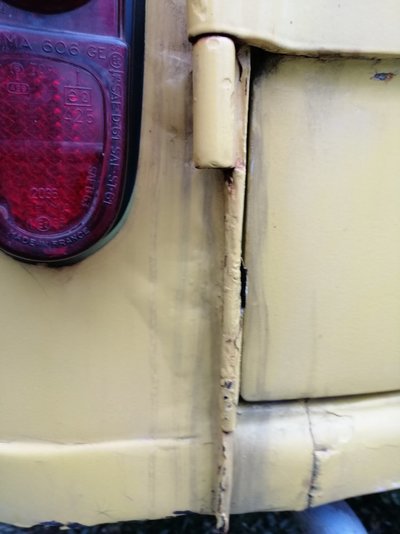
Claude is taking up too much space in bits so I'm planning to weld up the body before putting the new chassis underneath. There are a lot of bits of rust that look really small and end up being big when the rust has been cut out. All of them are fiddly too so I'll not get rid of all the rust.
For everything the rust is where the spray-on sealant had gaps. I've ordered a lot of new sealant so will hopefully get everything sealed underneath while it is accessible.
These bits were fine when I got the van. Maybe ought to have ordered the sealant earlier.
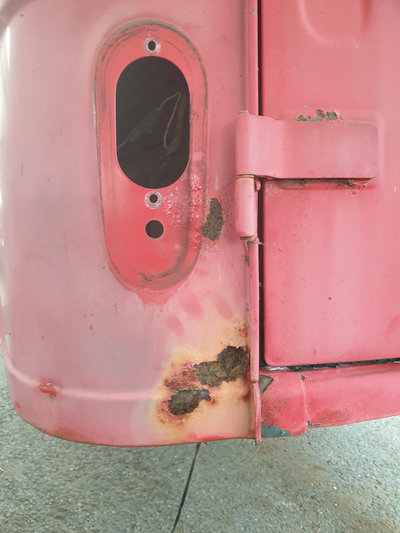
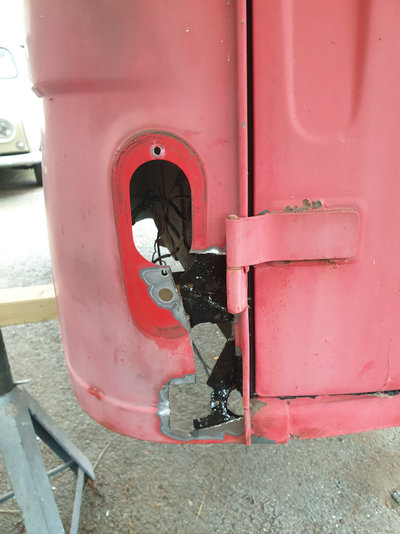
For everything the rust is where the spray-on sealant had gaps. I've ordered a lot of new sealant so will hopefully get everything sealed underneath while it is accessible.
These bits were fine when I got the van. Maybe ought to have ordered the sealant earlier.


Last edited:
Azazello
habitué
- Messages
- 1,113
- Location
- Italy
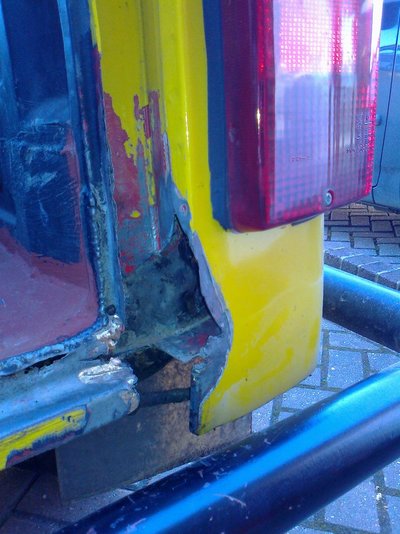
I have the same rotten corner on mine!Claude is taking up too much space in bits so I'm planning to weld up the body before putting the new chassis underneath. There are a lot of bits of rust that look really small and end up being big when the rust has been cut out. All of them are fiddly too so I'll not get rid of all the rust.
For everything the rust is where the spray-on sealant had gaps. I've ordered a lot of new sealant so will hopefully get everything sealed underneath while it is accessible.
View attachment 28081
malcolm
& Clementine the Cat
- Messages
- 4,641
- Location
- Bedford UK
That corner seems especially a pain. Normally you would cut out to metal where there is no sign of rust, but there are double skinned panels running right the way up and just a little rust between them all the way. I guess the repair will be better than it was but I can see this as a place where rust will come back.I have the same rotten corner on mine!
AdamWilkes
Enthusiast
- Messages
- 407
- Location
- Poole
malcolm
& Clementine the Cat
- Messages
- 4,641
- Location
- Bedford UK
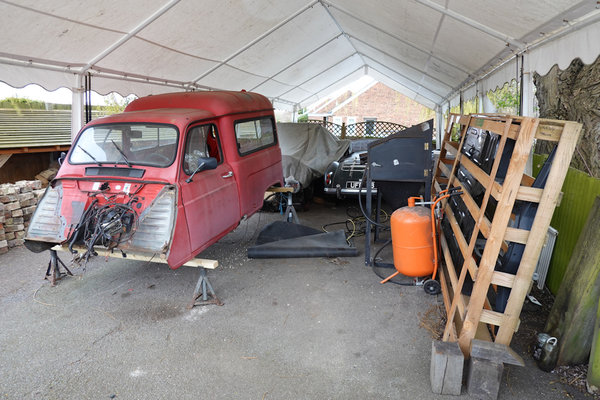
Shotblasting cabinet set up under the tent. I'm planning to shotblast and preserve the rare bits.
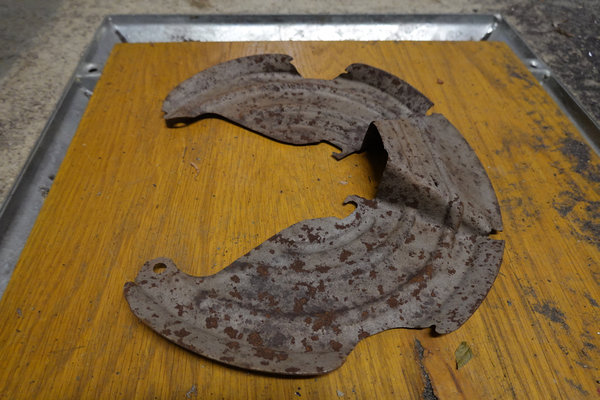
The crazy thin front brake shields came up OK with only a few little holes. I didn't prime them after blasting as my paint had dried up. I've got thinners now so will give them a quick blast again and get some of the 95% zinc Bilt Hamber primer on them. That stuff is really effective.
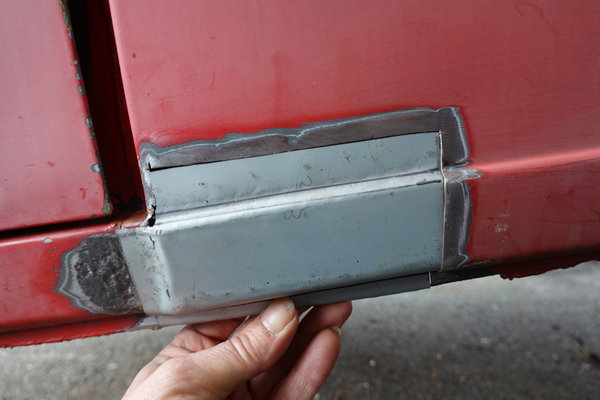
Making patches for the rusty bits. The welder is heavy and I don't want to take it out more often than I need to. Figure if I prepare the patches first then the welder will only need to go out once. Lots of heat and rushing the welding would distort the big flat panels so maybe a little on one patch then move to the next before eventually coming back again. I'll have about 12 patches so that could work well.

The crazy thin front brake shields came up OK with only a few little holes. I didn't prime them after blasting as my paint had dried up. I've got thinners now so will give them a quick blast again and get some of the 95% zinc Bilt Hamber primer on them. That stuff is really effective.

Making patches for the rusty bits. The welder is heavy and I don't want to take it out more often than I need to. Figure if I prepare the patches first then the welder will only need to go out once. Lots of heat and rushing the welding would distort the big flat panels so maybe a little on one patch then move to the next before eventually coming back again. I'll have about 12 patches so that could work well.

malcolm
& Clementine the Cat
- Messages
- 4,641
- Location
- Bedford UK
Suspension parts got mostly cleaned up and painted today. I just wire brushed them and painted them badly so it was a quick job. The grey primer is Bilt Hamber Electrox 95% zinc which has been very effective on the Gordini. The black is Rustolium just because I had a tin knocking around.
Planning to replace bearings, joints, brakes, and brake lines while everything is apart, but I can't find sensibly priced Bendix calipers. The old ones worked when they came off so will hopefully be OK.
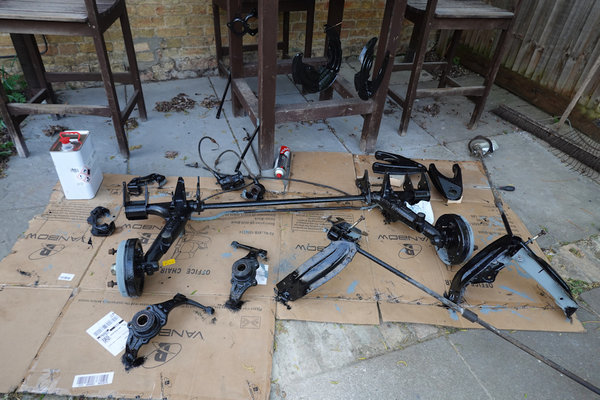
Planning to replace bearings, joints, brakes, and brake lines while everything is apart, but I can't find sensibly priced Bendix calipers. The old ones worked when they came off so will hopefully be OK.

malcolm
& Clementine the Cat
- Messages
- 4,641
- Location
- Bedford UK
I've done a bit again. My welding is getting worse because I can't see anything. I must get some new glasses. I want to finish off the body welding this weekend so I can get the chassis out of the way. It's hot and sunny and the chassis is blocking the MG in.
I've cut some rusty metal away from the rear seatbelt mountings. Ideally the whole reinforcement panel would need to come off to clean the rust between it and the body. Has anyone done that and was it a pain? I'm half tempted to patch it up every few years.
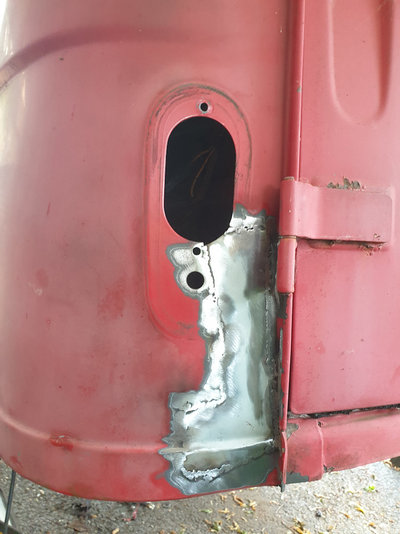
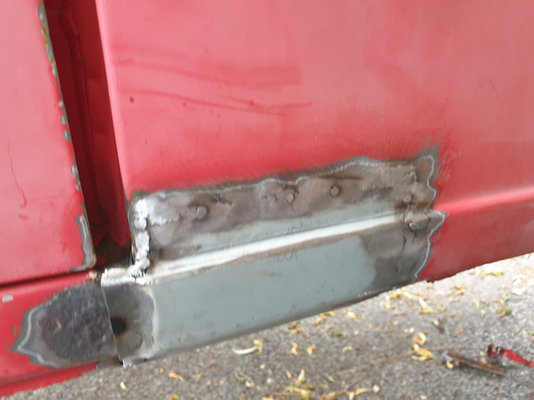
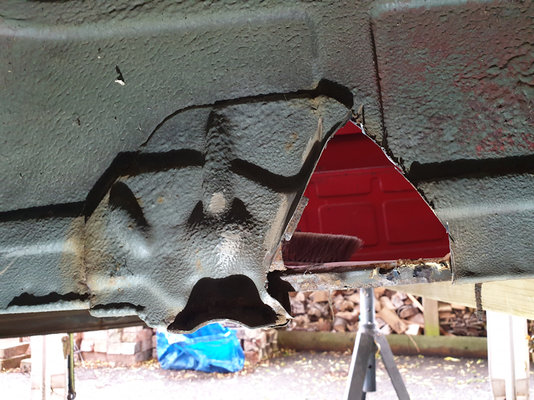
I've cut some rusty metal away from the rear seatbelt mountings. Ideally the whole reinforcement panel would need to come off to clean the rust between it and the body. Has anyone done that and was it a pain? I'm half tempted to patch it up every few years.


Azazello
habitué
- Messages
- 1,113
- Location
- Italy
Is the price reasonable?Mlinar brothers have that panel if you want to change it whole.
I've seen replacement panels for this part, don't remember where, but they were really expensive!
petak
Enthusiast
- Messages
- 1,926
- Location
- Vodice, Croatia
I do not remember.Is the price reasonable?
I've seen replacement panels for this part, don't remember where, but they were really expensive!
Will try to ask them and pass the answer.
malcolm
& Clementine the Cat
- Messages
- 4,641
- Location
- Bedford UK
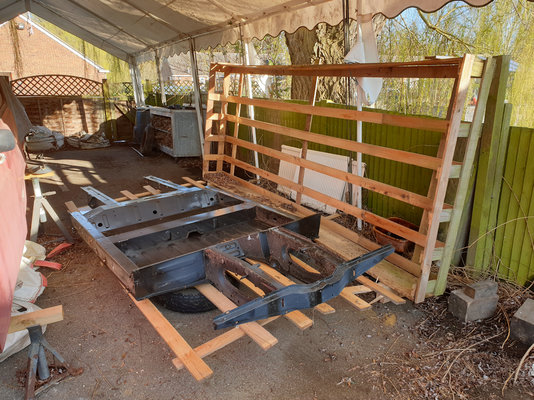
I haven't done anything on the van for nearly a year. I've finally unboxed the chassis. It has stripes where the e-coat has faded in the sun. I want to mount the body on the chassis this weekend so I'm finishing off the welding on the body.
There was a hole in the bulkhead behind the reinforcement bracket that bolts to the chassis. That was inconvenient as the bulkhead panel was sandwiched between the reinforcement and the panel behind the engine. So reinforcement bracket off and a repair nearly ready to butt weld to the bulkhead.
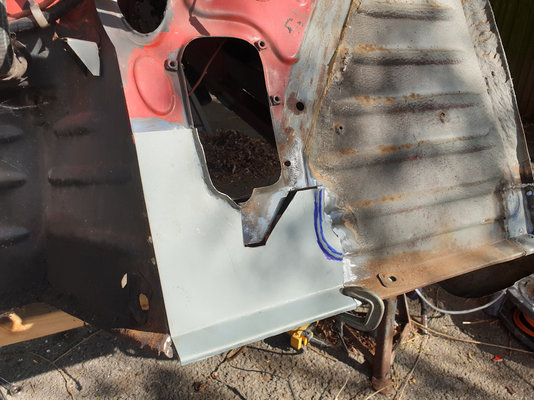
There was a hole in the bulkhead behind the reinforcement bracket that bolts to the chassis. That was inconvenient as the bulkhead panel was sandwiched between the reinforcement and the panel behind the engine. So reinforcement bracket off and a repair nearly ready to butt weld to the bulkhead.


malcolm
& Clementine the Cat
- Messages
- 4,641
- Location
- Bedford UK
I bought the MGA in 1992. It had been sitting in a scrapyard in Texas for a long time before that. Some photos of the restoration on here: https://www.vord.net/cars/helga/helga_restoration.html Of course the restoration was nearly 30 years ago and it's quite faded now.
Nearly finished the bulkhead. Looks perfect now. :-)
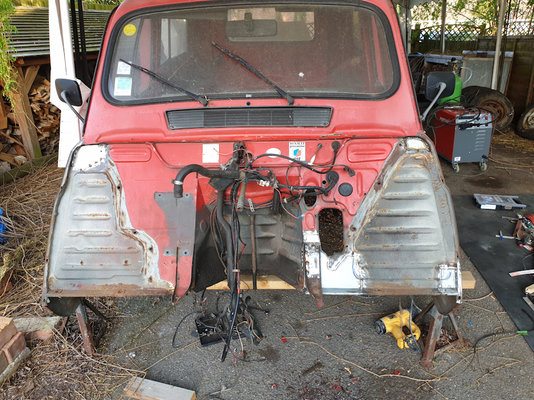
Nearly finished the bulkhead. Looks perfect now. :-)

malcolm
& Clementine the Cat
- Messages
- 4,641
- Location
- Bedford UK
I've started fitting the new chassis. Ran into a couple of problems. One of the rear suspension bolts didn't fit through the hole. A hand file worked for making the hole bigger.
The front of the body doesn't fit at all well. With the bottom of the A-pillars sitting on the chassis sill sections the bulkhead is about 10mm too high. I can get the heater console bolts to line up with some assistance but the bulkhead is very stiff in the middle so I can't close the gap. I think I'll end up using spacers and a lot of sealant.
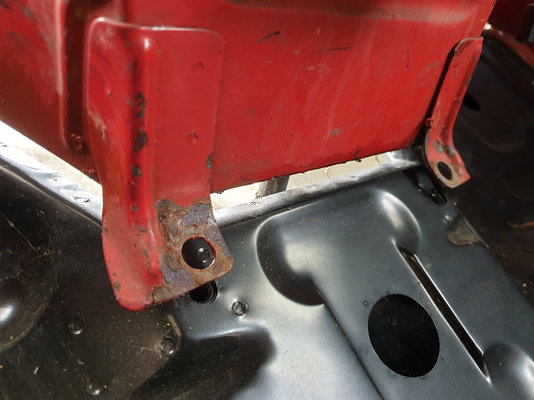
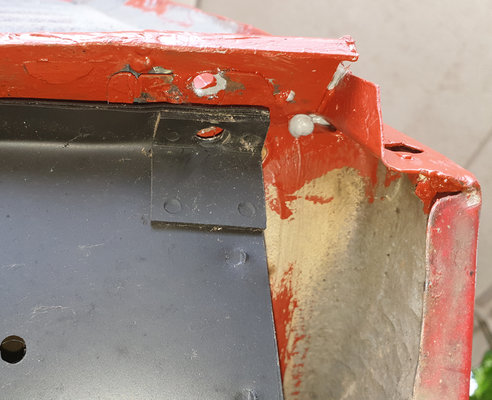
There is trouble on the outer part of the bulkhead too. The return at the top with the bolt holes for the body is at least 10mm shorter than the original. They have provided an M8 hole but the flange is so short there is no room for a nut. I can line the inner hole up but the outer hole has no chance of lining up. I think I'll need to extend the flange.
All of the other body mounting holes line up well - it's only the front that is a pain. With the front bolted as tight as it will go the inner and outer wings fit OK so it shouldn't be noticeable from outside.
The front of the body doesn't fit at all well. With the bottom of the A-pillars sitting on the chassis sill sections the bulkhead is about 10mm too high. I can get the heater console bolts to line up with some assistance but the bulkhead is very stiff in the middle so I can't close the gap. I think I'll end up using spacers and a lot of sealant.

There is trouble on the outer part of the bulkhead too. The return at the top with the bolt holes for the body is at least 10mm shorter than the original. They have provided an M8 hole but the flange is so short there is no room for a nut. I can line the inner hole up but the outer hole has no chance of lining up. I think I'll need to extend the flange.

All of the other body mounting holes line up well - it's only the front that is a pain. With the front bolted as tight as it will go the inner and outer wings fit OK so it shouldn't be noticeable from outside.
Homegrown
Enthusiast
- Messages
- 302
- Location
- Sweden
Not fun when buying somting to save time and effort. Seems like the manufacturing jig wasn't correct. Hope you can sort it somehow and still being happy.I've started fitting the new chassis. Ran into a couple of problems. One of the rear suspension bolts didn't fit through the hole. A hand file worked for making the hole bigger.
The front of the body doesn't fit at all well. With the bottom of the A-pillars sitting on the chassis sill sections the bulkhead is about 10mm too high. I can get the heater console bolts to line up with some assistance but the bulkhead is very stiff in the middle so I can't close the gap. I think I'll end up using spacers and a lot of sealant.
View attachment 30348
There is trouble on the outer part of the bulkhead too. The return at the top with the bolt holes for the body is at least 10mm shorter than the original. They have provided an M8 hole but the flange is so short there is no room for a nut. I can line the inner hole up but the outer hole has no chance of lining up. I think I'll need to extend the flange.
View attachment 30349
All of the other body mounting holes line up well - it's only the front that is a pain. With the front bolted as tight as it will go the inner and outer wings fit OK so it shouldn't be noticeable from outside.
Seen a lot of old Porsche 911 targa restored with new doorsills and the targa roof is some cm to long or short. They have paid the bills for sheet metal restauration paint etc, etc and when asambly the roof don't fit.
malcolm
& Clementine the Cat
- Messages
- 4,641
- Location
- Bedford UK
The rest of the chassis seems really good and is well worth buying. It's worth knowing about this issue so it can be given a bit of thought. There does seem to be a difference in height at the front compared to the Rodeo, but mine might have a stack up of tolerances because I've done some welding on the bulkhead too, mostly on the left side. But also worth bearing in mind the body is only there to keep the rain off so just needs not to fall off.
With the body resting on the butyl sealant strip (6mm to 8mm thick) but not yet bolted down the gap at the front runs all the way across the car and looks a bit frightening.
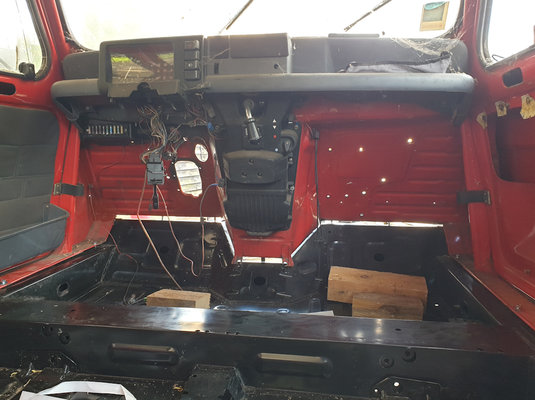
The gap pulled down more than I expected by tightening the bolts a lot. Butyl strip would have been enough to seal the front of the bulkhead but the piece in the middle under the heater needed something thicker so I used PU sealant.
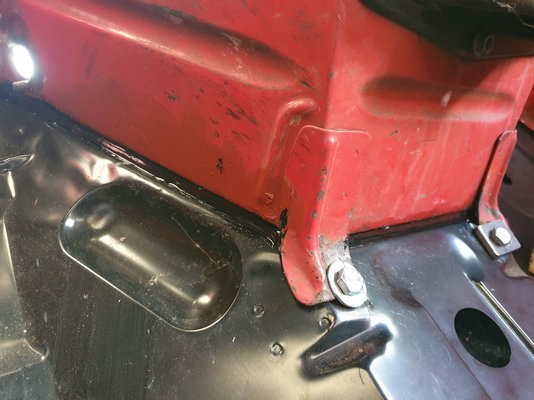
Here's my adjustment for the tip of the chassis that wasn't long enough.
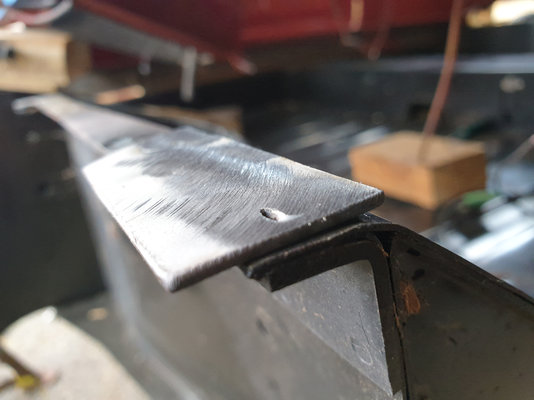
With the bulkhead pulled down on the bolts it now has a bend at the bottom and the inner wing doesn't quite fit. It did fit when the body was mounted to the old chassis. It doesn't really matter and shouldn't be noticeable when the car is bolted back together.
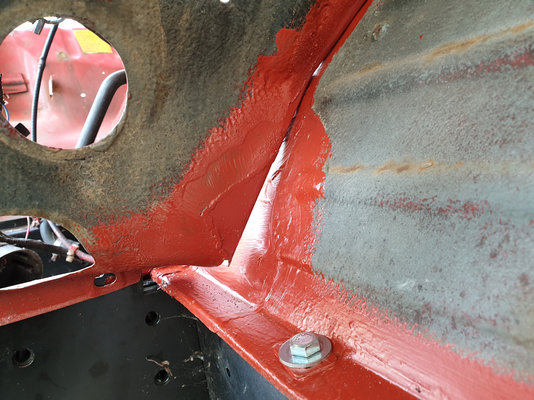
With the body resting on the butyl sealant strip (6mm to 8mm thick) but not yet bolted down the gap at the front runs all the way across the car and looks a bit frightening.

The gap pulled down more than I expected by tightening the bolts a lot. Butyl strip would have been enough to seal the front of the bulkhead but the piece in the middle under the heater needed something thicker so I used PU sealant.

Here's my adjustment for the tip of the chassis that wasn't long enough.

With the bulkhead pulled down on the bolts it now has a bend at the bottom and the inner wing doesn't quite fit. It did fit when the body was mounted to the old chassis. It doesn't really matter and shouldn't be noticeable when the car is bolted back together.

malcolm
& Clementine the Cat
- Messages
- 4,641
- Location
- Bedford UK
Looks like I have this week off so more Claude! The bonnet fits perfectly. The wings fit badly but that's entirely my bad. I've done a lot of welding on the inner and outer wings and they are out of shape. I'm missing mounting holes where I replaced metal so I'll drill some holes for the screws and do a trial fit. The inner and outer wings are really bendy and very adjustable so I should be able to make them fit before removing them and fitting them properly with sealant.
