Clementine's Garage
Clementine the Cat
 
Image of flower
Yellow R4
 
Réparateur d'automobiles

What I am doing!

Hi there, the chrome hubcaps on your blue one, how did you fit them? Are they standard 195cm ones but you’ve manufactured something on the hub to bolt against? Help appreciated.

Matt
Hello Matt yes I designed a ‘plug’ with thread hole in the shape of a top hat. Made of engineering plastic they work really well see page 15 earlier in this blog
 
When I restored Womble the Renault 4 I spent a lot of time searching on eBay for ‘NOS’ ( new old stock parts) I bought some shock absorbers and frankly this was a false move. I had noticed the driving experience was becoming unpleasant. Womble would skitter over bumps in the road and It affected direction too. Pushing down on each corner of the car revealed the shock absorbers were fairly ok at the back but imbalanced. At the front one was completely not working and the other very poor. I decided to replace with KYB gas filled shocks from Mr Auto. They were very reasonably priced and arrived quickly. I was able to get the front shocks on relatively easily. A little fiddling to get them aligned correctly but nothing major. I had completed the front shocks within an hour and a half. I was expecting the rear shocks to be really hard to fit and had read on the forum how the suspension has to be compressed to allow the shock to fit ( pushing down on the rear of the car lengthens the shock absorber) . They arrived with a strap holding them closed down. At first I was concerned they were too long and I had the wrong ones. However Simon Pocklington (Renault Reborn) advised they would compress more. They certainly did. I found using a stiff board of foam against my stomach I could compress the shock easily using my body weight against the floor of the garage. L

The mat on the floor and the foam stopped the ends of the shock skidding away from me whilst I tied wire tightly around the ends to the middle - I made a loop in the wire so I could pull it tight. The shocks now were easily short enough. With the car jacked up and bricks or an axle stand below the hub and lots of weight in the boot the gap for the shocks opens up. Fitting was far easier than I expected. I had both sides complete within the hour. The difference on the road is amazing - much smoother and quieter. Would really recommend Mr Auto

Good quality low price and very quick delivery
 
  • 7A056648-AD78-46F3-B486-0C9097CD99C3.jpeg
    7A056648-AD78-46F3-B486-0C9097CD99C3.jpeg
    123.1 KB · Views: 9
  • E6A4A5AA-0D67-493E-AF9F-816C3804EFEA.jpeg
    E6A4A5AA-0D67-493E-AF9F-816C3804EFEA.jpeg
    142.3 KB · Views: 9
  • 9C189217-FF4F-4EE7-A098-52AB7DAF39F4.jpeg
    9C189217-FF4F-4EE7-A098-52AB7DAF39F4.jpeg
    177.6 KB · Views: 9
  • 50CFA182-454D-4A1A-8581-0BB96290DC8C.jpeg
    50CFA182-454D-4A1A-8581-0BB96290DC8C.jpeg
    136.1 KB · Views: 8
20180701_171049.jpg Hi folks. Well, following on from my report on the GTL from April last year, the Kent Run last year proved that there was still something amiss with the cooling system, as the car got very hot on the way home. The radiator had seen better days, and as a replacement from R- Quatre.nl wasn't going to break the bank, less than €100 including a temp sensor for the fan, that was the next job.
In July a friend and I went to Thenay and the car behaved itself, the temperature barely rising above 80c, so all seemed well, no need for a fettle over the winter.
This year, the Kent Run was completed, and I've just returned from a long, and at times in extremely hot weather, trip to the South of France. No issues with the cooling system, the gauge hit 90c once or twice, but the fan cut in, so all good. She passed the MOT last week, no advisories, lovely, and the trip to Renaultoloog in September is the next big run, as well as everyday use, and then in the winter I'll give Chloè a well earned break, I reckon she needs it.
So snailshed, I think you can tell that I'm very pleased with how the car is serving me, I'm well chuffed with it.
Regards Brian
 
Greetings from darkest Cornwall. Having used my car a fair bit since I bought her last year, including a couple of trips to France, and with 132000 miles on the clock now, she is beginning to lose her edge. Timing chain rattle and general loss of performance is telling me it's time to fettle it.
I've managed to acquire an engine from a good friend with only 10000 miles on it since it was reconditioned, but with a leaking liner seal. I've stripped it and although there is some corrosion, the liner is useable, so I'm rebuilding it while still being able to use my car. I'm now, as you can see, in the middle of putting it back together.
My apologies to harbourseal for copying his silver engine paint idea.
Regards Brian. 20181114_115858.jpg20181114_115929.jpg20181116_154333.jpg
 
You are excused @Cornish4.
Looks nice and clean.
It might be a bit disappointing, but you need to put the pistons in to the liners and then put them into the block.
On a Cleon engine the lower connecting rod does not fit trough the liner.

good luck, Robert
 
I had just dropped the liners into the block after lapping them in Robert. Next I will fit the pistons in them before putting them back in and seating them on the paper gaskets and some Hylomar sealer. Then fit and torque down the head before tackling the bottom end.
 
Well Cornish, it's nice to see a complete Cleon engine overhauling, been there, done it but still no T-shirt :D.
I still have to wait for many months to fire my overhauled Cleon as I'm still in the mids in my house overhauling.
Good luck.
Regards, Joop
 
Hello Joop, yes I'm enjoying doing an engine rebuild, first one for quite a few years, and the first Cleon I've ever done, so something a bit new to me. Soon as it's done I will be doing the engine swap.
I know you've been busy on your house, one project at a time eh? but here's hoping you get your 4 on the road in the not too distant future.
Thank you for your good wishes.
Regards Brian.
 
Latitude was great but that's 3 whole days of Wombling lost . Yesterday straight back to work, but able to get back out in the garage in the eve. At lunchtime Rolemin popped over with his new R4. It's looking great and all set for summer days out.

So what have I to report? Well probably the most interesting thing is the engineer across the way at work came over with my little top hat wheel centres. These are designed to adapt GTL wheels to accept hubcaps. They can be easily removed for wheelbalancing etc . They work brilliantly! :clapping:
Can you ask your friend if he can make some more? I'd happily pay market rate.

Thanks Matt
 
Can you ask your friend if he can make some more? I'd happily pay market rate.

Thanks Matt
Hello Matt
Probably best to PM me

I have just asked and the machine they were made on the engineering co has sold. However they can be remade by hand. I have enquired price for five sets of four assuming others will want them too
 
Hello Matt
Probably best to PM me

I have just asked and the machine they were made on the engineering co has sold. However they can be remade by hand. I have enquired price for five sets of four assuming others will want them too
Thanks much appreciated, if he can make them then please pass my number on 0790752497five. They will look great on the car!
 
Hi folks. I'm happy to report that the engine that I rebuilt over last winter has proven its worth this year with two trips to France, one of over 4000kms, without a moments trouble. I don't want to tempt fate, but I'm very pleased with how it's turned out, although I might have to replace the water pump, as it's just developed that usual suspicious noise, but no leaks.
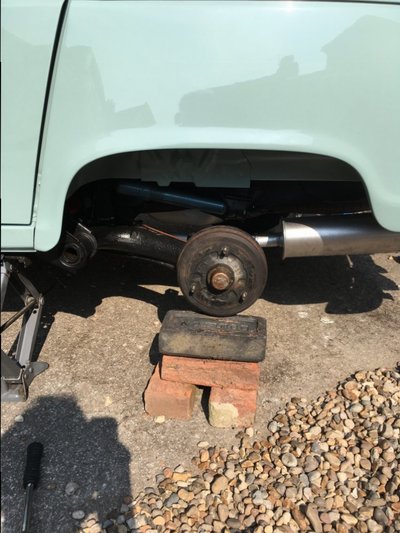
I've now turned my attention to the back suspension as I've always thought the car rides a bit low at the back, especially when fully loaded with camping gear, so I took the plunge.
After removing the shock absorbers and eventually knocking out the torsion bars, lots of soaking with WD40 and a big hammer did the job, I then had the task of experimenting with the aid of an adjustable tool I made up, placed where the shock absorber usually goes. It's very much a case of trial and error, but I'm pleased with the results, as I've raised the back of the car by about 40mm. At least with the tool you can get some fine adjustment, and eventually line up the bar with the splines, but it takes a few attempts to get the height right and even both sides.
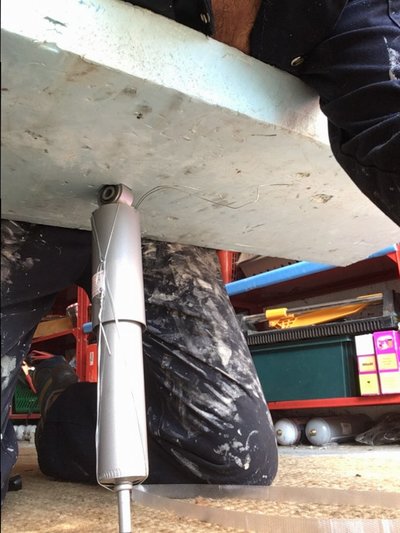
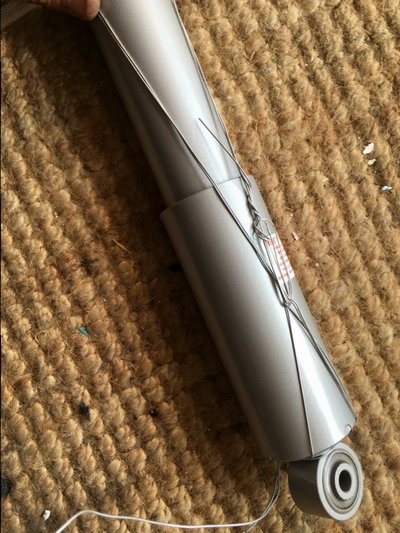
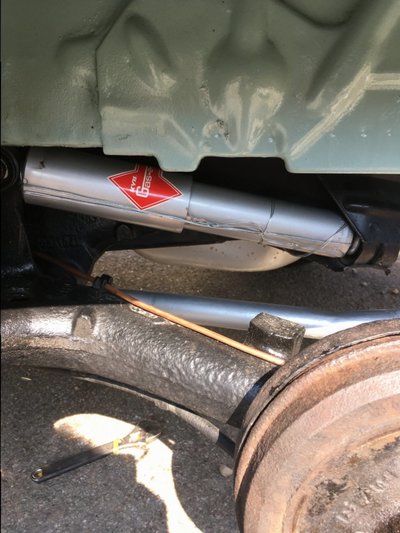
The hardest part was refitting the shockers as of course the mounting holes where now some 25-30mm closer together, so some serious compressing had to be done. Stout wire and cable ties did the trick.
I realise some of you will have done this job before, so I would be interested to hear your comments, but I now know that come the next trip fully loaded with all the usual paraphernalia of camping, my car will not look so low at the back. Regards Brian. 20191125_162344.jpg20191127_132731.jpg20191130_141531.jpg
 
  • 20191127_151652.jpg
    20191127_151652.jpg
    266.1 KB · Views: 2
Thanks Adam, yes not an easy job to do, especially in this case with the torsion bars firmly stuck by 35 years of rust, so taking a long bar and a sledge hammer to it is a touch daunting. But now I know my car a little bit better.
 
Nice work Brian, adjustment of the rear torsion bars is fairly easy and the trick for the shocks is, first jack one side up, the shock will compress and then tie it together with some iron wire so it will stay compressed.
The real torsion bar challange are the front ones :D
And did I spot a stainless steel exhaust and silencer? :clapping:
Best regards, Joop
 
Hi Joop, yes once I got them freed up it was fairly easy, just trial and error, and time consuming, but hey, it's a hobby, so no pressure. The problem with the shockers was I had to compress them more to refit them as the gap had got smaller. I've tackled the front torsion bars before by taking the front suspension apart, as I don't have the "special tool" to take the loading off.
Hmm, stainless exhaust, bit bigger than original which gives a nice throaty note.
Best regards, Brian.
 
Hey guys - (Cornish) you appear to be in my rebuild blog ‘what I am doing’ :(
Anyway to answer:hug: The trick I used to compress the shocks was my own idea which did work very well. I got into a real muddle Trying to hold the shock with one hand, Whilst trying to compress it with the other. Then I tried holding it in a vice, Then I tried tying it up with a slipknot so I could press it together and tighten down as I went. Nothing worked , but this and really well: Are used a piece of strong foam board and put this against my chest, with the shock absorber embedded into the board and the other end against the floor. I was then able to compress the shock absorber really easily using my body weight against it. I then of course had two hands free in order to make off the wire ties I had put within reach.6D766BA1-0F78-4419-A907-25EE6784E9A9.jpeg
 
Hello Jonathan, hmm, a risky operation which could have gone horribly wrong I reckon, but I'm glad you lived to tell the tale. I used two pieces of stout wire hooked around each end of the shocker, with a hook at the other end of each piece. Then I used cable ties to gradually bring the two wires together thus avoiding a possible trip to A&E
Regards Brian.
 
Back
Top