


You are using an out of date browser. It may not display this or other websites correctly.
You should upgrade or use an alternative browser.
You should upgrade or use an alternative browser.
Finally took the courage...
- Thread starter Azazello
- Start date
Azazello
habitué
- Messages
- 1,109
- Location
- Italy
Thanks Malcolm!On early cars the stop light is operated by a pressure switch fitted to the end of the brake master cylinder.
Do you have a photo of the cables I have to connect there?
I was suspecting that, and I think my sensor is not working and previous owner had mounted that kind of switch... I think I have to find a new pressure switch before filling the pump with oil...
malcolm
& Clementine the Cat
- Messages
- 4,519
- Location
- Bedford UK
Azazello
habitué
- Messages
- 1,109
- Location
- Italy
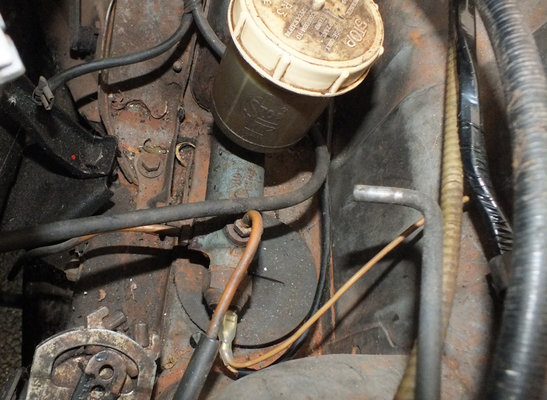
Here's a picture of a 1972 car. I guess the little wire that goes to the loom must go on to the rear brake lights. I think the other wire is the 12V supply which I think goes to the connector back of the instrument panel.
Yes, i've seen with my tester that the small wirein the upper position (brown/orange in your photo) is 12v and the longer one in the small black hose is directly linked with witht rear lights...
Azazello
habitué
- Messages
- 1,109
- Location
- Italy
Last three evenings were spent in the workshop of a local smith (the only one that was pleased to help me) refabricating metal arches for my sunroof.


I am pretty proud about how I made the new metal clips made out of an old microwave metal frame!
Metal was zinc plated, parts welded and original bits (end of stems) are sprayed with zinc-based spray paint. I was wondering whether a coat of black 2-pack paint will be sufficient or if I should use some kind of primer before...
Azazello
habitué
- Messages
- 1,109
- Location
- Italy
Quite frustrating I am not able to start the engine.
It started once for a few seconds, I thought it was a matter of regulation... the day after (I played with alternator but I put again in the same position) it didn't start, and still won't start anymore. It seems something keeps it from turning freely, but not always...
It is very depressing... I fear to have done something wrong and to have to take off the engine again...
mojobaby
Enthusiast
- Messages
- 1,288
Your yellow fan looks great!
You'll have to double check everything-no need to take your engine out again as it can only be a simple problem.
1.Check battery charge
2. Check petrol is getting to carb
3. Check spark is arriving at spark plugs
4. Check dizzy leads are in the right sequence (1,3,4,2,)
5. DOUBLE check your timing and rotor position
In my opinion its number 4 or 5
Azazello
habitué
- Messages
- 1,109
- Location
- Italy
Thanks Mojo!
You were right suspecting my dizzy was in the wrong position, it is rotate 180 degrees... maybe I made one more rotation of the camshaft when replacing chain. Tried extracting gear and replacing in the right position, but definitely too difficult since I should fabricate a puller.
Anyway, just swapping plug wires was sufficient to let the engine start the first time.
Now I do not know why the engine does not start anymore. I checked the dizzy position several times using a 12v light, and above all I am worried because the engine seems to block sometimes... do not know if it is linkable to timing or if I have some problem with chain or pistons....
mojobaby
Enthusiast
- Messages
- 1,288
To make sure that your chain is correct and that your camshaft and crankshaft are in sync you should check on the following:
When the mark on your flywheel is lined up with top dead centre, both No 1 and No 4 piston are at the top.
Your rotor points at No 1 cable on your dizzy cap, but when the rotor points to No 4 cable (then it will be 180 degrees out).
Take off your rocker cover and watch how the rockers move.
After lining up the flywheel mark, turn the flywheel clockwise. As soon as you start to rotate it, No. 7 valve, which is the inlet valve on No 4 cylinder will start to open.
If No. 2 inlet valve on cylinder number 1 starts to open, then you are 180 degrees out.
Remember when you set your dizzy/points that the shaft/rotor rotates clockwise, so the felt tip of the points should be before the lobe on the shaft.
To explain it better using a clock face, if the lobe is at 2, then the felt tip must be on the 3 side (not the 1 side)
malcolm
& Clementine the Cat
- Messages
- 4,519
- Location
- Bedford UK
You can check it by first removing the rocker cover so you can see what the valves are doing. Turn the engine until it is in a position where one valve on the cylinder to the front of the car has closed and the other valve on that cylinder is just about to open. You can do that by putting the car in 3rd gear and pushing it while watching what the valves are doing.
Next rotate the engine slightly until the timing mark on the flywheel lines up with the marker - last photo on this page: http://www.renault4.co.uk/tech-points.htm
At that point the inlet and exhaust valves for the front cylinder should both still be nearly closed.
Take the distributor cap off. The rotor should be pointing to the lead for the cylinder nearest the rear of the car and the points just starting to open.
Last edited:
Azazello
habitué
- Messages
- 1,109
- Location
- Italy
I've followed a similar procedure, when the valves of the 4th cylinder are both closed (inlet just closed and exhaust still closed) I set the pointer around 10mm before the mark on the flywheel, the opened the distributor cap and set the timing with a light (rotating anticlockwise until it turned off and then clockwise again until it starts turning on). Plugs wired in order 1324.
Next week I will try again, maybe helped by someone more expert than me.
Next week I will try again, maybe helped by someone more expert than me.
Azazello
habitué
- Messages
- 1,109
- Location
- Italy
This tip seems quite sensible... this weekend I am out for a meeting, but once at home again I hope to open my dizzy and find out you have recognized my error...
Remember when you set your dizzy/points that the shaft/rotor rotates clockwise, so the felt tip of the points should be before the lobe on the shaft.
To explain it better using a clock face, if the lobe is at 2, then the felt tip must be on the 3 side (not the 1 side)
mojobaby
Enthusiast
- Messages
- 1,288
1,3,4,2............you mean?Plugs wired in order 1324.
Azazello
habitué
- Messages
- 1,109
- Location
- Italy
Really hope you focused on the problem!1,3,4,2............you mean?
My mental scheme was wrong, but my visual memory on the dizzy wiring is right. So it's just matter of discovering which one I followed reassembling the whole.
Unfortunately I am not able to chek until monday...
But of you're right and I am wrong as I hope, could it be the cause of the moments in which the engine seems to block?
petak
Enthusiast
- Messages
- 1,882
- Location
- Vodice, Croatia
Had similar problem with my Gtl.
Set timing, set points,fuel is coming, spark is there but car would not start.
Checked few times all but could not start engine.
In the end mechanics came and change position of cabel 1 and 4 on dizzy cap and car started instantly.
Only diferance from your situation is that engine was turning good no mater how long i was triing to start.
Azazello
habitué
- Messages
- 1,109
- Location
- Italy
Finallyshe started!
Plug wires were right, I just set the timing again putting in balance cylinder 4 instead of 1. I thought it was the same...
Timing checked with lamp at first and them by ears and finally with strobe light. Now it purrs like a kitten.
Wires on the dizzy cap are a bit messy and the condenser is far too near to the 2nd plug, so I need to rotate the gear and have the dizzy in his right position... but not reached in the attempt. Mojobaby, can you tell me how you did it? Any other experience is wellcome.
mojobaby
Enthusiast
- Messages
- 1,288
That's a very sweet sound, I'm sure you're happy now.
The gear is very easy to extract with a strong magnet.
Its one of the most useful tools that I have bought because I have a habit of dropping washers etc under the car. It has a telescopic handle so I can extend it to reach under the car and in difficult to reach places. The magnet is so strong that I can even lift a hammer.
When I replaced the gear back into the engine, I first stuck it to the bottom of the distributor shaft with grease. I then turned the distributor to the required position and then lowered it into the hole.
When extracting the gear you may have to twist it a bit to disengage the gear from the camshaft and the same when you replace it
Azazello
habitué
- Messages
- 1,109
- Location
- Italy
Mmm... this is from a cleon engine, isn't it?
I think that billancourt ones are different.
Tried with a magnet and it seems to stuck on the "walls" around and not on the gear (supposed it is not iron). The gear can be lifted (a mechanic told me so) with just a pair of pliers, but after you extracted a small cylinder that is fitted above it and in which the dizzy rotates. And you need a special tool (which you shold fabricate).
Hoped you already did it and had some great idea abut a easy extraction...