Clementine's Garage
Clementine the Cat
 
Image of flower
Yellow R4
 
Réparateur d'automobiles

Finally took the courage...

Finally off the rotissoire!


Back to the ground... the pulley was a really great buy!


The rear axle is going on again.


And so is the front arms and axles, but I had to find the way to keep the car low when I jacked up the lower arms...


On her wheels again!


But still not definitely. ..


It is definitely to low, as Angel and Paul told me some time ago I couldn't put on the old type rear axle as I could do with a more modern one... I have to take out torsion bars and put them on again once regulated the height.
 
Excellent progress! The Bodyshop im guessing will be ready to return the shell too...are you going to beat me to it ?
 
The bodyshop is ready and waiting for me to finish the mechanic...
My limit now are time and money!
Last week I was on holidays, now I came back to work and this week I will proceed very slow... just collecting pieces...
 
Today fuel tank treatment, but I would like to show some photos of the whole process of fuel tank restoration.
Dismantled and cleaned.

Degreased.

Rustol cip.

Antistonechip where it should be needed.

Miss a photo of the 2 pack painting, but I am sure you can imagine; if you cannot, surely there is somewhere along these pages a photo showing the fuel tank painted and hanging for drying purposes.
Insert a chain and acid to derust.


Once the holes are closed someway, move ta acid through all the tank in all positions to act everywhere. It was not very rusted, so I hope an hour will be sufficient.
Tankerite mixed with hardener and thinned with alcohol.


Holes capped again, moved gently every few minutes to cover all the interior of the tank.

Caps off, draining the exceeding painting, let dry. Tomorrow I can put the fuel tank at its place, but I cannot fill it with fuel for a week. Don't think it will be a problem.
 
It's engine time.


The engine was running fine before dismantling the car, so no big issues: just gears and chain, clutch and water pump.

It was quite fine to discover that under the water pump the channels were very tidy.


Unbolted the oil pan in order to clean the inside, found no creamy deposit and no old sludge, so it was a really not necessary job... I will paint it while it is out.


Waiting a pack from Melun and will begin working on the gearbox too...


Obviously couldn't unscrew the bolt to drain water from the engine block...
 
Thanks, but it is not my merit: I own this car since just a couple of year and 2000 kms, so I menaged to have just an oil chance... I am just very lucky!
The fuel tank was in quite fine shape, maybe I could avoid all that hassle, but I am trying to prevent bad surprises; I prefer a bit more work now and not to have to take it out next year finding rust powder in my carb...
 
This evening, while I was preparing some details for painting, opened the distribution carter and had a look...


Signs on the tensioner are 0.8 to 1.2 mm deep... does it mean a significant wear or is it still usable?
Since I have a complete set brand new provided by our friend Angelos, I think I will proceed with the substitution anyway, but I will keep the old one on the shelf on a you-cannot-know-what-you-could-need philosophy.

I bought a paper gasket from melun for the carter... is it sufficient or do I need something else, too? I have a paste for gaskets, black, think it is silicone based, in a tube like toothpaste. ..
 
Today we play with distribution...

Notice the signs on the gears...
The tensioner tries to explode in my hands while I unbolt it.

A puller for this gear...

...and another for the little one.

I had to use some persuasive method...
With a blade I ckeaned the rests of the paper gasket.

Both new gears at their place, the new chain came without marks so I had to count from the old one.

Hitting with a hammer, one time the gear and one time the finger.

Everything at its place, even the brand new original renault tensioner (thanks Angelos).

Checking alignments last time before closing.

New gasket.

The haynes manual advices for a bit of gasket cement...
 
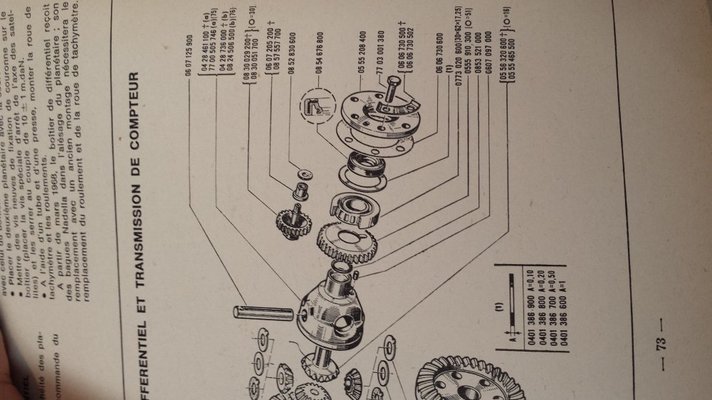
Someone could tell me the thickness of the paper gasket under the differential metal circle in order to buy the right paper?
0606730600, if I read well...

20151005_175551.jpg
 
Yesterday I opened the gearbox in order to change the oil seal. Found a lot of dirt...

The front cover was rusty too, so I cleaned the rust with acid and sprayed cold-zinc on the outside (hope the oil will prevent the inside from rusting another time).

Following a friend's advice, put a liter of oil and turned the shaft by hand for a minute or so, then flushed from the front... the oil was quite muddy.

Found in the oil a little spring... maybe a souvenir from an old oil seal.

Don't really want to think to what could have happened if the spring finishes between the gears... brr.
New gasket cut from paper, and everything joined again.


Now I need the two 19x3 o-ring, that seem quite hard to find...
 
Brake hoses...


Fitting the last clutch pieces.

Now I can assemble again gearbox and engine.

The clutch centering turned out to be uneffective, so I had to use the alternative method, unbolting the clutch and letting the gearbox centering it by himself, then screwing the bolts again from the hole above the clutch.

The front mounting is ready too...
 
Without trying to alarm you it is likely that metal spring piece is from 2nd gear synchromesh
 
We are still at a very similar stage ...I'm just about to work on my fuel tank and seal as you have done so I am reading with great interest. Really good work ... It's really coming along now :clapping:
 
Without trying to alarm you it is likely that metal spring piece is from 2nd gear synchromesh
Synchro springs are an entirely different shape.
I reckon that little spring was from an oil seal.

Azazello - did you check the primary shaft seal in the clutch end cover plate? Now's the time to change it if needed.
 
Synchro springs are an entirely different shape.
I reckon that little spring was from an oil seal.

Azazello - did you check the primary shaft seal in the clutch end cover plate? Now's the time to change it if needed.

Think I really love you.
Yes, Angel adviced me to change that oil seal and tho ones on the differential too, with their o'rings. He gave me the measures and I bought them from Melun... but did not found the o'rings!
I already replaced the oil seal on the primary shaft (and the old one did not show any track of its little spring) and will replace the ones on the diff when the o'rings will arrive from uk (had to buy them on ebay).
Thank you guys, your advices are really precious and without them I would have stopped at the beginning of this restoration...
 
Just zoomed into photo
I was wrong sorry I can't be right all the time ☺
 
Back
Top