Clementine's Garage
Clementine the Cat
 
Image of flower
Yellow R4
 
Réparateur d'automobiles

R4 GTL 1985 Restoration

When you thought chassis welding is challenging due to the "thickness" of the sheet metal (I'd say the lack of thickness :laughing:) then Renault R4 body welding is a true challenge on your welding skills, the sheet metal is even thinner. :welder:

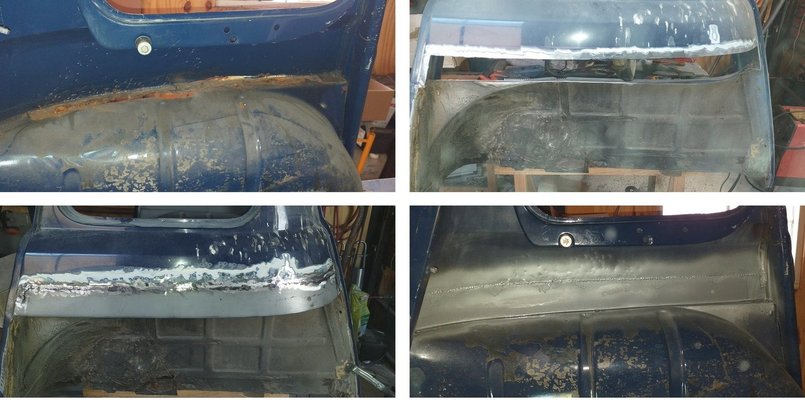
Continuing the rustoration and first we have a look at the right rear inner wing. It's pretty severe but nothing in comparison 'till you see the left side.

The affected areas shown in red.
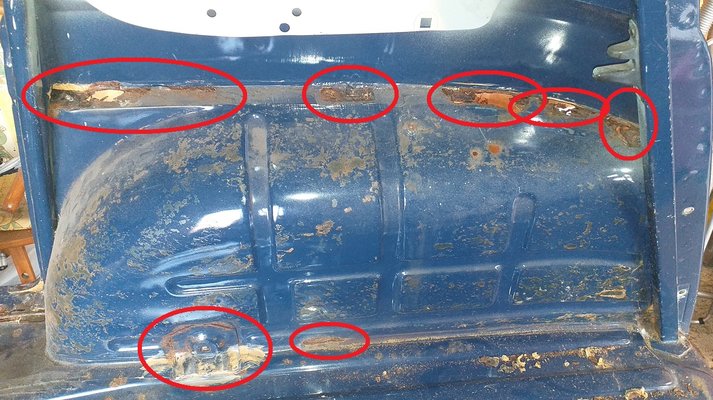
665.jpg

Removing multiple layers of original Renault and later added protective agents, shows more rust damage and repairs.
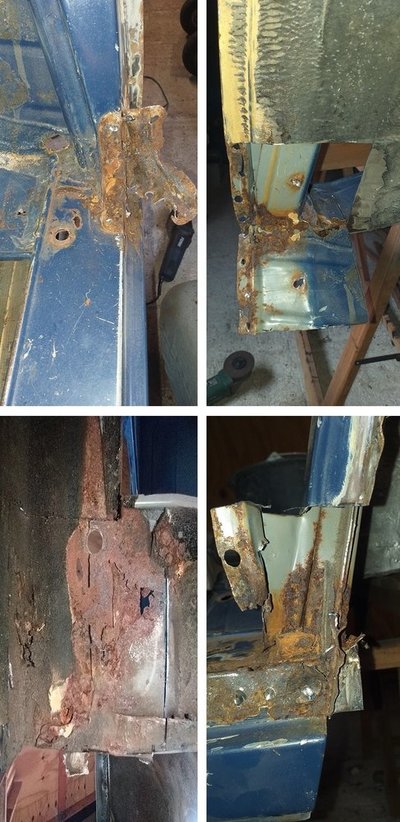
At the bottom of the D-pillar it's rusting from the inside out and a MOT repair on the mounting of the rear seatbelt reinforcement plate.
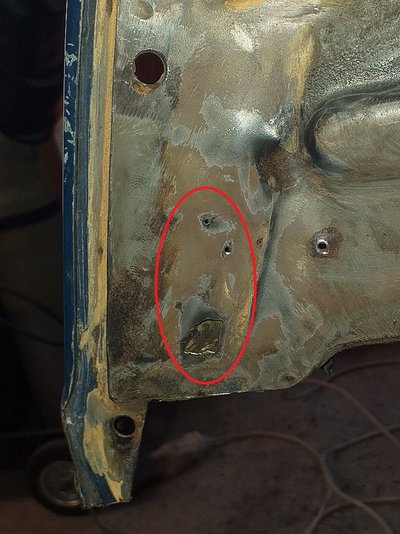
666.jpg 667.jpg

For all of us the well known rustspot at the bottom of the C-pillar.
668.jpg

Start cutting the rust affected areas and don't be shy on removing the metal!
In the R4 lifetime the rust has spread further and further underneath the so called protective agents.
669.jpg 670.jpg

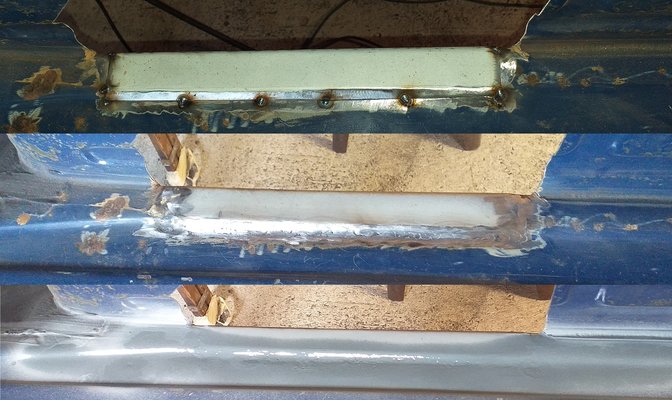
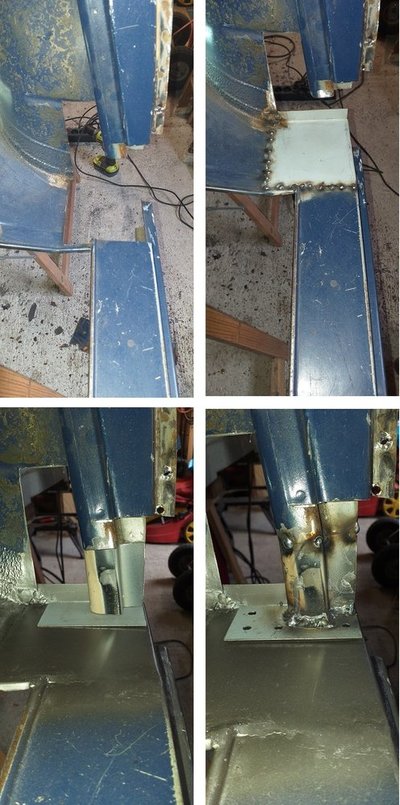
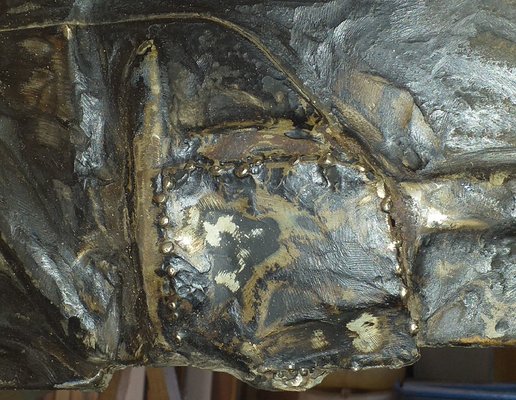
Applying new formed body metal with a basic tack welding.
671.jpg

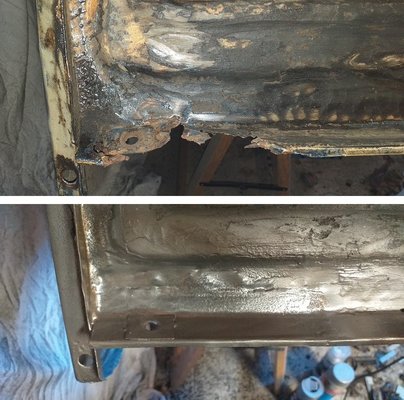
And finish it off with a seam weld. The trick is to grind down the weld as much as possible without grinding any sheet metal.
The final finish is done later by lead loading the weld seam instead of using polyester putty.
672.jpg

Here one strip of thicker metal is tacked in place instead of the standard overlap.
673.jpg

Meanwhile some formed repair parts have arrived patiently awaiting further processing.
674.jpg

Body welding is more challenging than chassis welding not only to the thinner material.
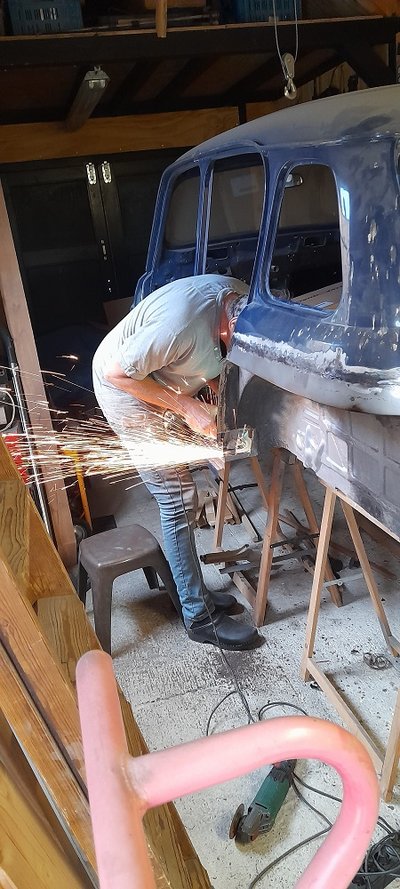
While doing chassis welding you've all the space around you but while doing body welding it's like origami to fit a 2 meter tall person in the booth.....
 
Last edited:
I think this is one of the most challenging areas to weld on. Great welding skills Joop! Good to see the progress. Nice new parts, from der franzose?
 
When you thought chassis welding is challenging due to the "thickness" of the sheet metal (I'd say the lack of thickness :laughing:) then Renault R4 body welding is a true challenge on your welding skills, the sheet metal is even thinner. :welder:

Continuing the rustoration and first we have a look at the right rear inner wing. It's pretty severe but nothing in comparison 'till you see the left side.

The affected areas shown in red.
View attachment 30361

Removing multiple layers of original Renault and later added protective agents, shows more rust damage and repairs.
At the bottom of the D-pillar it's rusting from the inside out and a MOT repair on the mounting of the rear seatbelt reinforcement plate.
View attachment 30370 View attachment 30362

For all of us the well known rustspot at the bottom of the C-pillar.
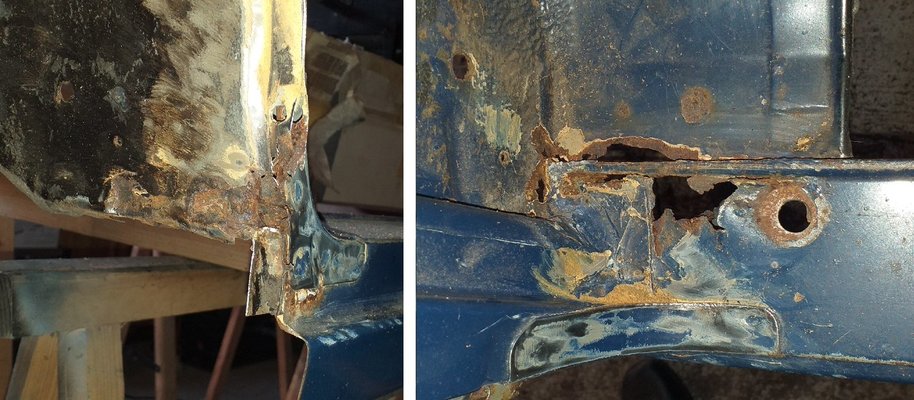
View attachment 30363

Start cutting the rust affected areas and don't be shy on removing the metal!
In the R4 lifetime the rust has spread further and further underneath the so called protective agents.
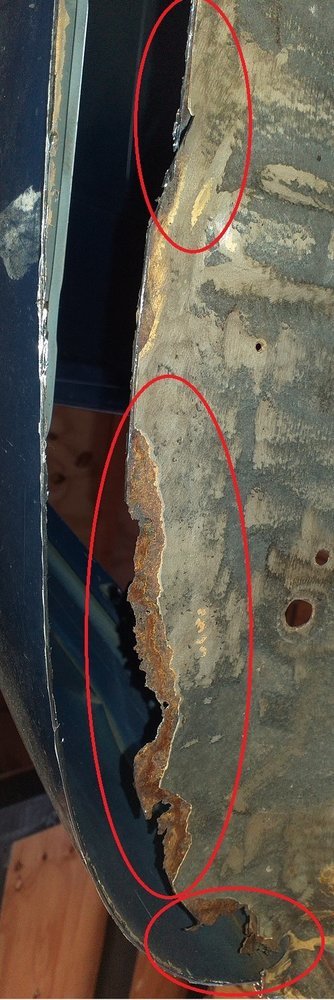
View attachment 30364 View attachment 30365

Applying new formed body metal with a basic tack welding.
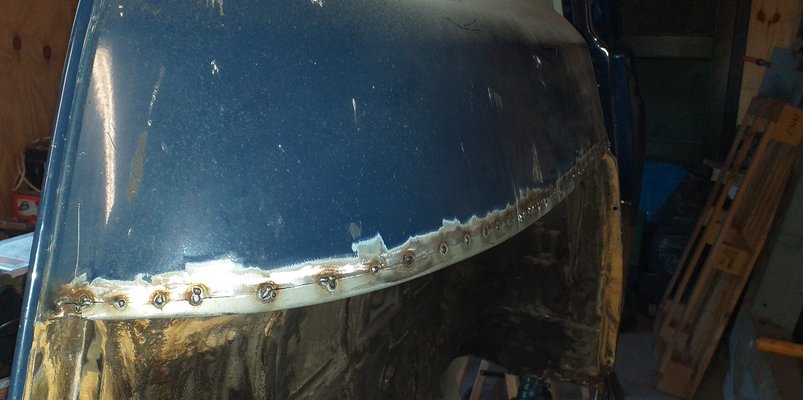
View attachment 30366

And finish it off with a seam weld. The trick is to grind down the weld as much as possible without grinding any sheet metal.
The final finish is done later by lead loading the weld seam instead of using polyester putty.
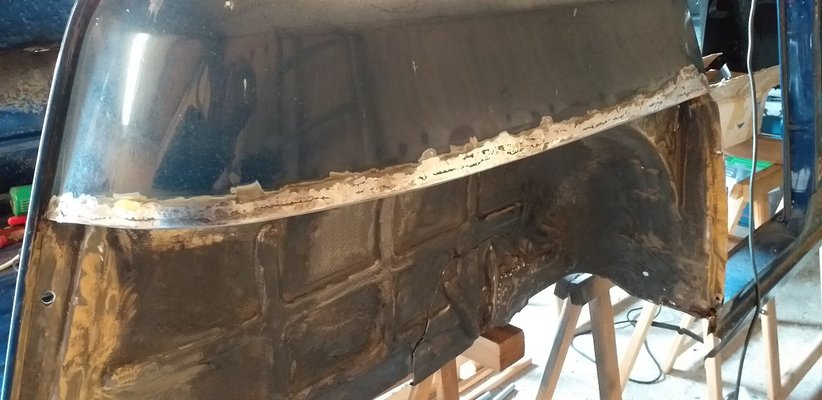
View attachment 30367

Here one strip of thicker metal is tacked in place instead of the standard overlap.
View attachment 30368

Meanwhile some formed repair parts have arrived patiently awaiting further processing.
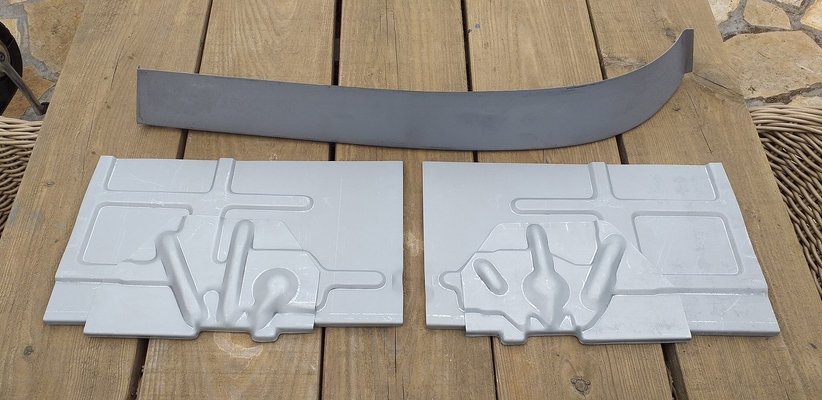
View attachment 30369

Body welding is more challenging than chassis welding not only to the thinner material.
While doing chassis welding you've all the space around you but while doing body welding it's like origami to fit a 2 meter tall person in the booth.....
Great work !!as regards lead loading, i used it on many restorations HOWEVER be careful to neutralise the acid with sodium bicorbonate as it will rust like hell. I stopped using it and it think metallic filler like vaku-60 is nowadays a better option.
May i please ask if you overlapped the quarter rust repair or just made edged welding(if that's what its called). I avoid overlapping however on a tricky area like that one would be tempted to overlap to avoid warping.
 
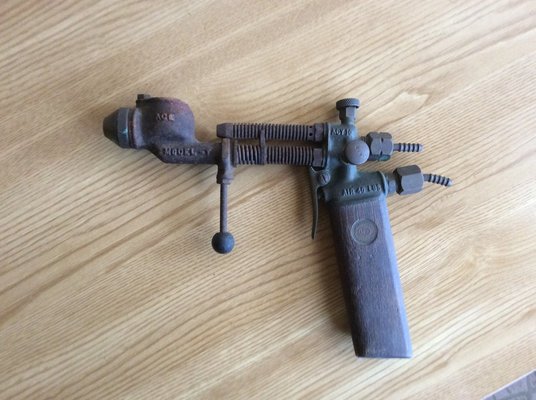
Never used it but picked this up years ago at a boot sale, for spraying lead sticks..1D567070-625B-4871-AA0B-325D0E946854.jpeg
 
Great work !!as regards lead loading, i used it on many restorations HOWEVER be careful to neutralise the acid with sodium bicorbonate as it will rust like hell. I stopped using it and it think metallic filler like vaku-60 is nowadays a better option.
May i please ask if you overlapped the quarter rust repair or just made edged welding(if that's what its called). I avoid overlapping however on a tricky area like that one would be tempted to overlap to avoid warping.
Hi Braingrech, it's not an overlapped welding as I wrote. The outer wing is seam welded as is the inner part but I used thicker sheet metal.
As far as lead lading, indeed the risk of acid residue is known and I keep in mind your tip regarding vaku-60.
 
I think this is one of the most challenging areas to weld on. Great welding skills Joop! Good to see the progress. Nice new parts, from der franzose?
Thanks @Jurjenz indeed a challenging area I'd say every area from a R4 body is a challenge.
And yes those parts are form the Franzose.
 
Last edited:
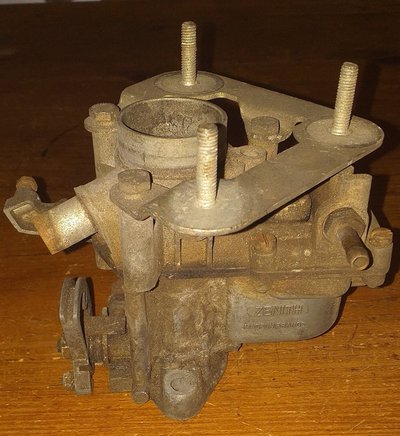
Soon an update regarding the repairs on the rear right and famous C-pilar, but first this beauty arrived this mornig for a mere 40 euros.
That's a real bargain because original carburetors are worth their weight in gold these days. ;)
20220810_123437.jpg
 
It took a small while for this progress update, this was due to change of work, holiday(s) and the hot weather, but here I go again spoiling you lot with the pictures and my story concerning the right wheel arch and C-pillar repair.

Cutting away the affected area which holds an reinforceement plate as wel as the rear seatbelt mount and strongpoint.
Also an area from the booth floor has been removed.
y4mLbrG5Qu2bV4ECcGtY5P-zM9XWYGABAqd75Y2ul06hUjvawJJGbBdy6PNW3hA0hzIlZP36PVIjRzZQSe7vrT02DGV0t1I9Ofh2HYuzBdu6yIXY2P6ltJy8ArUrryaQSMbMbzLAJ0syxcNSRekb_OtrHAkQixvRB21Oy6sBUG43E_lt6aDftriGbA07zhUcJ1C


Here is a view how the rust eats his way through several layers of formed sheet metal.
y4mdaITa5Kn39I4U0nu4vGf_sAc3lsU0M0FYa1TX23uOaKRQ4aYkoJkZ5wwhKAJNjuEleRrPa96K5kHCGAoHjQPpYLmUJeYBweuRO_7nrynHIwSuwkIelbSBHXp1-ONCsSZelfYbqc2qf5hZ0KXV7ZspMkiIyeat9tiS7KoTP14o07VP8MxdLC_WqhPNm_uplqE


The repair of the small booth floor section. I used normal flat sheet metal and hamered a profile.
y4msv76RX96VTBU69zYORMAG4N9xMOeImEwYkgU3WU7MS3P6ostAstqgEpSKmntNxLLJClfw1JfPkEvy4SDBxJA6pIKVIPE1vT1Ines3oxpYbTltrDyOodxfJKY2f-jTtyCo3rNJC-RGEHYynW6kbAILwGtZtwbUp2oaLMrSAz9Oy3vLdzVNiMTonO07qAsZQPk


Here the first layer is prepared to close the gap in the wheel arch with a few tack welds.
y4m5uFQfcR0IJPIK_rQylEvwZUnIf6UGJVnybH9fPGouFZVDRqWFVNbLy5RzqgSQ0JABvYSICrEeu7ejiGTjxkkV_qzQnGx3mShn0ZJnMe77de94oXnCmvfdNlwxaHrPzpZNHqYwNymDdZDeUzThdPz2vAvVQHB4hVZdrjNBMG3KaVwaZl5wr4nblMk3vUX0WBa


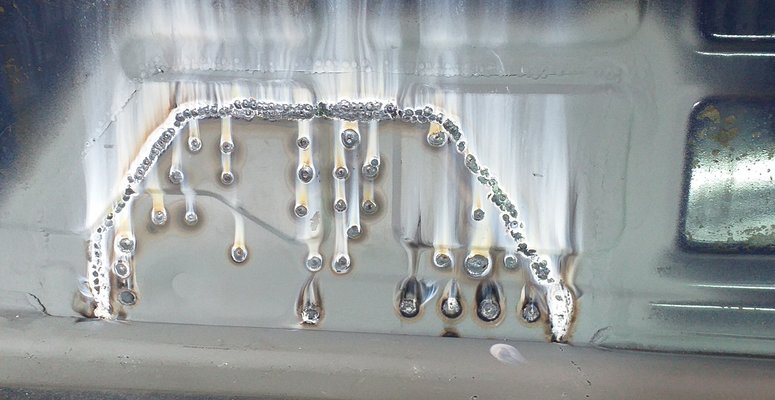
Plug welding,
y4mliNSJsPTTjPOM_WmUW5icB7SaODQKGbKL6YJfQQ4asCIasQ2e1kCgYNzcrE3nIjfOcEwZmw3vdCYQCr6n335JIls0SRxJMNBGll4VlHqViZmsr3qHRjXUqUzw3dYzoEu7jEEi25XWbWGrOgK7Av01-Z6pwj0ycH3jouxj-8N8H-7KZeZNNtvNvAWbItg4oQR


Here a view how the plug welds penetrates through the other layer of sheet metal including a selfie :D
y4mRNK5HhKaTYHkc8pS27Ht-NzQ0NCHx_rETcw_BMNuXpr3wwW1JHJgv8UGh4Ln2nqzDnSF0K7MYMzNiAXpTBnEQGG66NUJECXxO6rx50eAJfbenn95Q8V4kIoBeQSgRyzgtuQ1L18hAMPUi4RM5Ir0foGdzsulzmhUhzme2J-eoXM-ZqWVzO902iVg4GBqEvWq


And the usual drill, grinding and zincing on the outside,
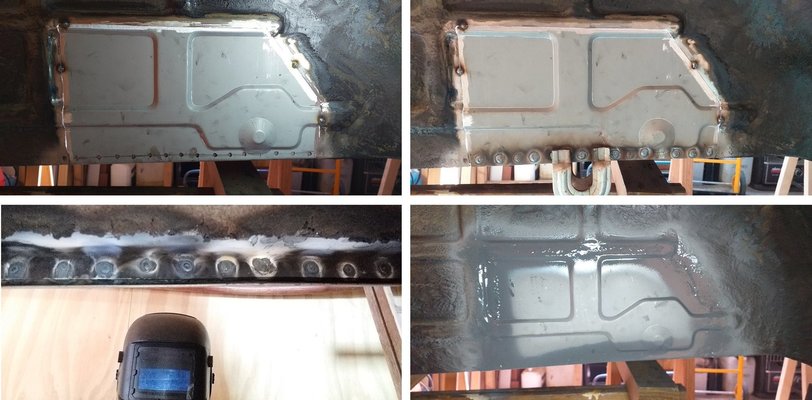
y4mHu7v_MxBPvkvYv4NoyOqC1UB_jhtEcyyTMDgG9RM1g9Oam8nT5Ivgb-GeDJDai--UuL5iP_-v38w39ArZKPSfceJuSabUloRTt_Kdpc49bIZpFmFhW2NwqzLfjSgYOvp6_3hb4b2U_wtxZM0WFrdaBu7RmKWarlqbnOAYkwfuwnp4a2qEPbd46Xs7G78ofD3


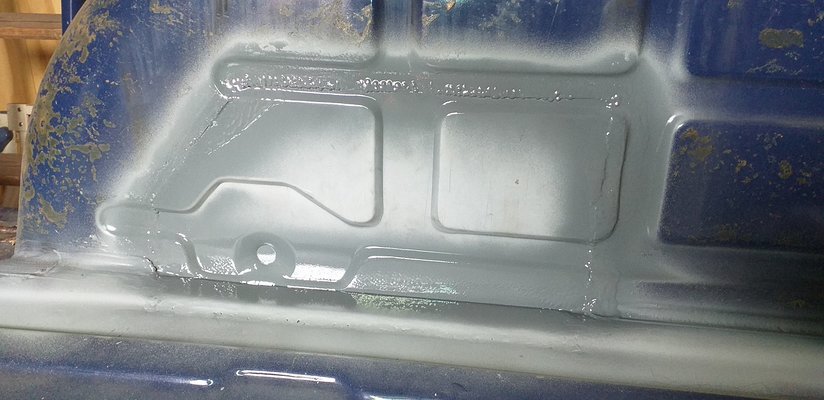
And the same on the inside.
y4mzL-RGIHmuDqJ6KtuoyaV5QI-FZdwVPUx_LI_CFn61rWriiRIsdVQVOgbiWWbEZqdESDHxcZbH65uXLRwcoCqAStsaeCGiGbxWF95GGB0P24zYZpOjhR_b7cOjSJ6Cie9TpINfM4ygKS8d0_Ga-tfzbCHBOoWjBwvMXvELZY6eabnuQOr3urR_9vMjvliH-5U


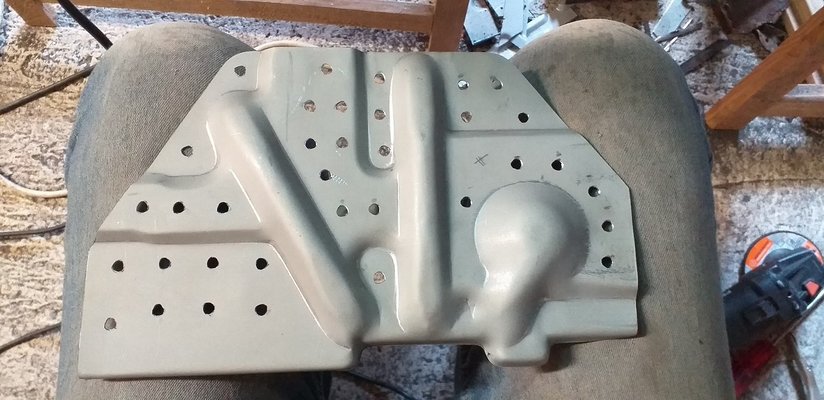
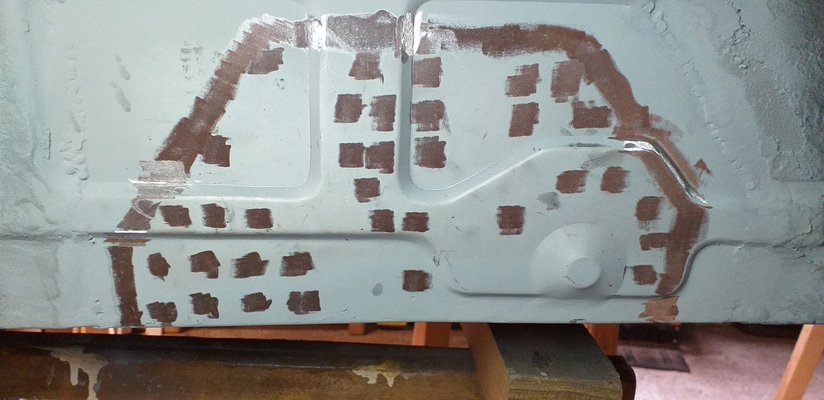
Preparing the reinforcement plate for plug welding.
y4mqUQOER7_8OxBaxBecxx-c5EfL-ejUJOlwRfmI5Yd5fw6Zn4MTuJk3HalBqrxSSyMY_iplVHFb76YvGstqsmgpoyEOX4hwwX1Ynral4jkuYJD53RKaxlZvuwWtrkdfDHywFboaDeG9LvCEFHtkzn8nY-bjMgsHQ7_Hx24_b5l-dpz6CojtLrW0tAoMpM6kXGR


Removing the earlier applied zinc protection were I'll weld it in place.
y4mp73NEo1u5m1cv2lzyLt-IUd2rU8HqdT8wPcQlaYqv2GcRztRife2_qDdvKSNE6q_SjKI-1kBoaMCikmGesxmSDEcOPoce-XSVg0DQmFDEL8Y8r2ACmL5FMPvLWT1qeXUHRzPjr3FHArtMyCrlPyoEEmjMluL6xkCnUN8Lz4_obesXav9wYLfNdQQRg9kv8xp


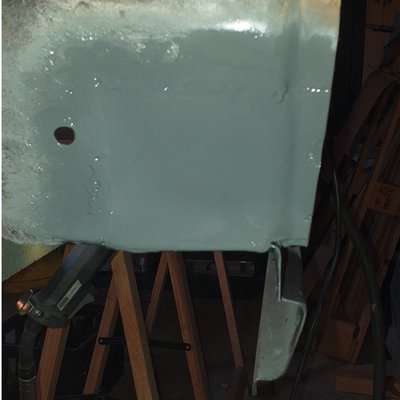
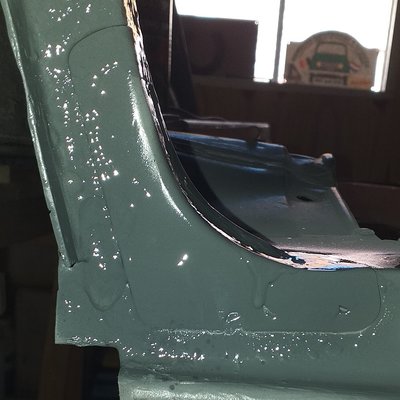
And after a lot of welding and grinding I apply the zinc protection.
y4muyP765oGJ8hxBzDZpJkeJpSprheqAsq9V2ie5kD7ORPMh770Gi2I9vC8lUMc1Z8V7CUIdxjmRkvV25t54RzQlW9vrnWXvpEtGTd0BKTdYPR3ivxPeXApYTkrAX26wM-AW0eMCawg7E5A8gY5K6E4V0jnU0Dx_CAWFwsLmPnj8lvGKAzpyhFRN7ZgRdiLHOa4


And here is a view of what welding on the outside looks on the inside.
y4mOyhCLhsGl2vz9X9DCwkKasYMwEpJ7nP1y4K5YvSHJjTMcsL6XG7SAXSixtg8yQTcQ5daLEOFZjc8zlnAe0bCiOpifq5sPRpKQizTLnPqA5_IVyoKn8CnqMxmXaSEWCA-2QcVv6TDpO2w9Fbr3_A9Zi9SsFXK5yWHoa6TUmvtz4jE8henFu-QwBnxb1DhEB1b


The usual drill.
y4mpJ0CR171PID3GFmBED-wVpR422jtpBrAvIUmwlnnFnKdphJQ6lEeoZGzmbiBXtP0S9t61X1s3J-ZIytVBlgUSgfK3sWPKwXNGZz8zDXE8Gl77AdM_qzFI15lKONvLxpzY4hk1pXV4L9rX-ees_df3MiHi5tCMEhPFlBGX0BV5OHvK9s8Op5fCAoFiqN8-5Zd


Here I made the rear seatbelt mounting myself as that particular part is nowhere for sale.
y4mccCaXbYD-Jr5aStppVf8M7VyC3QD-B7ivAee3QG33hZAziJjWQJ55Aa_R4pp0LdfX4DfAL8J6-FavY_guNNbxxYNwJwv5wXpZjKkl0LQvsim50K9LFl4i9gsTgBsRwqS3r8mZNFg_UorYv8WajXbM4qF6zOSls_8XdsvXDvSYTcMk4IlAKJmAQi3vJ6t6RxR
 
Last edited:
Here above you could follw the rear wing and wheel arch repair.

Attacking the C-pillar repair is a nice challenge because there are several layers, a formed tube (the C-pillar) and formed sheet metal which covers the C-pillar.
A copy of M.R. 176 is a must in understanding how various sections are made.
Again I used @Jurjenz donorparts from Louise mk1 and I made several formed sections because not everything is for sale.

First we have a look how the rust attackes the metal and eats his way through the structual section as seen from various angles.
y4m0woQPvzJ1S68FuVFkhQSdBwdCHhmhzLf0D7VQHakUlxiM1j90G3wyvZRy5Pncf3iiB5f2d_WUOTL2t69cohlSu2UIH_KtfZFc8XUyndOsGfPeCboJBk0U5_mYeZFVvNEe5TkXaDnRr53BV7XTmkz_1gc-Y-d8CMNfTUK7lahHeGk2zyg41Zbgim2kP8O4g0F


y4mDfQqoiTqZMlF1jJ_nR1YBmP5n1TnKo8d_v7ytgqpNWJszfIK4ZarJsyB6R5KYLyFtiZ5hYbxk5a9aZTEaY8HMS9CxJlw9puVQC6-2O5c1nIMmdG7YnJhZ3HN2H__Z-oCpg03BfO6PkHz_Z_IorkKtS1FSeMxZkfb3r6SncVs6Yc87J_xJEyBL5v_qTbroXFJ


And as seen from the underside.
y4mbf5VFwWheLUVuIWXj_6rbLy78fcNHGfoULIMuxLiMFJP9keIwQwteqHnd09ekYj9TS6ZBf3K3JtOcdldDKxZ9i5IhIn4eFxtu0l-JzoCsGrVihteU5fPWNxHyPuorY9eJHx9t3Pn8lqVirZr8BL33n8fV22q2MKCUejCe92t2xs16yLy_lacf8HYN60BH2Ts


The best way is to perform a body off repair because there is a thick layer of bitumen between the body and chassis.
Also when either the body or rear chassis is affected then both areas are infected.

Removing the wheel arch sheet metal reveals quit an extensive rust infected area, the C-pillar is almost gone.
y4mX8CNXclTnjcHdfH5U9AgZ2sILoW8jkqS5bRHsd1iECv3rWYGLmvQPBAsi_McLXPuGmK3iFTrgM50DUmkCACJjxYx1-y_sy4vKZHRgO026j6cp6XM1keTL0sTlhThvRnKm1X6Vv8wNB3pabEsHbAeAap2P8bz2BySDEvJPkZINxQPTiySRBsaaZPBRcSeigR-


Don't be shy on cutting away the unuseable metal.
y4mzKbXRTSO1g6KlS2qpIfWnFHAacuZqbNbw9aH34yYwO20GH6_zPiF4OnjWKfS2u4soTTP7nPYiEUP3S22q9aWtK-hCtByXO5YW95xxOR0v0PCdFLQG4DAMD2qujOXZCOYRWzXUWfKAeOntg1VPcfJlpCJUMavGseJv9upRbcLz74x8i320j5sRd70PKrktBPC


Fiddling to get the C-pillar repair part in place with the wright angles seen from several sides.
y4m51IpNGcYu_yj-McoXXS-IfQ7FiIxXJWhjXcmWrwLgQRIPqwZgg_MflfGKYbVYN1V1eoqH9Ukf9VWLjIeMwyqan-7ji9r3BfHCkL1_N0t58abNMvzT6zH98XUOmW3cglaK_GAgHF7ZTDy7buhPe1xO_vJj_9E7SUnzmrF7XcWM5gMuI-7QqC16XU8IRVef8eg


y4mxtX7w13hYaSHN15BymmKZBk-Ha6QO3bqL83L565qfGHPQwU_3WUao27qwjx72VewdtYOSiLQDXdUfHLHen-d--A0zYOg6WnDLMOv_XrJ4B9DWvE_KoiznkKyaObP6_Aq4eSDqAAubX8GEJ2K-OPqDlmIZ2g05a8mvedrUx36S80v4MA5uMRTPs9DjCCs-eJX


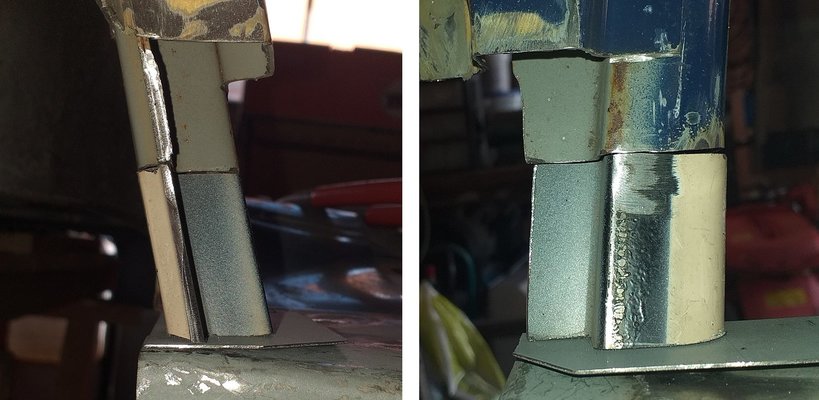
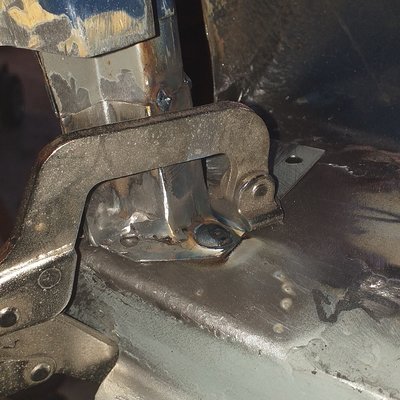
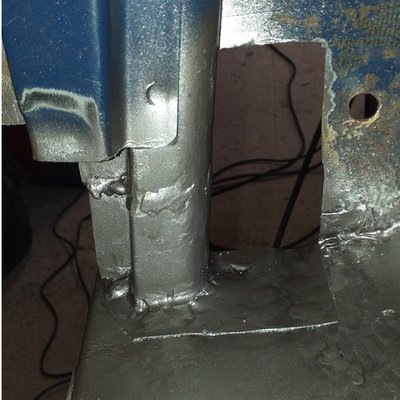
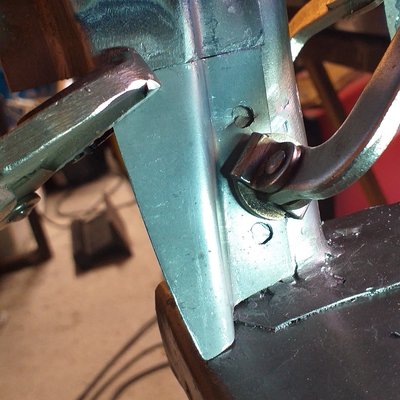
The weldings starts, first welding the C-pillar part on a base plate, than tack weld the part on the original C-pillar in it's wright angles, then plug weld the base plate and seam weld the C-pillar.

y4muZaUhjn77RGa3mHWxNHCV2ZrQj7MF9PbAXwggZYDDi3CTIrweDA2aAKfmL2iy4vIVLUCo0EKT_P0YtgpmHAMz3V-3WuZYvhzAC1GULlZabLVAQWVpb5UoT3lLv6GrEvTpTaXsH0TdhybnL1iguZ1SnIeqT_ThXd_Hq1CbEh8onyOMgFiPqP9Ke-MLSO_Ujap


y4mw3tnFmqANXz4GfhrLP7CBvdXj2lqxesX6Ysc9O8398aT9tiI8D9DeitVtXPCVkhGMAex1yk389pdSuj24dKF1RFMawCGCRB6FaoTevkpv8XF6bD4ZlBvyBh877jONU9kyhyRrodoNfp2gC-k2dZEbTf7JWQQpbE3aIzCZ_OL2RxmSPEom-gmtM-3KnEXuwvm


Now we cover the C-pillar with a selfmade formed piece.
y4mHp6Ysojk2W6YUaL4cK7Y5pp9AV1m2NtCMK8cHKdCdrjvuui_i0j3g9ldrLJpGS6MhMVc61xcMoYqR3VV4wG8Km00HgV5COk18mZPdHW2OfltQZUEZOUWkctd7Se5geyZz-KudrYfavkSXLtpaf5rB8pkWhK1SBJUh_oyhfC8rj3x-QsfmdIUZJRehCn47Ggv


Ofcourse finishing that part.
y4moy34QfCkATtZOS-Uje-mFUK1LjMgtne89p50ZSrD2I7O_4T3Q_dfdqw0BAxjOjD477Y-kdnJBZEp6_1BujphctLW0WTvMAC0UOEQzydKgzVAcyli7QrIqE-wMTdohHflD_4cuV_yNcR1xBy5TLh3BKc-uF3i8kjphT-bqyJPsxBAePelOKzVzggB-iMF0jmA


Closing the wheel arch with again a selfmade formed part.
y4mPvhsKeFgFdDH6eaH179am-lEDyGw9Dju1X04Wz3OXpQ0ZADjs59vs-c5RHE9MGE8loMj_w-gRIx_TY4Vbr2KJf_GtPieXEz0Yhi2TfYQ45ISMtXa3mLKHUJUX5R0pVZjvGv0VlDsUqEjrR-GffROkS15nB4rH9v7OFa69bfws62561TlbojsK7PNcYYll8FZ


y4mSTwSumwD7TdsJd0YiYVrMOQIxDDxi9jNrHWqbzohKR1BxhIzTOX5VDCRovkDJY7br4_qI2UNGa8LVD6kLvtsVpLJhd34QhkQWG43EPzc9IihWhg8ouGtR60XV6Es_09JpBnH4a6djkQI5MkpRRkq5IZMyOTGGDZ6YcjBqB4LErrc3Mu3wac1WEgkwx-x7hGd


Finally the curved part is welded back.
y4mIryQ6prxPJPhz-dDkik8Adqq-UDmVzvjxXLA8XqcPbNVRsWeSAHUozv6n_FfqbWEzgQ69qcaUNWZEhFz6a-YVLM_HRLf-jAQIaXLqF4yfQbVtd_eWOpWnm0QznXNVSrVd4riCRg54oFiPnmUMNO9ND-mcqW5SORFcTPwtE8EgXVwLfsmPF_3uxCqx9uU0UpX


For the next weeks I'll attack the left side which is even more affected but you will see the progress on that as well.

For now cheers.
 
Last edited:
Wow, what comeback :-) Great to see the progress and step by step photos. Cheers!
 
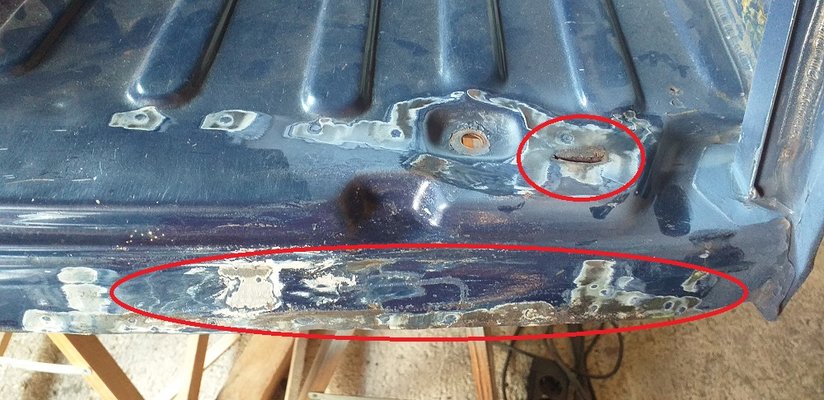
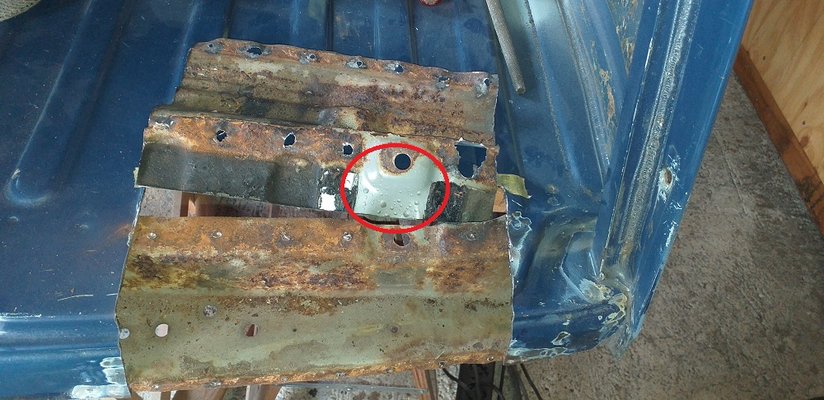
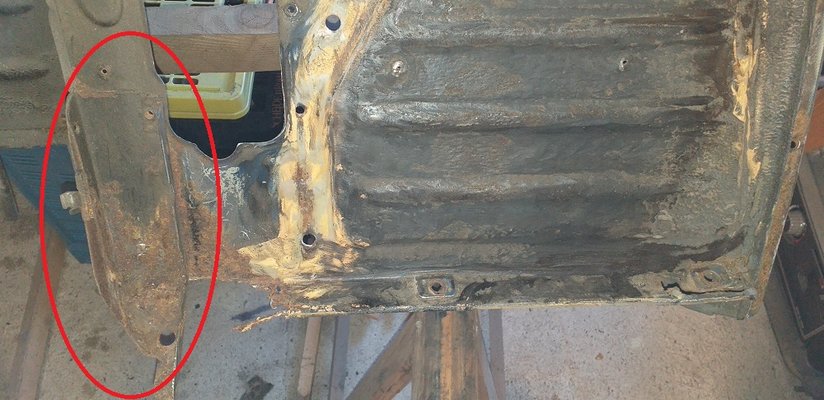
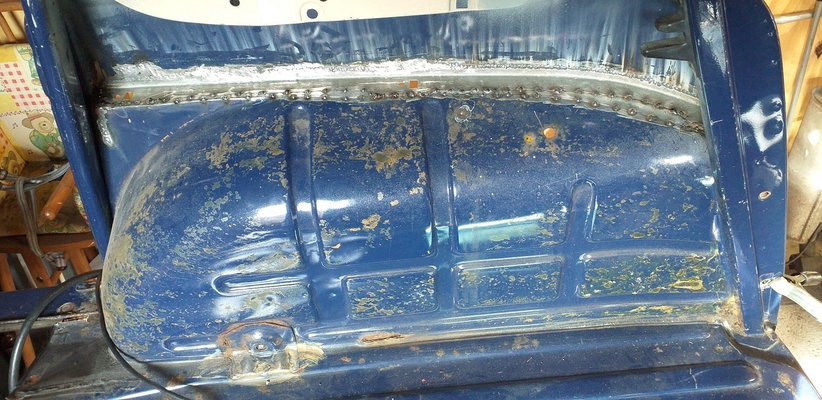
Before repairing the rear left side I move from rear right to rear left and I noticed a bad area at the right rear bottom booth, so decided to repair that rear right bottom booth section first, wright? :D

The bad areas are red circled, a hole and loads of polyester putty :vsad: what a bodge.
y4maMGMxJ2rHG3wSPI5D09XwIFDNXLsx3eV7IJVMy77DGmB-BWsZlS58n91DbvzLY2pA9ck671VzS81iHnbbz4iJtAP-Aptqg5EEqxdpt9Rpf5bkQ4BXPbgDtv5P8S-rKT5kvgT361jje5p5fMcXEk9ZzeZC_Fo0Jd_fmbnuUC2Q3-0aImmXkvk8F_oB8T906MN


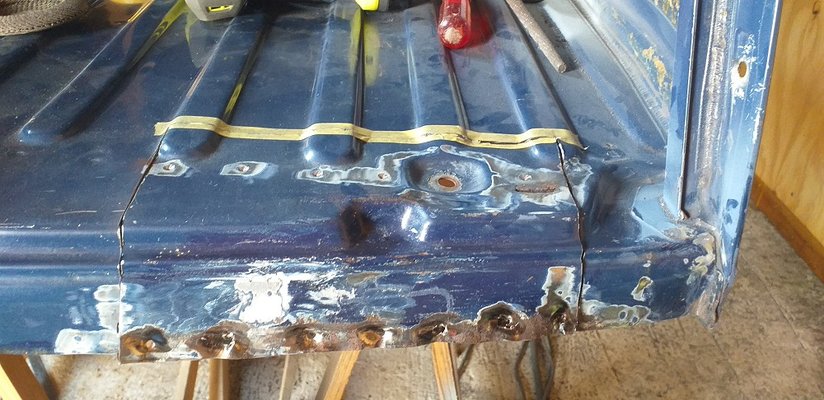
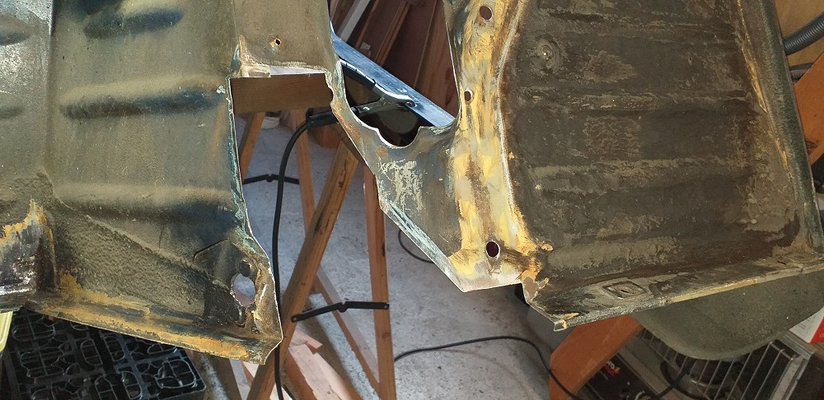
Cutting and drilling out the spotwelds.
y4moW-Pg5IFRXBbVFcTDfiOKHazv3SkaLsme5lpX01QTT1e4I6Joknu01JgYX2p41D04ElvIEezHsGx0F6RKa4tCC7cHwB-pJnZQpiU5EB3_rgjSgUwM2Ls_IO1Ons_fUgCtNru3Qjth_HcbY1yM8bmTmCBSxF_7pkkRyKlcBAOwhkP9Z2AVTlhzWT7fTRQZmH-


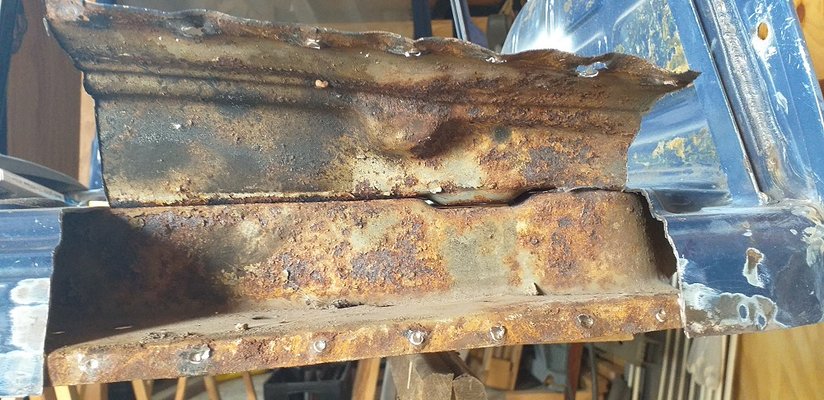
Lifting the cut section revealing some superficial rust that's not that bad.
y4mTGNKkxKobi4qIpnTTac6lXICEMNC5YCTeEvAnkAKJUFu3tNvZ4wi_jBHNcNOoZdcY7MvHwH7JCtcxKjBvUbkCuNWB33iOIFDlPAl0rW3iAvQtUeNNrQERzAmv61mC5FEfj_Qau3NmpK7qDiD81RKWTYhXLqSn0xxPsrJYlenlwjupzJ0evE_SSuFPKiCIHT2


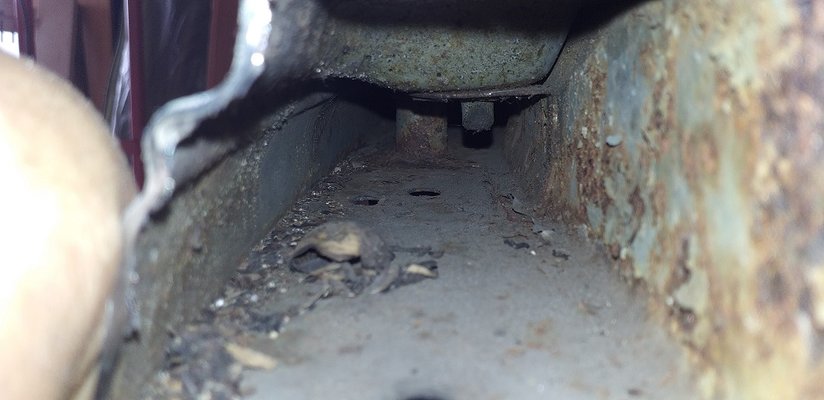
Inspecting the cavity reveals that mus domesticus leaves his trails in every cavity regarding my GTL :dontknow:
y4mBCSXJxpJH2faIfg1Oa7G0fjs7A9ZJRg5LtBwLWacXT166VuY09M1XwLGh1E_QLUPg_wd5GiNKCkDC6SvBwfKco8qXMa3WQxLYbxYl6j4jShBKw0tG8VtmC31y2LgQwilkvP80_1fcAfRbp_8dMk_AaIZSFrZTdsvDsSAY9IofFW_RL6iilyb2aCswDtjeH7t


Interesting fact is that the area between chassis and body has a factory applied layer of bitumen between it and suprisingly there is no or hardly no rust at all.
y4m0Q2She2QVXe5tiqx3EOaxUAoOvStBafsI3kg2qo6MuhVH-mzb79aHKe-NWM894ME8Hh-2rA4IRAhvb7O_R37TUel58nkRfhdJ--rkQGNm-QneL6_9n8g-LJ1ryWYh5eq3_t7W-REPTXHpljHsxuWP5xXT7ZnnXBGiOZwLECSSXMWNOz-dI8T_N01E3XKV6Mc


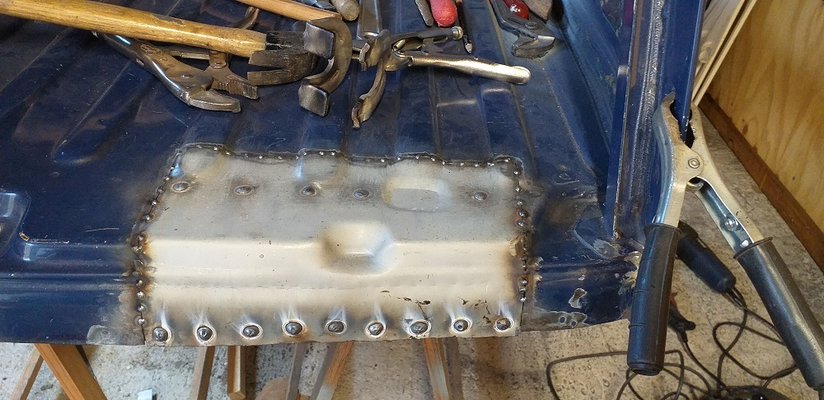
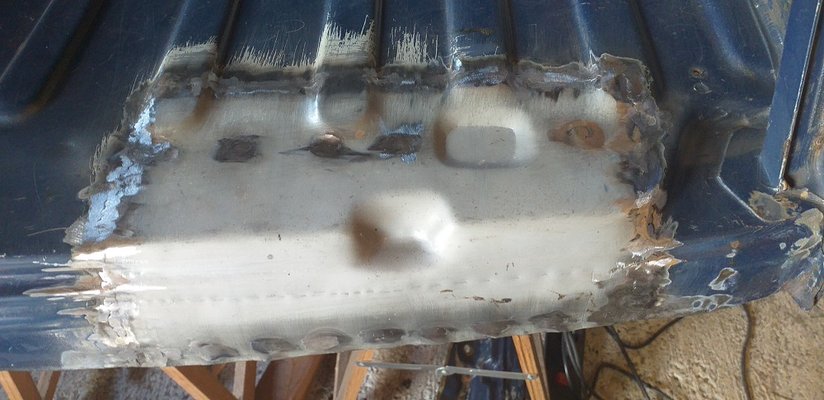
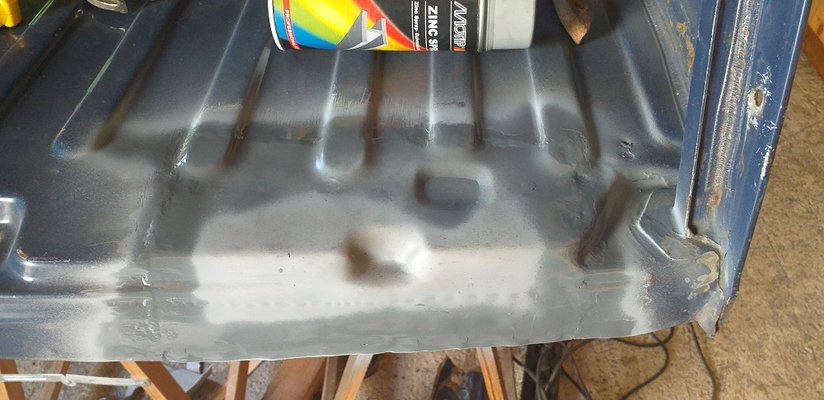
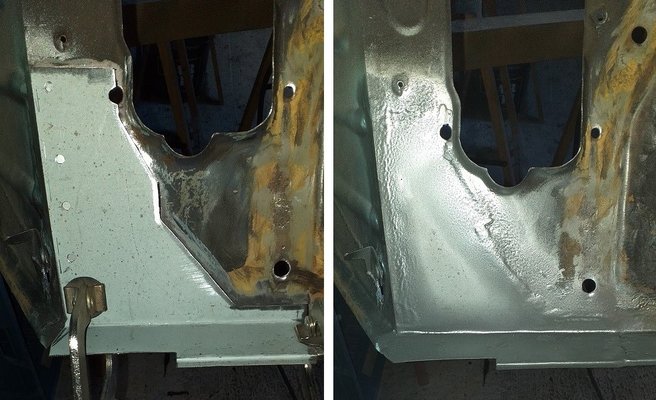
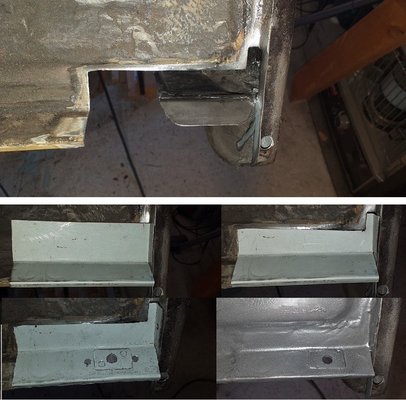
And after cutting and fiddling the repair piece is in place ready for the final seam welding and zinc protection.
y4mKt9fnXgStIK4lXJ5iU_WSJR0Ja_5y9CutdLVK2gQ6Oar7T04EFP4eYAsWlhPoJOo2cwU0Th9paLyguUUyWichni9S77r_XJlBoEFdT3cjo0k1hSH48vzTgRRANLm8849SfmiNEvwuG36Wm9LzQf2UG_0Ey3joboe4lhOlTjCCkFgu_9f0UD-RZX3s_aYWNT0


y4m4qlEEhOQQgR6q8nm-PU_xRhHqmKcPLIxF959_9HpuTFihlnv2b3GeWepnxTbiQ9QnFPfHiFkISqbkHL6LA6tFgAOsBlKh11QdZHLBpEX26p-i30qxZgHnw1gTHqI49re2qdER_1fsNXhRtBP6Ods6FRJQRUawTiFHAxkucnrqo-wsdBNQ3QqzOvilQbVW1aw


y4mKoeWYqX1vJux2ueCCxsRVy_pZIYA6giECFlnWz7VUr3VKsUbeL9WTtlD0VHEtaDw3c9_aUDZ3fKylZlWvTKJja--o5gSWyeHuFYR8yLquilf3LB2G8krXvzjeOq8_bgFm60vn_5_kedeh4oK049draGH3h0tAoWWw-ki7jS__x03Nrb3xzYysQiSOTrPKR8u


Cheers
 
Last edited:
As the rear right section has been done, the rear left side is next. This time a shorter version of the repair as the affected areas are much the same, albeit mirrored.

The rust at rear left top wheel arch and bottom rear left outer wing, as seen from the inside.
y4mCGMd9SuugGGQOGMhulUjZYwPeUlbrMmxY1krUnLMXDxMzZSQCtRHfsEyU-nE4cfgQ-r6F92sUChbXizuldQO6CjVcuHib8lUsnls5-QFUR5-LhQiZjpEenywrPf-ERJtye2xpKmpLsRQtF_VkkMmkK0ZTQ94T6zYMfn65ABCca2wsqENkhybrxkA9fDilJfb


Again don't be shy on cutting away the misery, here the misery is even worse due to an immense thick layer of dreadful unnecessary polyester putty :vsad:
y4m8JiJi9MlZYWCXeYRqch2TfFdXsBQujZAGQdan_qjqAf_wSSOZuBnSsmbaYHv_mMRJHXeUrUHd_qnShWRr-T3CQMeJY-Gnd_geLKkY9se0eDHYc-zR_W60VQ9J_Brm5NvKOuZ9cOeuD2_fIwthf0FvAH7yV_gkuc7ET6k8DBiXodl3U6s5O-kt_YzJVFSw47H


New steel is attached
y4mJH5f3cF_GKGxQOSDqQnJmVKIaGcicJptkztdAUHWcNHDe71lpLaXBgzd4z3SYn88DOwZlHxXsUu7TaJcUCtPZHqNOotVywYhOyQM7OVHqYvCMhUYfI4sx6yhjpRixzWJFKdA8QXxARvTxVOR2o3eGxTkE3H4LMmKguRBV8cqRpPCNe4Rx_WAcPzkEOXx5I2x


y4m2mmVqKRnSbNji3lZfk9UoRbScEGTl-pOefMnxoYVIBRBe5AHxY-Wkym6WgksKPhb9rbxxdxQc0syZ2A-8OTgbDPnq54gvIAL3zPv5TSYh3Xr18XJBXJ4WHNbTyN_IZ1QZiyQhoxiBULZU21c3KuwySxKX1uxRavCfxtWoaFYQu4MnHtfZTdkOV8vzAYnj_LM


Next the rear left wheel arch strongpoint section has been done by cutting away the misery and welding new steel in a small floor section and fitting the double plated formed repair panels in place.

y4mosj_pcjY9WpcvZ6q2XSxS_4Ve7wMbJTjef4SEh9r6hlq9WnzX5GxFtqCUSJ7Yjoh2w5Y-4JVzy6LzDMsMiabG2_XEuf1y6UEtkND_uGlcJ50HbQjZRO09AkjI8p05g495aAW1mERJEltVzkP-BPzw1d9WGgPYOg8RQ7DAa1op7RU2uhZELF_OCzRcpS3NFCF


y4msukwIpXafxI3S2IAPja3JrPwYK1yTxGJDuOHKu4m5FHFnxOr8yfAhTvhWsNwdfXIUXdUQU3WXOzEFUSRh7IcDT153bE8ebFCOgDvn3Vcxo5XQZTpXFc4c_Szf_cLgx0NR0SHUbHIvriok4bqNHAAL7RTKZYQxNg100VcpbWUGY0eV029dRcpGSW5FpqDaxt6


y4mx2XGQwV5P_TFVpzFpJah5e1zPkQSrw9BK9QE9T4B2kkQjTxlOz4XpWiY0An3cBZ0XiM5-wwonKdXo1MfDXsUIqN97TvZbkldz-77Y3QCEkvykp1JYVF1XpxuxmUJfX7Yvyu_1n7oXq90uNoyyc0KyMQigAd_WGaBuLnB-tc8zAYe7wNj8Jz8ZUm5NB_IYxsX


y4mpeqqLDnLMV0RPk5l7YglgWpiqFeysENYHJeIJNH9R2Z0ptJQp8PLP-1hthi0a7jTm221HMBEBjG6tgIQjRp1TUbLxYER56fdeNUrTVyoWDQ6OyQ0YhOm3Q6DaS_giiKtP2l4jOYEhw16MVfS9GcOWTP17nmmCN0Ga9G3zOS69YtYdp1H91fwE-G8yUC8XG3M


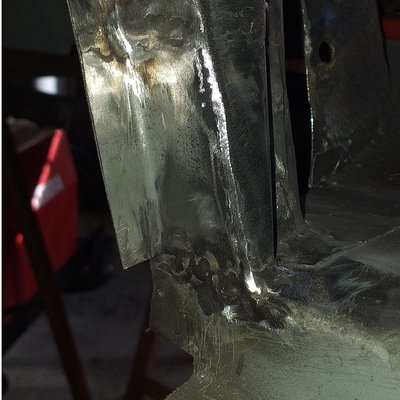
The lower C-section is always nice just seeing the affected areas as well as doing the repair.
The repair is a small challenge as in an area of just 15 by 15 cm you are using six different shapes of metal, some pieces must come from donor parts as other pieces you have to create on your own.

Rust and rust
y4m4SJkYcAhmGb2lTAUycsdxO5ZjscPRNhLm0IDU728ClHj0rcwCki6yGOl1fl3BXpjSxfYlCEjYsRbNiN-m_NJ4b-W_6h9BGT_QXTWlaE94KqpjhIz4mD9GPJ-9LcltGCjdtRwsyqay-DQuzbkjhSwFqfXTojwOy_j74tMKHRKwNu6bMqpKrwwzrbHHtbKYZuP
y4maBOUu-MkBwzP_WUscEih8yt3HBZUUqbfLIM_dYqlZEAxefEmLe_R7_5eBKK8koOfPyl_Z6LVCgN7a_1XlWXxe_jo4F6vD5IRedynatbCgel3rfhLrza1xnzDIy2NFVtunhQJItn4MNMtrxQTlncjG6mJ69UP10FaClZNl-NdjQF7BR8n6FgDobQtLxYK4Zrx


And more rust.
y4mRTMeHxhXnTTeJuAW0p2pRL2HqO2Cpgx_QtAITY7cWFM6Pny-G7EXhEnwTGvvaLBmizhpRl9uey1oLcgWlMGWxJJErrhZ9hKelC-oVM5V14Qz_k-1Z3dycpJHOFYUH6Y_CQQkMAFyircWB7HBltwgl0YqiYHbLeL6YcHLX_-nqgUpi316OGWlzA9eUG8DouFJ


Free your precious R4 from it's misery and start repairing.
y4mcqPmfVNaSmv5XISdBSMxB6d4KuTzxeZcRc7CU4QCE2fGsiL_OTx5u5pzoK8Q7OvsG22wTwNy3zxrkzcM6riBUU52selI71Ay3MbUngpr_aOvNa2JundFlfFE6PPVjogentM-_EObNq7Bgx9Od08Bv-7HgGvJEF94-63j24bdwtPHodKZhvnbIk2e166JRO9X
y4mfGvxqiFS11DmkPviVemzEyJ8uMqRMGQgtgys6KzWQPsmJJHOwjQ6p9WTqG0YjAJP1ejprNfQYeFP-qhqfIdYpgcRifQ7DbQUer6LH1EXwpwbxG3SbORVF-poeCQQ6xpmTo1u8Emyqr4JJgNXmyyUcf5szZQN7zNWX_b2Tj3ACFTEZXymG-nA1qYmtrvdVaHc


Again a Louise mk1 donor piece is used.
y4moImx0MhspidDRWxNjOiiEexi9TLq4T3Xc-qayFZpWRQOvf7fMvJsDNrXdVXVeKWHIvM6VrFXjK-y7_rNWnSsrbN60kiBBjoGzrblGmY5xGU_tt_ZUKJMSL8dcvT7N1iGdoC3Zc9aa1qh4HMAQDAsCoLU6PDTO7cwz7EUpx_YGjVgwOATjTl7fx70aBJ-jSif
y4moaM0L0QSSfX1LhQSzrSUHZdnIPWMFDkSlMmMjWCvAA8sUtGWDoJLRzrfBpOR06nI9zUlRXI8ia021NlvfXni11tFKUYs8bHcMDdkZ0BD0DXKSw8jEN59ABQg0S6oYZkcO49Cllb_UgwhKVeOqRc5z00R5aXDv53dwcILpBH-UJMAPelPnBR4ByTA_QLWnqKS


Cutting, fitting, welding, grinding, protecting etc.
y4mJFiq-HoXEhvyh86ujhiyq96m5E2YNEFUrWWslaLKv0RxSOUyPJCISenPHQAoBrytymedDFk3df5oLYuBgFd4O3Av3_5xHvEcfSAfwDnanVMrvK1Zfk2fSmXbJx9VeKCGq3bWln8m4HpeCdWYLFjiHJi8LlM23luJhypRBVpEmbQ6lGwTpWrE-VvIp0qeIj7u


y4mFD-1J_m4Qts8Q0xNexPeBWL2rlnS0z_CtJOppM-EtTUWH1napp2Txp0h6NjYbaAGNKW7VdLn14enxAJ6xTP4pc7zTP3H8uv-eYSNsWMzkHhnxxegVqIaXP8ShY0oAXWFpeONk2yx6bJliBZxrwl8se6QvW_VlfX09QQ76z41MpWVtrQO1Ph9QGPYR-KZG08x
y4msPVeEotizQYE0lCL2OcOh0UVKtV9rxh13wIcFbtTU4naBOza2rtTQgyUAYs6myNSSlz0Jl9XKD3imQ5WNZZWFPmFTx40_iqyY2H9fI1xLO8ZIWkD1p9CIJoq7Iy49hTwLCHrCN_1EE7GP4lHRuPyEsdTqG7LwuHQ_VhIZMm540jkTrM2UjG3KR4YAkPSF8jm


y4m7Pe0qaVxJCOTglsDDbt68lg5VKnxEj9xhe2icpCLCyNj7KW6aUBkD9wZhSE9d7ck08vpJwFibcbSmw8h327bmtJwCW76Y4WpSpXp-q_g29766EqzxGPxHQX5AVt8BsJD__VzZ00XVa10pSBz5uODrUDubr_EPZipd34jrkIRCZ4kKHY-w2pSVBbufnLSWjhC
y4m4BrcUQWSWAG4vBwxYNyZGurh5rOD0h_YoprREFSXPYTFoEgG8uVClbNPXqAnJ3Qn8fvIw65X7556yMkwKjgupRisNfPqei3V0t-b8xCJH7kf6LlElYz4pq6WHFEaYzM_7ekCAxn8bfWizp9cuHmRKdMVLj3cQW0tNvGcA8wlv_cZG2MnzAe5PO888GBUMvrZ


This concludes the body repairs on the rear.

What's left on the body repairs are some small repairs on the lower section of the bulkhead but that will be revealed soon.

For now, cheers.
 
great work. they all rust in the same places!Every car
Thanks, and yes they all rust on the same places and keep in mind when you see the rust on either the body or chassis then they are both serious affected with rust on every layer of sheet metal.

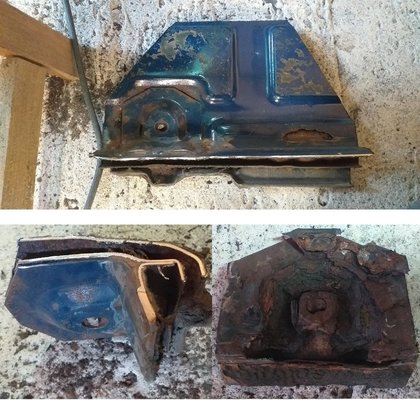
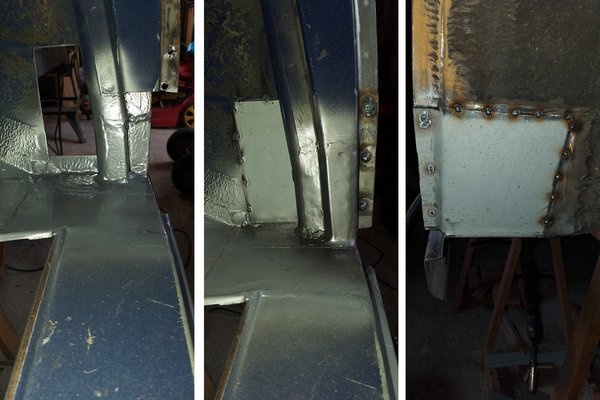
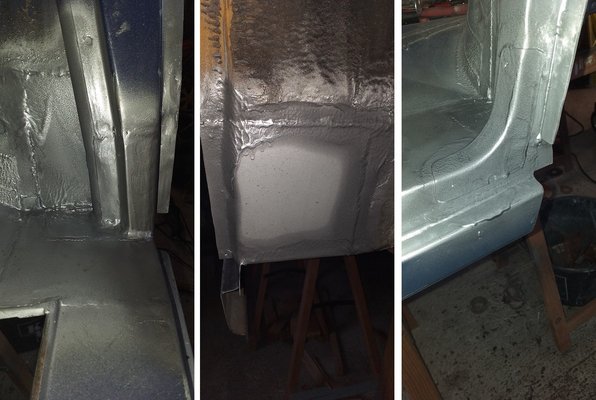
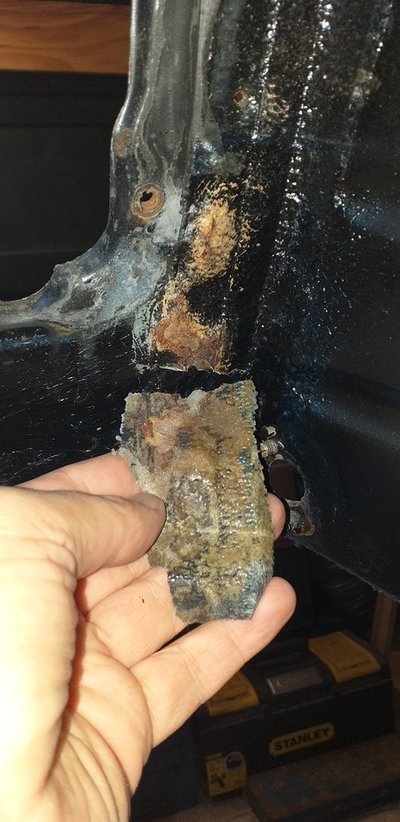
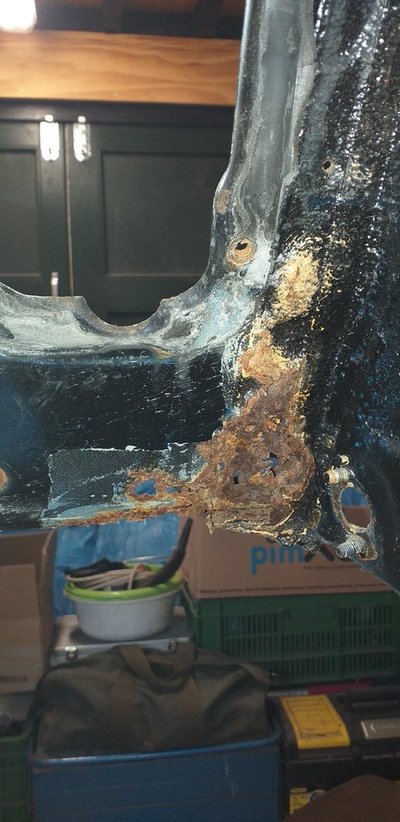
The first surprise arrised today when starting on "some small repairs" on the lower bulkhead, as I mentioned here above. When I cleaned the inner wheel arch section on the bulkhead some piece fell on the ground.
After close inspection in appeared it fell of the lower bulkhead on the inside. A whole area was covered with epoxy fiberglass...:vsad: again a bodge repair on my R4.
Fiberglass and polyester putty are only to be used on a Corvette or Lotus cars :laughing:

20220925_113606.jpg 20220925_114014.jpg
 
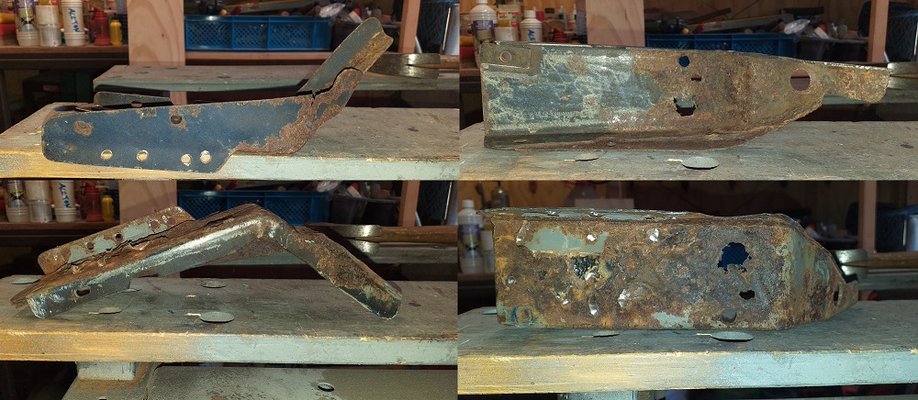
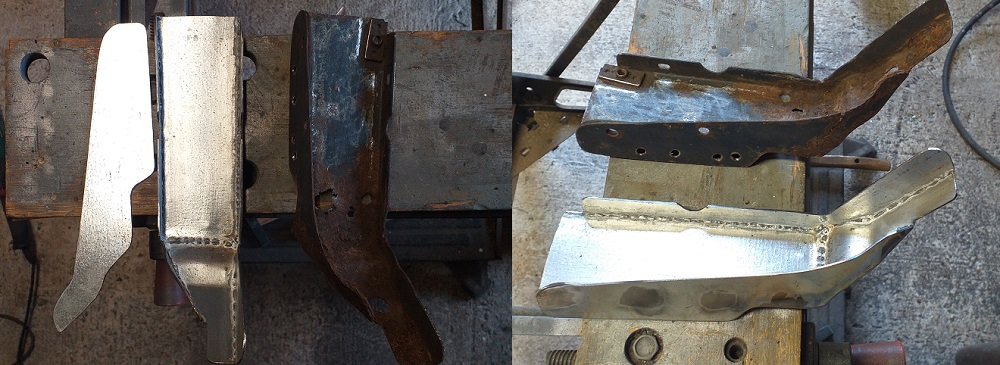
Continuing the rustoration this time a sort story on the repairs on the lower bulkhead as well as recreating a piece on the lower bulkhead known as "Console Avant" e.g. partnumber 7700654526.

A look at the left side and the "Console Avant" in the red oval which will be recreated because a repair piece isn't for sale.
y4m6AL0AGO96YvbsnCmbdmwOApkCAT4hbecjsCFR5bRApe1O1nkAsTDhxU0oKBTQoB2aokimApTPqzXQpfEwXKSy9vK-2c8u_Imb49vXgXB9LC4FH74HMW5uc6bheR2Bh16KSAv_5d1OxGX1hRu0qkp2f8AjVGhE7cXvwAO-eAbu64OC6pknOXsvJhcCaAFi434


Cutting away the rusted area.
y4mvwPIqWT8ogFekkCENNYkeSCvecJHjfpWZS04bQHzvwLCCCYBKyhS1Kavb7u2bk6VJ1oQ7LHN2DF-h7Gadaf2y4uB-mUqD6ty9DRG0Uejm0zEaE6rQZzuE9SGGlNg8K3AdBMmMx6Ms2CjrdxPzbppjBuPLDpbmUwrJvgxjmlNsno0jjpF4j5gsFMcwXbHPy0j


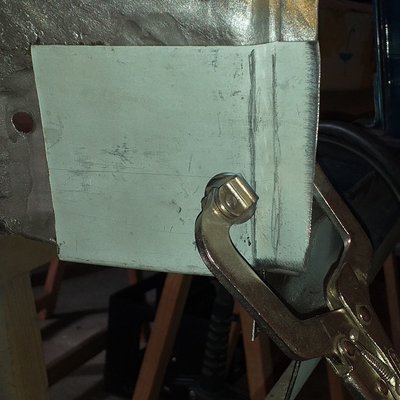
First I welded a new corner piece in place and then fitting a fresh piece of sheet metal for the front which will be spot welded, seam welded, grinded and protected.
y4mWd8MqW-uZ3aJmQsPGxlPyy4M2B2iv8xB6DPywaeWILWCyHHaS_gJyfA8rl8ey636PG0l2Ppf-miPr87a29GHp74fo1ZUSqxww66g55HbFEZHr1qn9Ovm3ydF_Zap-GJTNaxVdD8F0lnfL9HhE5JkLKzAka46O_jFrHxs9mveMYCNGOSrf8_iNx655G67nvOK
y4mAp1e7LMiT9rLR_mmMZCKPedsvue2LJ7wWvSTy4pWpWbgXCnSkt391IBBJM3C4vjTo6pyVy89nTOaWW7mGHChZdcSbhjSU5KnTN9rh_48hNX1D85wwhoRFEcM7Ne88PVwH-dt_2NCu7MYPySLkwbwZ6vmuqeZN_aXkdAu3Aiqp8OkAhoAglkSuJGN9bOu1a3n


Now the lower left side is repaired. the rust attacks two pieces, the lower bulkhead as well as an inner piece. Just cut away the misery and first start welding a small piece on the end of the inner piece so we have an area for spot welding.
y4mgU6DooikYFHwXM-Z1ta58nXoskCx4OKJYgORoBrLRQL3XSXW8YKy9XPpYt__XYtsu1nwHc2Oe-H08HQT0y0xxbfe5Sgb8GkHGu6EczO3yuqrVESmrabjig2IUlFCD0FbL3EWVJeFXNXNTiSa3Zst7f_c-HkHGrSNqMLQO0w-dN-9snZS6sQ9NhbNE4fuEXbz


Here a small photo collage on the repair.
y4mHvbXOmsx6JO4WkPOhagncIPFMiNbsxOEtoHRyv0EWf5AFEDvxUk1trNDTGR10LQDV3q67viahKcJ-T86JorCVgp1yLeeTcI1znu4sOeJ3iOXu0N51RCzfmB6XiEXojStU33Ok5szo8YK-AbahtiFbs2Ol0pZ9cX6zmpRzLSK3jCu5dbVdqPDzSMj75IXBgNY


So the left side is done and I'll continue on the right side.
This is before...
y4mgSI8bZuCsVKqZ_WKwWISRXVT25tOgZ6owZAIwiRViOdHysShy2Zr8GFKIBXPSTnLoZhnKvTudNC4Wpm4z8AUTzrfOz-PcaK7vmfFGEFverT8vQ_CZ23DeL2PVAMHDNqezYnrVQXQ-4EK-iwTIF4DxlDhoQgz8jRM_cH7jKXwdDjYxHL_dXBxG5kqSoEdUbwB


and after the repair.
y4m0eL7nZVrws2dN3LjeuRM3xsjTqdqhg91_6RCkqc1z3tJzV0U4KsudXg22BEIi-juFu-x4CbCZJI5FB8vTwg-Wo2YC1cmfewgiPyVMqWBispYbYaXM315sduggeLCvs9YyUNMhKIevSBSXK3Wb2cZJinN78JFiwSlBac3XjSRbfsmnfvWdodoUXMe3MNz4hlI


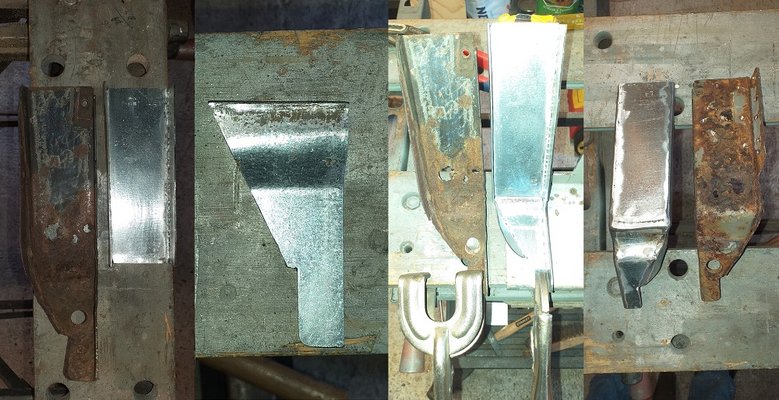
Now the "Console Avant" piece is recreated. first a look from all sides.
y4mDK3IFvxPdeXtpNGSNmiZdPT0X_BJ8LJYx1AbKShr9ff0712IMPL23pcBZrVyqIohOLe8ZxLRxSeMNwcO8U8iuqXif4AXj5h9TrSfDpHn2SJ8E_Conx9XsS4yK7rhwIyvzB0lI86i3kk2xpaEGXLoePHYrQmGxKW31ItaU_knnwjdGax5GdpsmpM7b5GV_D2G


I ran out of 1,5mm zincor sheet metal so I went to my local hardware store for a small piece of even heavier galvanized sheet metal, and slowly but surely the piece is recreated.
y4mJKYLEvBra9IGvxqvAyIXwFWEH3bcUzeYQzLSWFDV7SKdsIxvq3763HwvRawjSubxs1fLwBAmjzAih8YoE1fnM3OpbQj7FLggRbE1OfjFIV7oSeYOA6dumUvBxunI44_Yb1L2w1Wiy1N42irdwowxWDd2Jcxl3_mrPDzag8QGUVzcJX5lGjGJw7nFR3zV6Sz3


y4mO4Od0FQHD47To57aKNqQV4F5UtSLypCTe_J3jRY7ZMNr9pk3ccobPYZX8mgnuC3OWauIouPRzxfqybJQ2N8DkcI-iEZnVxjyh4PGXay6Xa_WTO0MR6GVYhYFACpMQugszKkIRE_dxnkUWqcZBZGMISIyU3Fl_pJh1J6MTSDzzTKuYZVh2_TjhlqittKD32e9


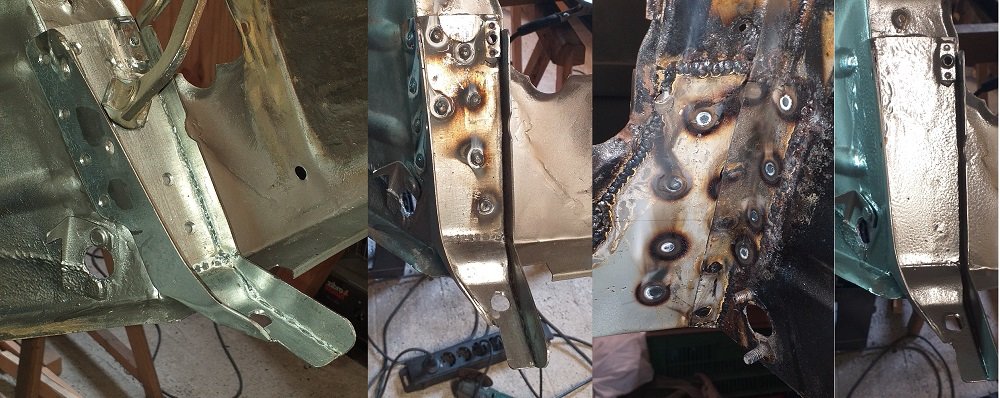
Finally the recreation has its holes drilled and is spotwelded in place as seen in the final collage.
y4mL5z2WgOd-IuUlAq4h8RLZy6VbkIrNN62mTFr4EWZs3gfrY8ehoKdV757l65sFFB1fkHtfMPA2ShONnSoiIbP0-FSKdlcRNPw6QcMuoDBXgJtdzi7zGwdc9qL6OxxhxoE-gJnJc3E6GZPmSB_8AVr3tH7SndM693vDIBESofqpgDFQuC2sHQ-vgJZoQdXoRpc


What's left is removing the front windshield just to be sure that there's no rust underneath the seal. Whilst removing the windshield the seal made it, the windshield didn't :dontknow: anyway ... shit happens and luckely I've still got a spare front and rear windshield and luckely there's no rust anywhere underneath the seal :D
y4mtL2WUO1s7yjHYRAipQJwHjhl8_HSVwnt1mlTCgyPRBHFQ_x9RJ135uqi4Ue1OvgpKpSgZTWTmd-Fmgt0RMYmsBWKguzB5QgwLv3nd9u4YJqu3BlvA7bO1hQmoBodgF_5Y_PgG-vXwzC_OPOfFDLORxM_4iENfpKAjaxtPf7gzqtb0UGgqH5u-33ic5o5xXIG


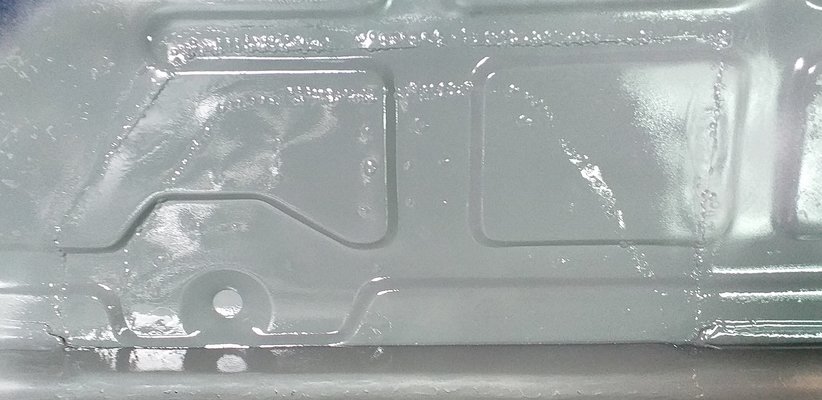
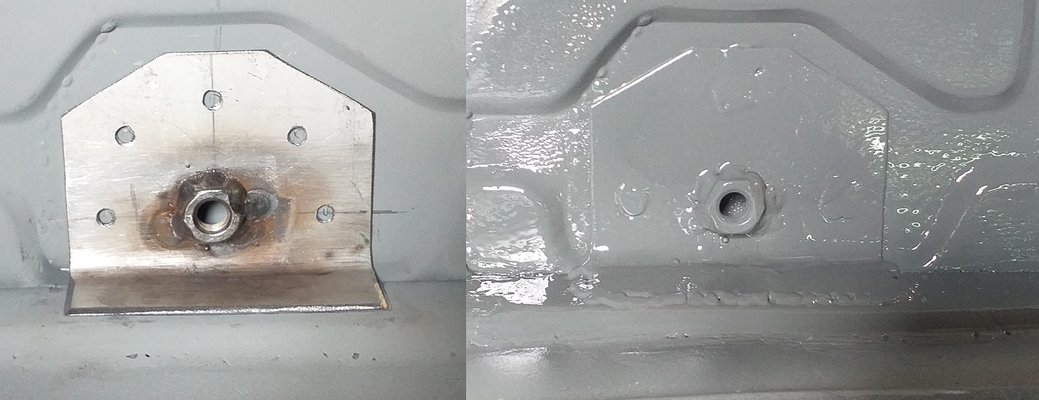
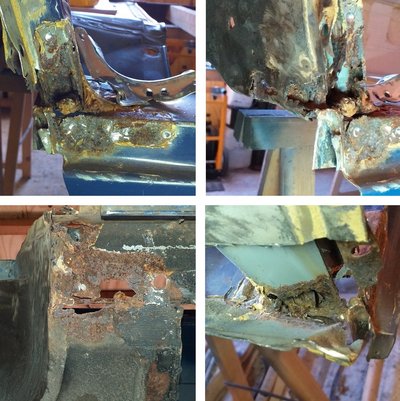
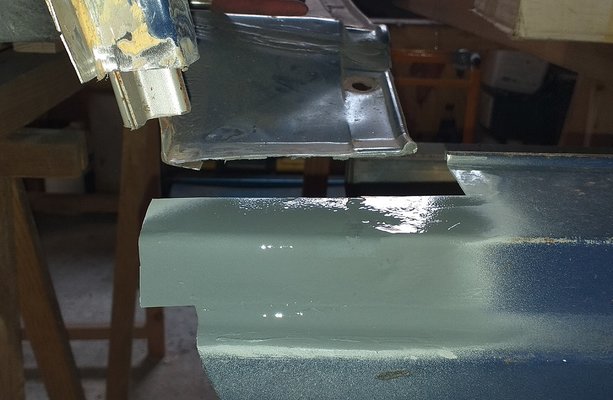
The body repairs are done :D further on it's just removing the old layer of sticky bitumen and a lot of finishing welds on the inside, some lead loading and cleaning and prepairing for painting.

But anyway there's still a lot to be done but that's for later.
For now cheers.
 
Last edited:
Back
Top